Blog Archives
YAHAHA and the Amazing Maze, Part 3: Teleporters, Visual Effects, and Movement Paths
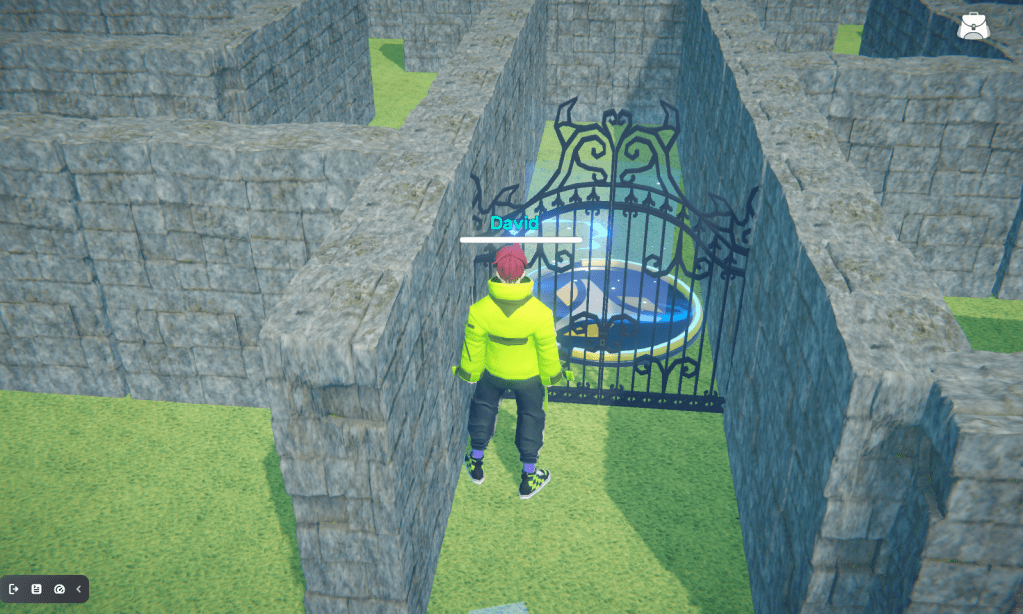
In my previous post about using the low-code game development platform YAHAHA Studio to create a navigational puzzle, I discussed how to use the Rotate and Revolve components to create walls that opened and closed like a door with a hinge. In this post, I will describe how to use the Teleporter component and visual effects to make the maze even more magical.
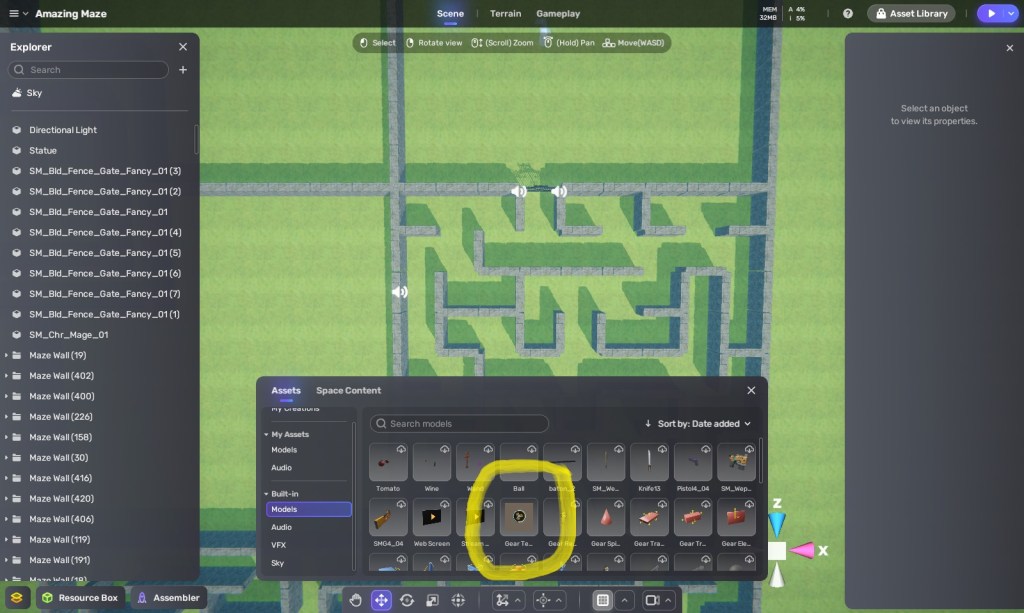
YAHAHA makes getting started with teleporters easy. The platform comes a built-in model called “Gear Teleporter”, which already has Teleporter, Trigger, and Audio Components installed. So, all I need to do is download this bad boy from the Resource Box.
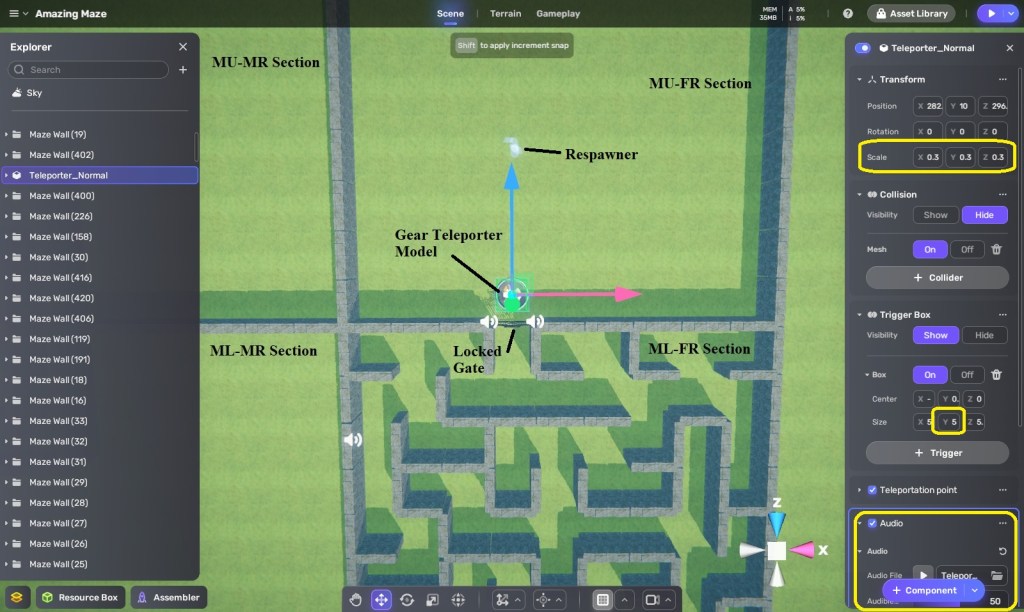
As you may recall, I am building my maze as 16 sections, which, looking down from above, appears as 4 columns x 4 rows. I am calling the columns, left to right, FarLeft, MidLeft, MidRight, and FarRight. The columns are, bottom to top, FarLower, MidLower, MidUpper, andFar Upper.
I am placing this Gear Teleporter in the next section I am constructing, MidUpper-FarRight (MUFR), right behind the Locked Gate I previously added to separate section MLFR from section MUFR. My goal here is to give the players a clue that they need to teleport into section MUFR but they need to find a corresponding teleporter first.
When I first placed the Gear Telporter (which is called “Teleporter_Normal” in the Explorer), I found that it was much too large in comparison to my maze walls. No biggie. I just scaled it down to .3/.3/.3. I then had set its Audio component to play an audio file called “Teleport 1-1”, which I downloaded from the Asset Library, and set the audio to play when the player entered the object’s trigger box.
I always tell my students to test out their games periodically to make sure they work as intendend, and it’s a good thing that I followed my own advice. When I put the Resawner near the teleporter and playtested the game to see if the teleporter sound played when I had my avatar walk on top of it, I discovered that the trigger zone was too low to detect entry. Again, no biggie. I changed the Y value of the trigger box sized from 0.6 to 5.0, tested it again, and everything worked perfectly!
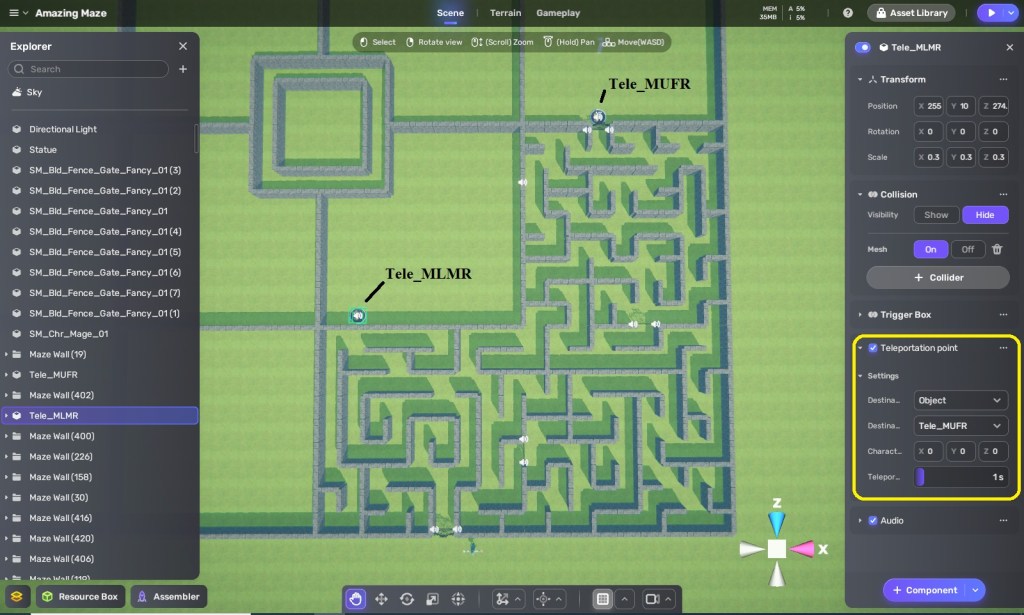
Now that one teleporter is working, time for the corresponding one. I duplicate the teleporter in section MUFR and move the duplicate to the next section I will work on, MLMR. Too more easily tell which is which, I name one “Tele_MUFR” and the other “Tele_MLMR.” Next, I set Tele_MLMR’s Transportation Point component to use Tele_MUFR as its destination.
I immediately test to see if this works, and I find that the teleportation takes too long for my impatient tastes, so I lower the teleport delay from 3 seconds to 1 second.
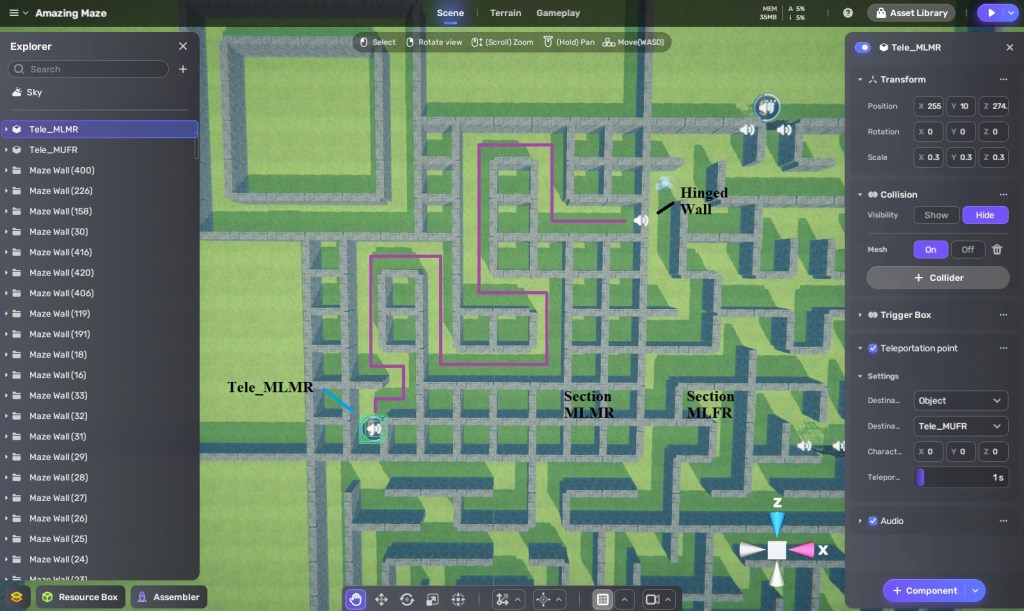
Remember that hinged wall I created when I made section MLFR for my last blog? That’s the real exit for the section, not the locked gate, and I want the player to open the hinged wall and find the path to the teleporter in section MLMR. As always, I follow my mazemaking process of filling in the entire area with horizontal and vertical walls, and then remove the ones necessary to form the path I want from the maze’s entrance (Hinged Wall) to its exit (Tele_MLMR).
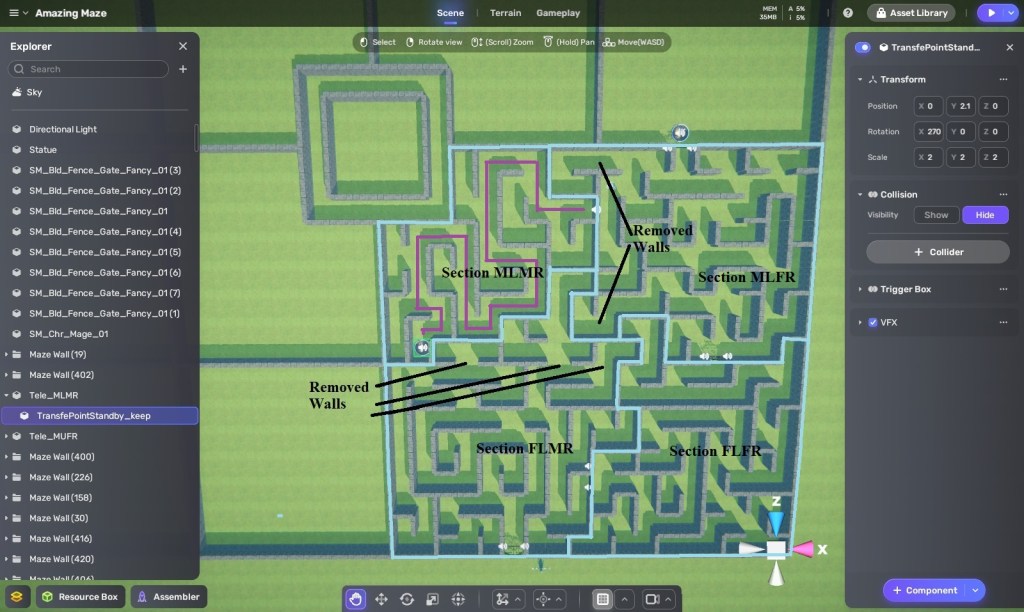
The final step in making this maze is to remove some more walls to create passages branching away from the main path. Also, even though I originally created my sections as 9×9 squares, I don’t want them to be too semetric, so I remove some walls around section MLMR’s border so that paths can lead into and out of my initial bounding area. Of course, I still want the sections to be separated so that there are no shortcuts into the solution path, so I also add some walls to preserve a (non-square) boundary between each section.
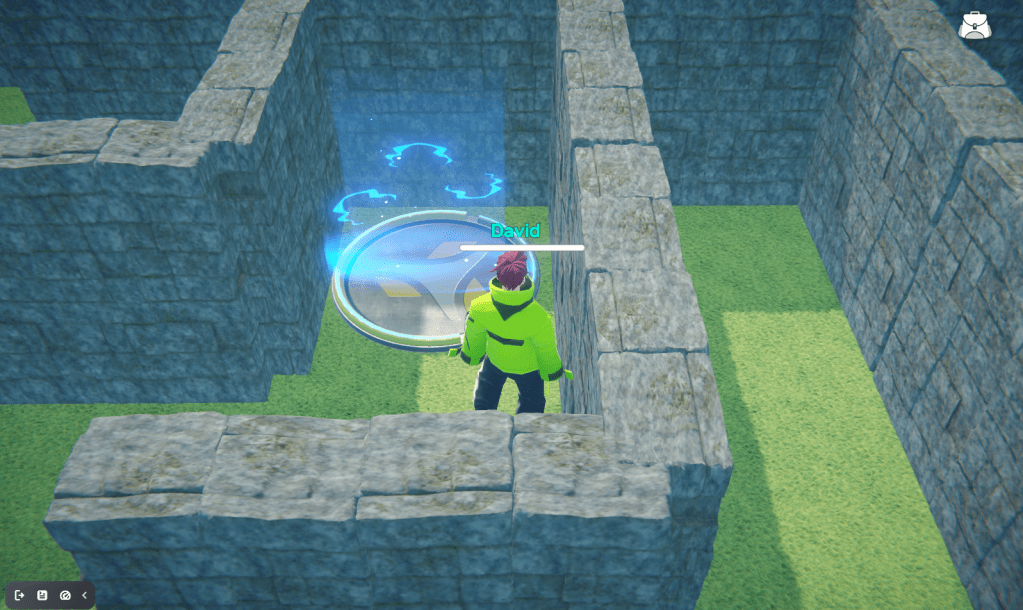
Oops. Did I use the word “final” too soon yet again? As I checked out my “completed” maze section, I realized that the teleporter needed to be more dramatic — more magical — since that was this secton’s distinctive feature. Fortunately, as I checked the Resource Box, I found a built-in VFX (video effect) that would do nicely, VFX Teleporter_Normal_Keep 2. I scaled it down to .4/.1/.4 and place a copy on each of the two teleporters. Finally, I walked my avatar around the maze to make sure it effect isn’t too obvious from nearby paths.
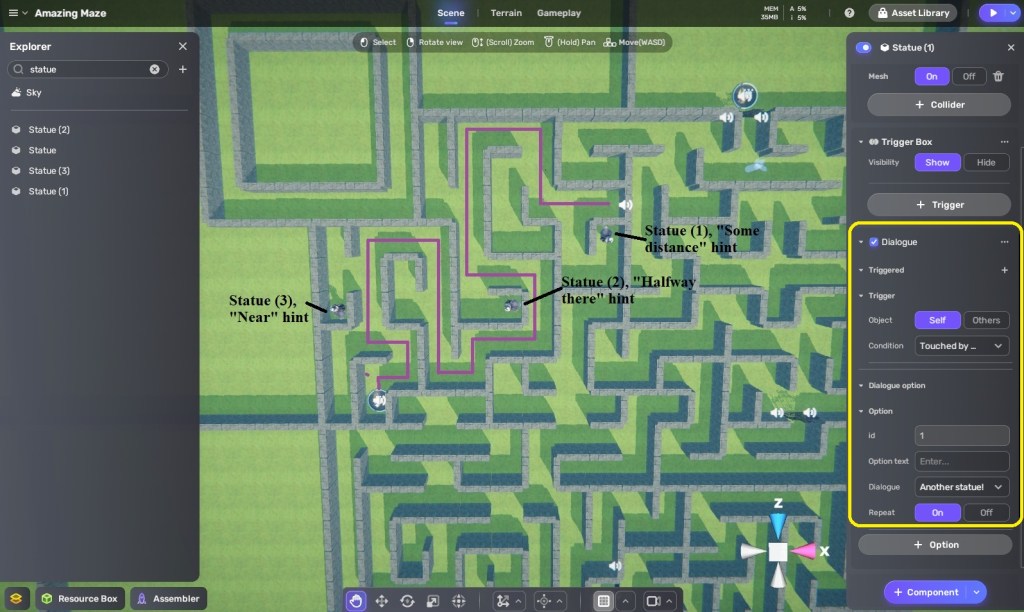
*Head slap* I keep using “final” before I’m finally satisfied that things really are finally final. I’m now concerned that this section is still fairly early in the maze experience, and the player is still learning the rules of how my devious mind works. Since I don’t want some players to get frustrated trying to find a way out and trying in vain to open the hinged wall from this side, I’m going to re-use my “hint statue” from earlier. In fact, I’ll use three of them. One says the dialogue, “Walking alone will not get you through the gate. Find the teleporter. It is some distance from the wall opening.” Another says “You are half the way there.” A third says, “It is near.”
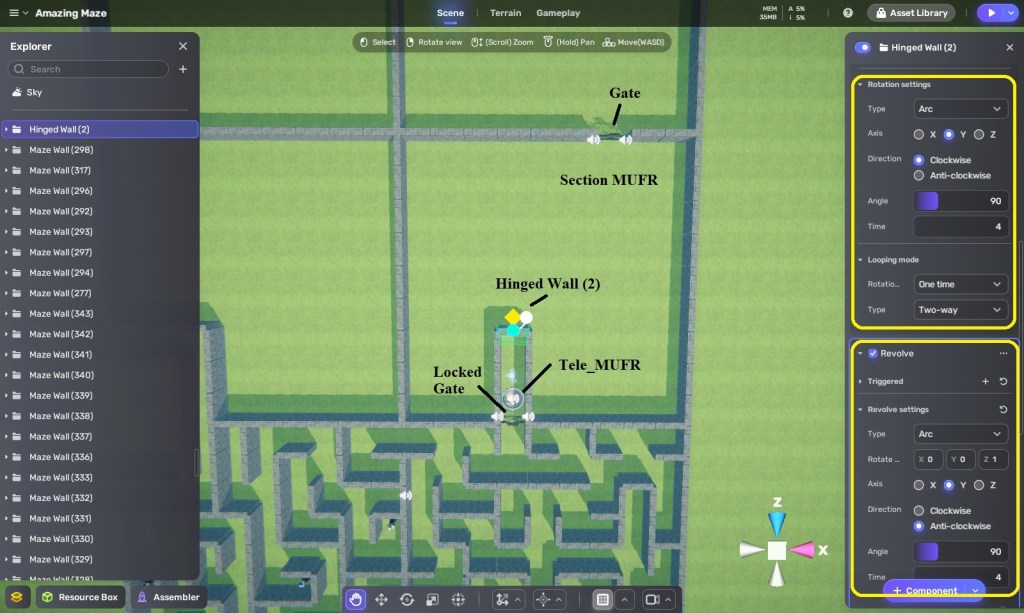
On to Section MUFR, where the other teleporter is located. I place a normal Gate as an exit, but what else to do? I think I’ll have some more fun with hinged walls, since the player has had an experience with one. So, I duplicate the Hinged Wall (1) from the section below and place the copy here.
Here is how I will start off this maze section: the player teleports in from Section FLMR, only to see there’s there’s nothing here but a locked gate and a short passage leading nowhere. However, if the player enters Hinged Wall (2)’s target box, which I put just in front of the wall, the wall revolves and rotates like a door, accompanied a rumble sound, just like the one in the secdtion below. However, this wall opens in a different direction, and so it took about three minutes of experimenting to figure out that rotation needed to be clockwise and the revolve needed to be anti-clockwise around a point where Z=1.
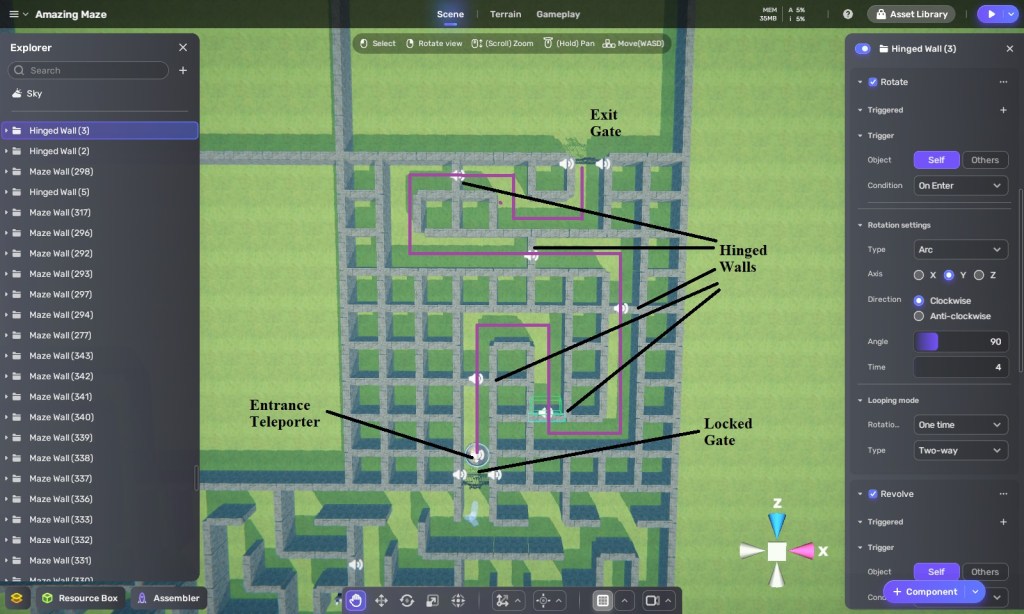
I now create rows and columns of walls and then carve out a solution path to the gate at the exit. However, along the solution, path, I add in a series of hinged walls.
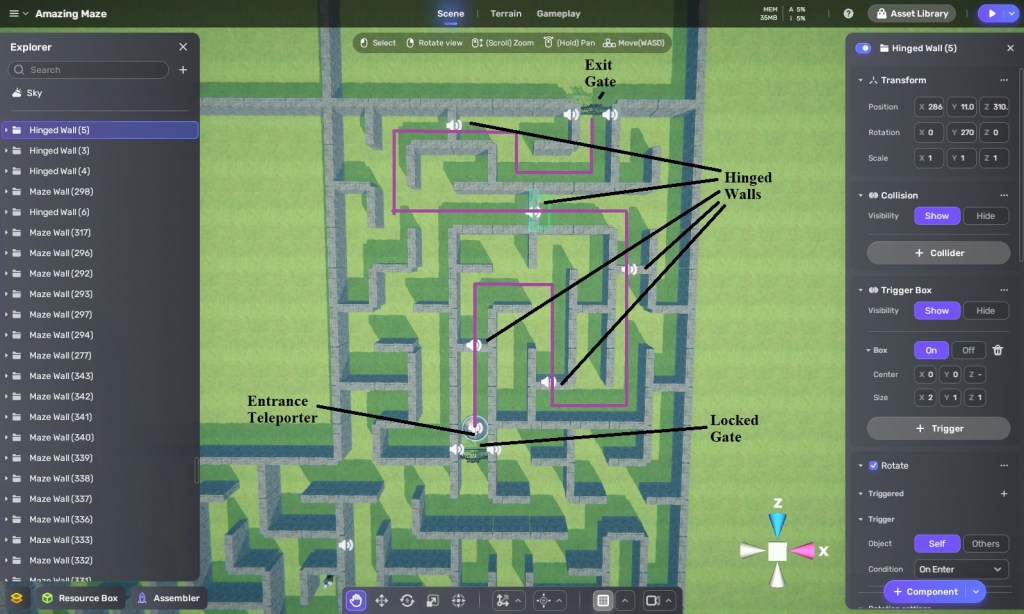
Add in some side passages and allow a couple of the passages from the section below to extend into this one, and I have a maze. Should I add some hint statues, too? No, I don’t think this is necessary. You see, the hinged walls, which open only one way, serve as closure points, making the solution space smaloler and smaller with each wall the player goes through. My feeling right now is that the solution is simple enough to not require any hints.
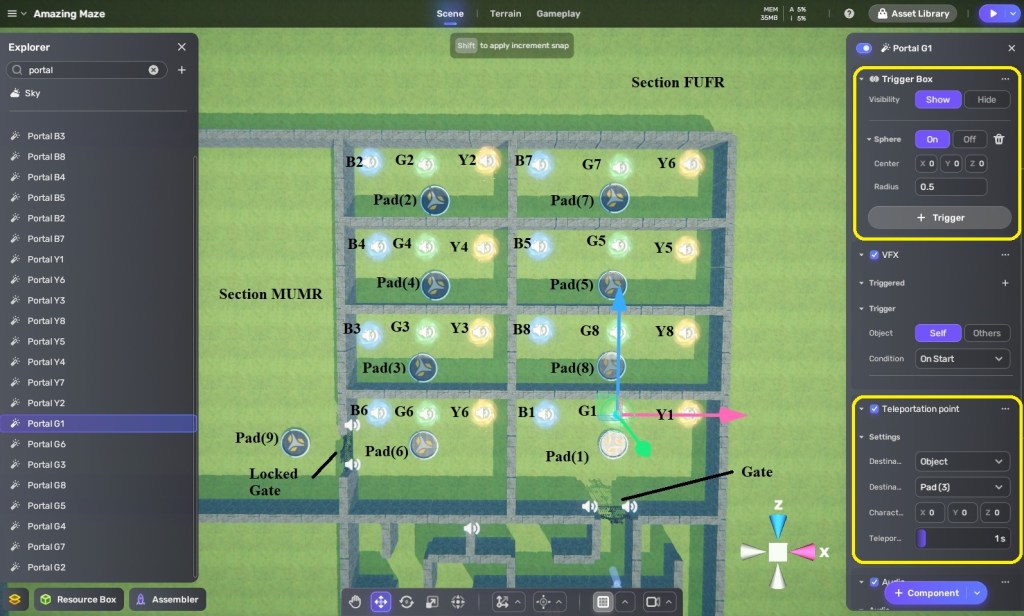
It’s time for some teleporter fun. I dived Section FUFR into 8 rooms, numbered 1 through 8 (not consecutively, as you can see), and I place a locked gate along the left wall of room 6. I copied the Teleporter object to create 9 Pads, and placed one in each room, with the ninth just outside of the locked gate. In each room I place three portals, using the Blue Circle, Green Circle, and Yellow Circle built-in VFX. I scale each of these portals to 2/2/1 and rotate them on their 9 axis 90 degrees so that they would be upright, like a door rather than a hole. Since they are circles, I give each a spherical trigger box rather than a box-shaped one, and then set up audio component to play teleporter sound effect which triggered.

These color portals are going to work as an order of operations puzzle. The player needs to go through the portals in the correct order to exit out through Pad(9). I used the above chart to work out this puzzle. The correct path is Blue-Green-Yellow-Blue. If players choose any of the wrong portals (Green or Yellow) in Room 1, they will bounce around between Rooms 2, 3, 4, and 5 until they eventually wind up in Room 1 again, where they can start over.
If players make choose the wrong portals in Rooms 6, 7, or 8, they will be sent into Rooms 1, 2, 3, 4, or 5. So, there is only one sequence of portals leading to Pad(9), and any other sequence eventually leads back to Pad(1). After I was convinced that this plan worked as I wanted, I set the Teleportation Point of each color portal to go to the appropriate pad.
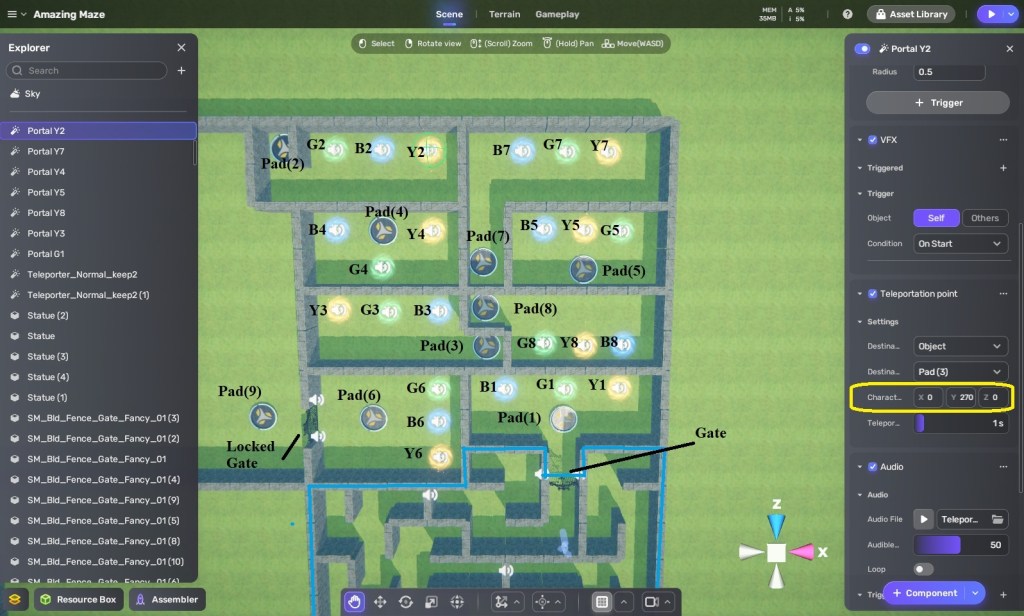
Since maze sections are 9 x 9, divding FUFR into 8 sections resulted in rooms that weren’t all the same dimensions. That’s okay. I don’t want these sections to necessarily be symmertical. I just move some walls and add some others so that the each room looks a bit different from each other. I also rearrange the color order of the portals or move the location of the pad in most of the rooms.
I also set each of the teleporters’ Y rotation position so that players would be facing direction I wanted when they teleport into the room. For example, when telporting into room 6, I want players to be facing the locked gate so that they see the exit pad (Pad(9)) on other side.
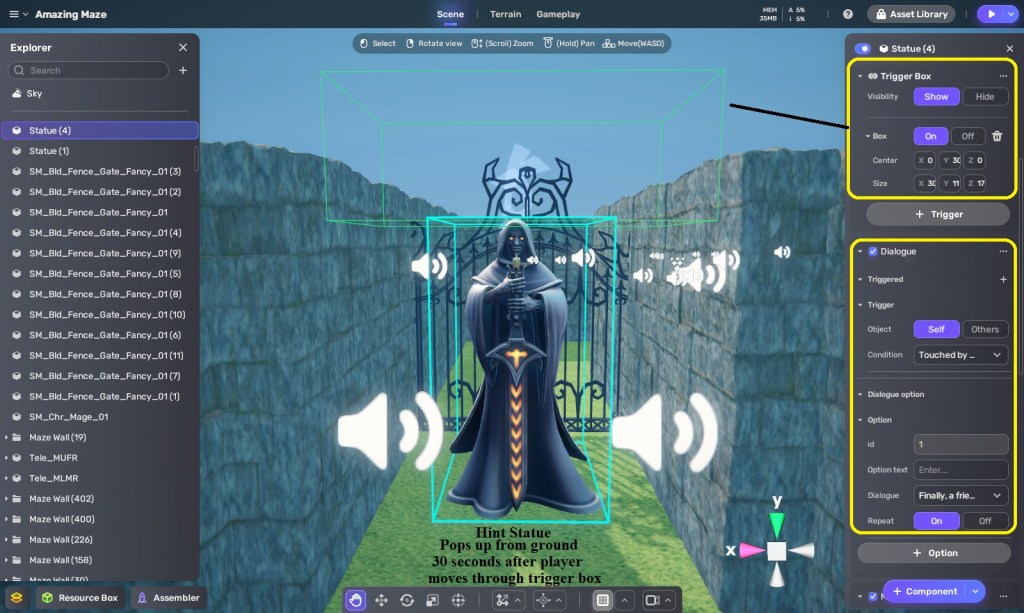
This maze definitely needs hints and therefore, a hint statue. Need hints. This time I placed it under the terrain between the gate and Pad(1); however, I put a trigger box over its head so that the trigger extended above the ground while the statue was underneath. When the player walks through the trigger box, the statue will pop up about 30 seconds later, so that if players wind up back in room 1 again, the statue will tell them what order of color portals to go through to reach the exit of this section of the maze.
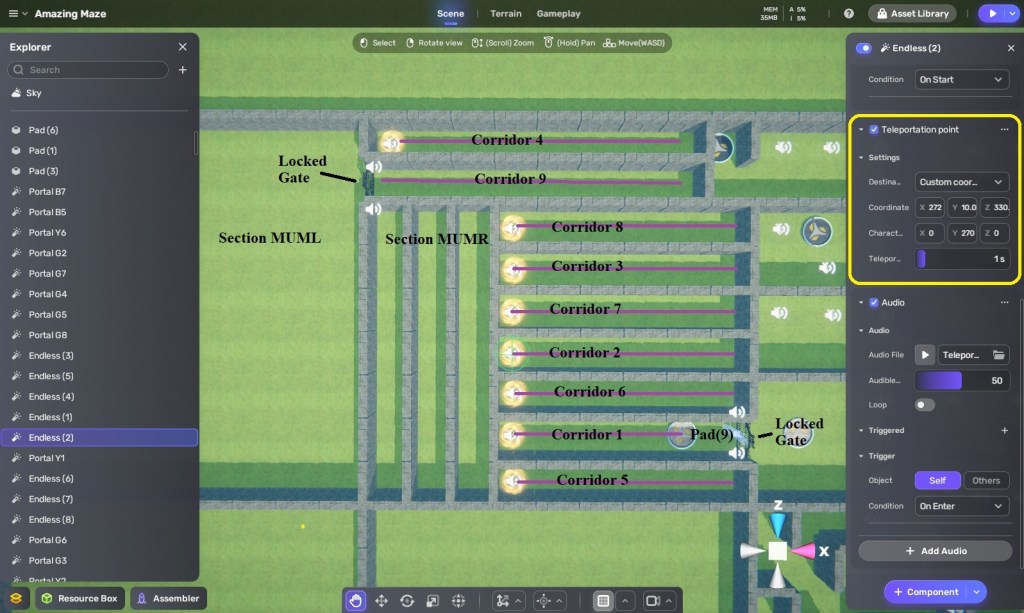
For Section MUMR, I am going to combine portals with hinged walls. Well, it’s mostly going to be portals because this section will be like an endless runner. When players teleport onto Pad(9), they will find themselves in a long, straight passage with a yellow portal at the end. When they go through that portal, they find themselves at the end of another long corridor that has a yellow portal at the end. After going through several of these, they be in a corridor that leads to a locked gate. That gate looks onto Section MUML, which is the final section of the game. Eventually, there will be a fierce Minotaur there, guarding the maze’s exit!
But let’s not get ahead of ourselves. Let’s get back to the yellow portals of Section MUMR. Instead of the portal teleporting them to a pad object this time, I’m having it teleport to a specific position in another corridor. How do I figure out the custom coordinates to use for the position? I’ll use a pad object, but I will move it to where I want the player to appear, write down the pad’s coordinates, put them into the corresponding portal’s teleportation point, and then move the pad to figure out the teleport point for the next portal. I do this for all 8 yellow portals and then delete the pad object, as its work is done.
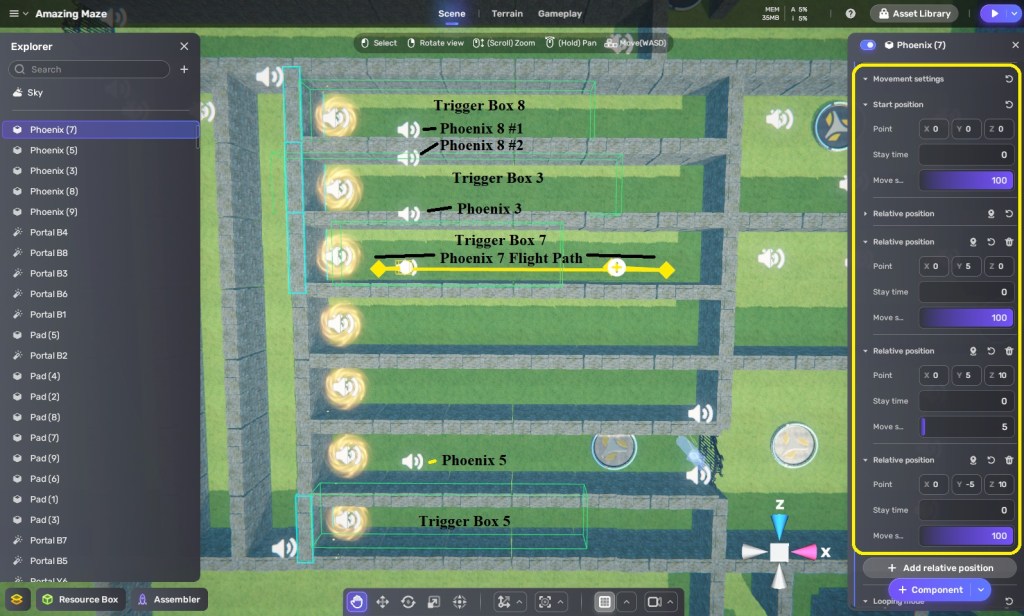
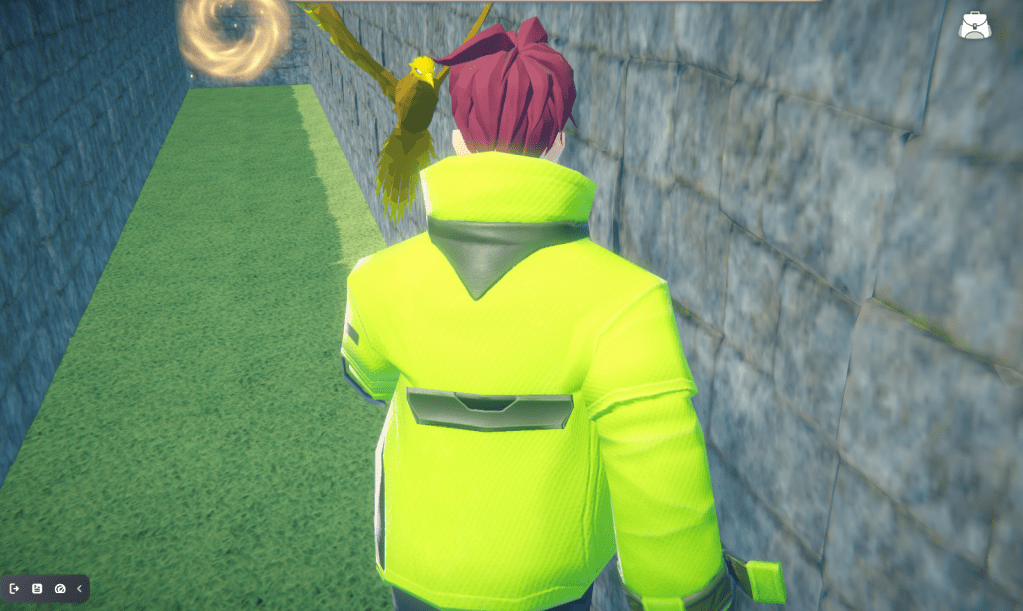
After playtesting this endless runner section, I realized it needed more and decided that some of the yellow portals should have yellow Phoenix’s flying out of them as an obstacle for the player. I download an animated yellow Phoenix model from the Asset Library and placed it under the terrain in front of the yellow portal in Corridor 3. I then put a large trigger box attached to the wall behind the portal that ran from the wall to most of the length of the corridor. When the player enters the trigger box, a bird sound effect will play and then the Phoenix will move through four waypoints. It will first pop up 5 units from under the terrain so that it appears in front of the portal. It will then fly 10 units down the corridor towards the player. If it hits the player, it will push the player back. The Phoenix then drops back down 5 units so that it disappears under the terrain again and then moves back 10 units to its origin point. This will happen every time the player enters the trigger box from the end of the corridor opposite the player.
I do the same for Corridors 5 and 7, but with each one, the trigger box is a little shorter, and the Phoenix appears in a slightly different position in front of the portal and then flies toward the player a little faster. For Corridor 8, I have two Phoenixes come out of the portal. After playtesting it, I find that it makes this section of the maze much more interesting while not being punishingly difficult — this is more of a puzzle game, after all, and not an action game.
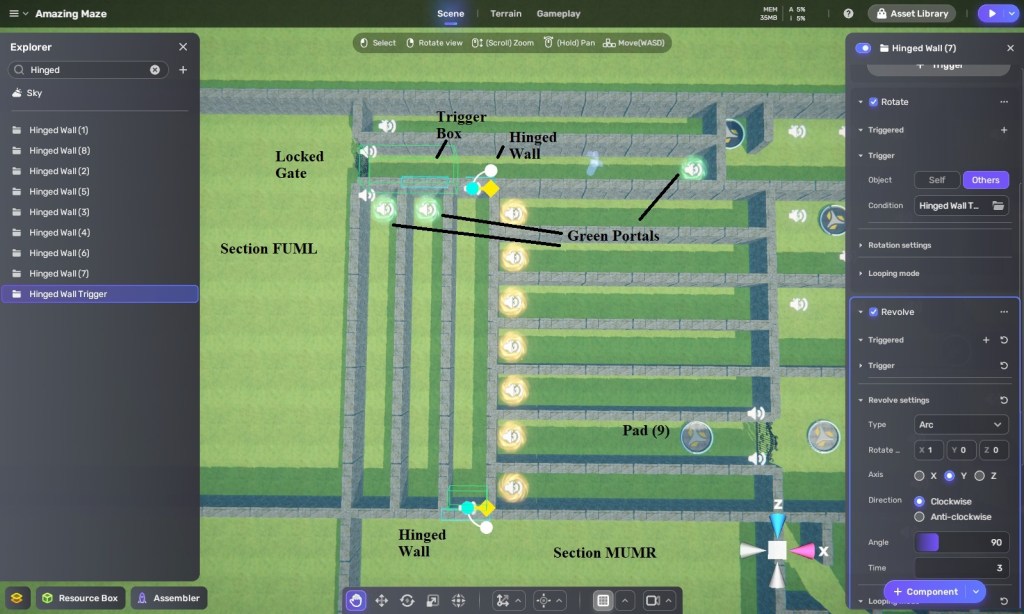
I have one more trick up my sleeve for when the player finally reaches the corridor leading to the locked gate looking into Section FUML with the Minotaur. I set up a trigger box so that when the player comes to the gate, a hinged wall behind him opens and closes. When players turn around, they may miss seeing the wall closing, but they will see a green portal at the end of the other end of the corridor. If they decide to go through that portal, they will go into another endless runner sequence involving two long corridors with a green portal at the end of each. Unfortunately for the player, that last green portal leads right back to Pad (9), and they’ll have to do this section of the maze over again.
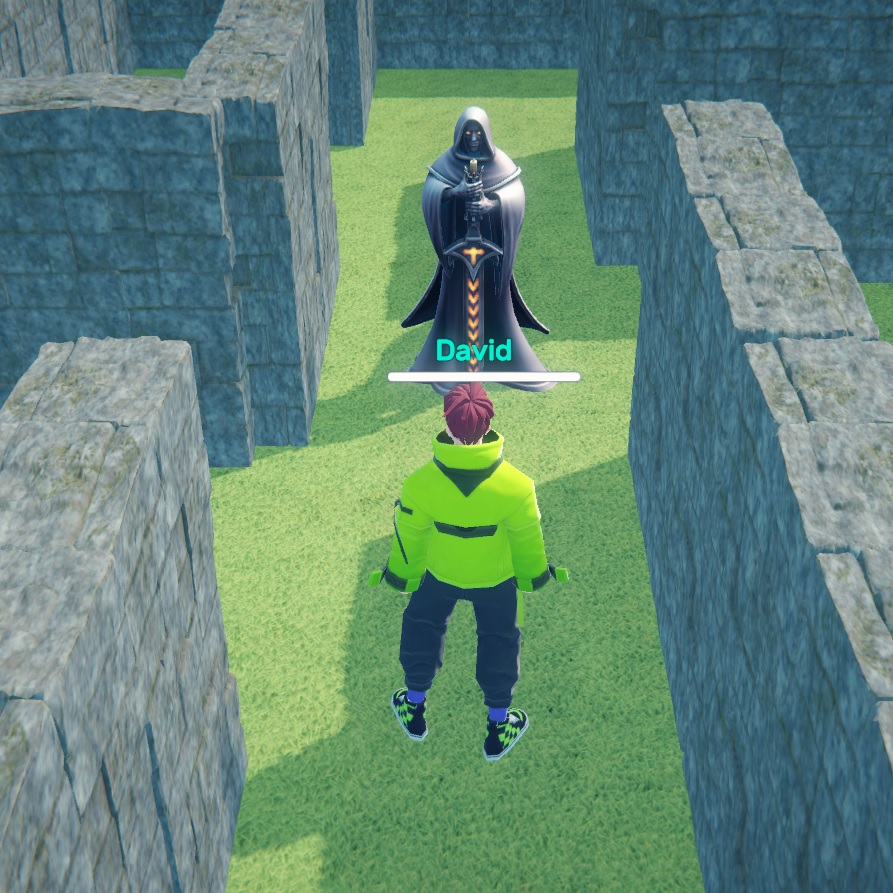
However, if they do notice the hinged wall and pass through before it closes, they will enter a long corridor with another hinged wall at the end. This leads us into Section MUMR containing… what I will dicuss in my next YAHAHA and the Amazing Maze entry. This time we covered a lot of territory — teleporters, video effects, and movement waypoints — but there’s more coming in my next post. In the meantime, here are some screenshots of what these latest features look like while playing The Amazing Maze.

Note that you already have learned more than enough to start making your own 3D games using YAHAHA Studio. In fact, you may even be ready to participate in the YAHAHA Global Game Jam taking place January 30th through February 5th, with a $15,000 prize pool. You can find out more by click on this link.
YAHAHA and the Amazing Maze, Part 2
Happy New Year, game designers! My first blog post of 2023 is the second part in a series about how to use the low-code game development platform YAHAHA Studio to create a variety of video game genres, beginning with navigational puzzles, or mazes.
In my last blog post, I described how to create a simple hedge maze, but now we going to dive into more complex game mechanics by using additional YAHAHA components such as Rotate and Revolve as well as employing object groups and triggers to begin development of an even more magical maze.
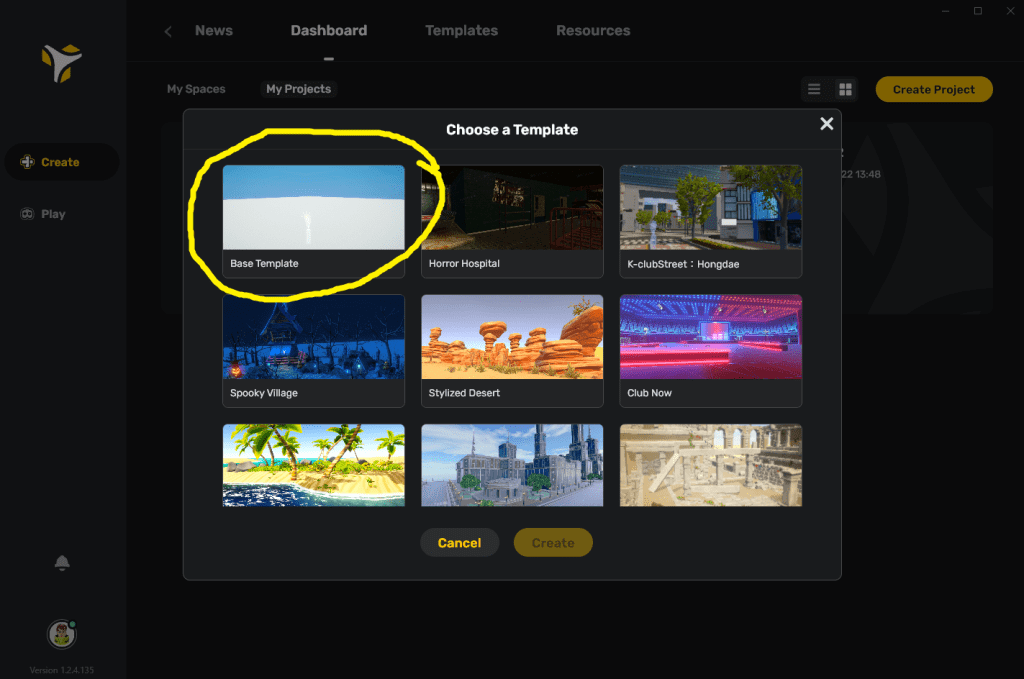
Once again, I am going to start with the Base Template.

It looks rather desolate, doesn’t it? Just a plane, a directional light, and a Respawn Point. Not too worry! I can quickly create an attractive environment by going to the Terrain tab and generating a new terrain, just as I did with the Hedge Maze. However, this time, I’m going to use a different grass texture, just to mix things up a little. Now, don’t panic if you don’t see it immediately when you create your own terrain, because it is generated at Y=10, which is just above the current point of view.
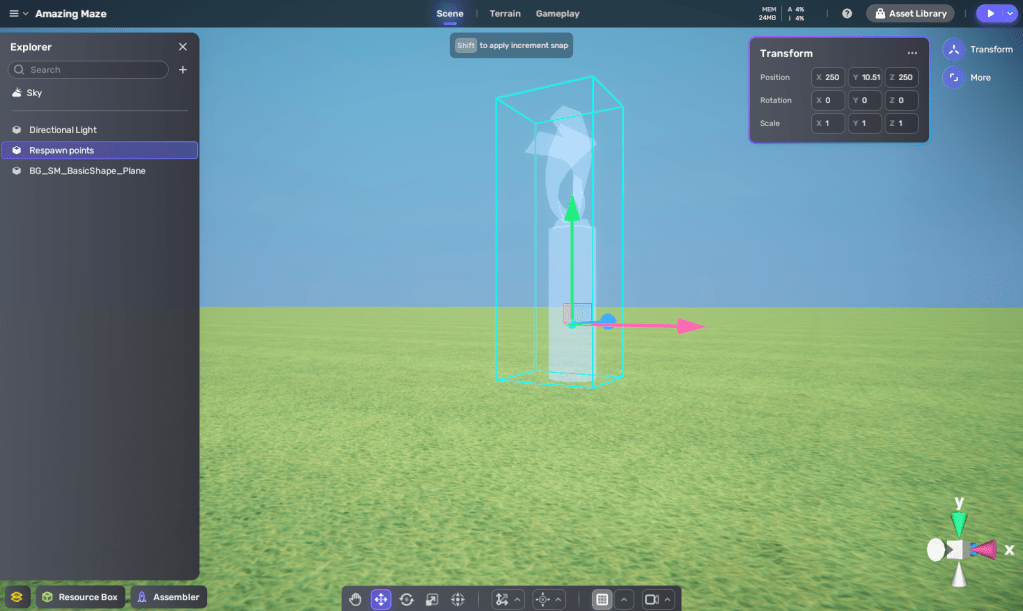
Next, I click on the Scene tab, open the Explorer, click on the Respawn Point to bring it into focus, open its Transform window, and set its X, Y, Z postion to 250, 10, 250 so that it is resting on top of the terrain’s center position. This actually sinks the Respawn Point a little bit into the terrain serface, but I can use the Move tool to raise it a bit so that the bottom of the Respawn Point’s collision box rests on top of the terrain.
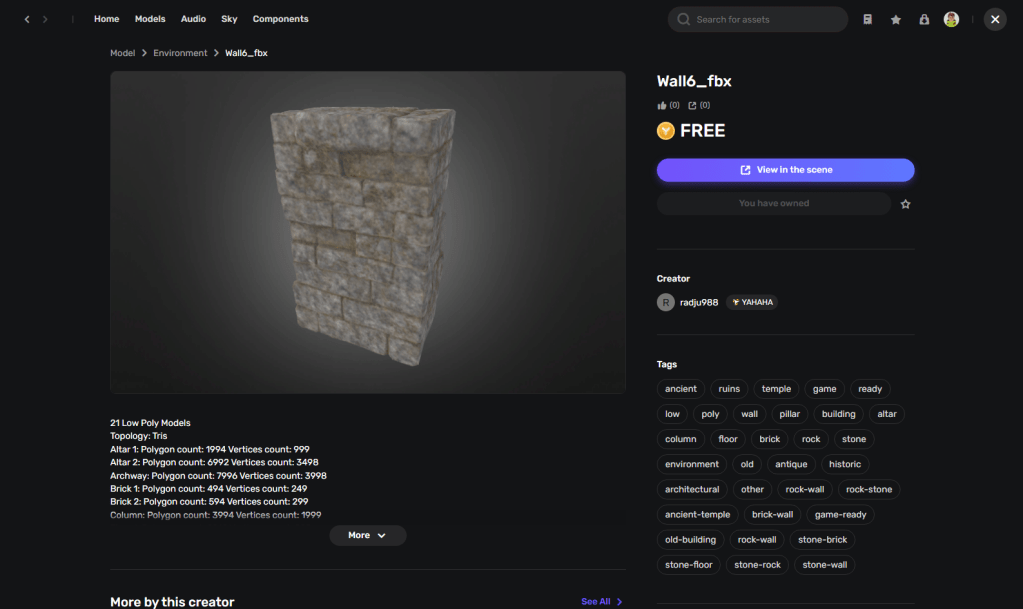
As I wrote a couple of paragraphs ago, I want to mix things up a little this time. Therefore, instead of a hedge maze, I’m going to make a maze out of stone walls. After a quick search of the Asset Library, I found the perfect wall piece, called Wall6.
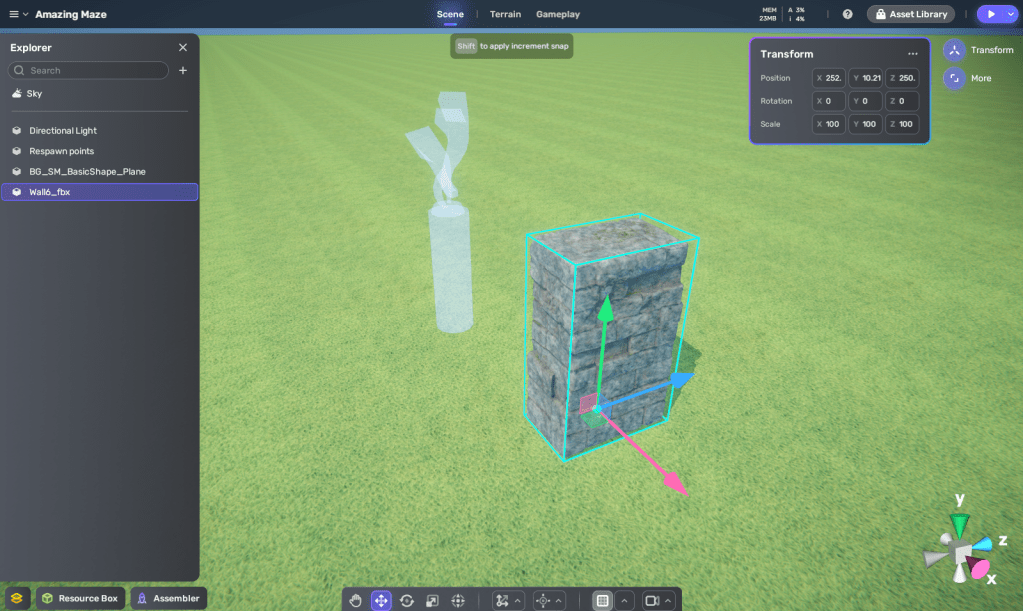
Maybe I was too quick to call it “perfect”, because when I bring it into my level, I can’t see it because it’s too small. No problem! I simply open its Transform window and scaled it up by 100 in all directions.
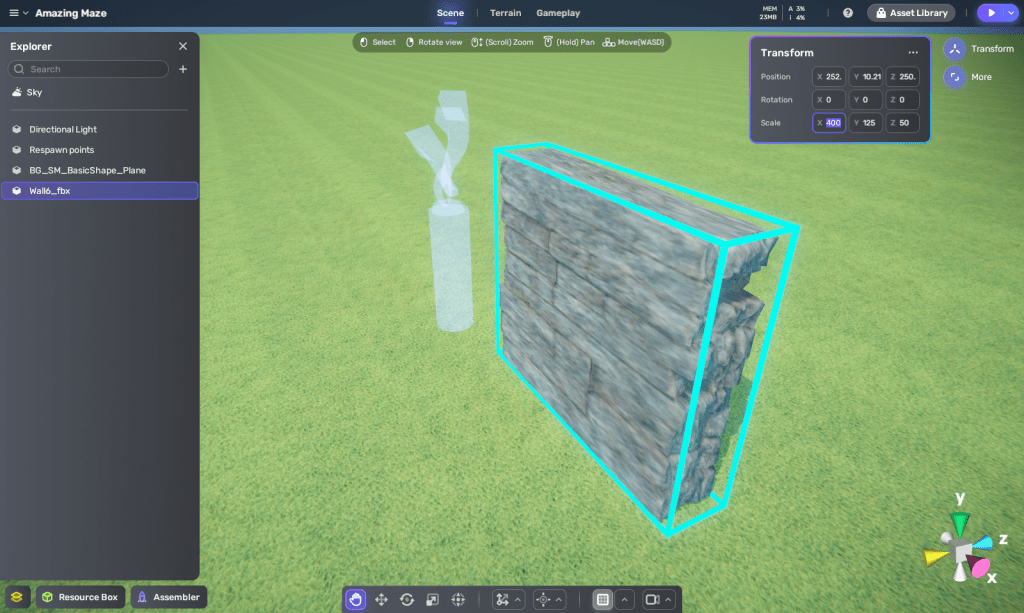
Still, it’s more of a column than a wall. I want to be about four times longer, half as wide, and 25% taller. Unfortunately, it looks too obviously stretched out at 400, 125, 50, so, I’ll leave X at 100 and put together four copies of Wall6 into a single object, that I’ll use for building my maze walls.
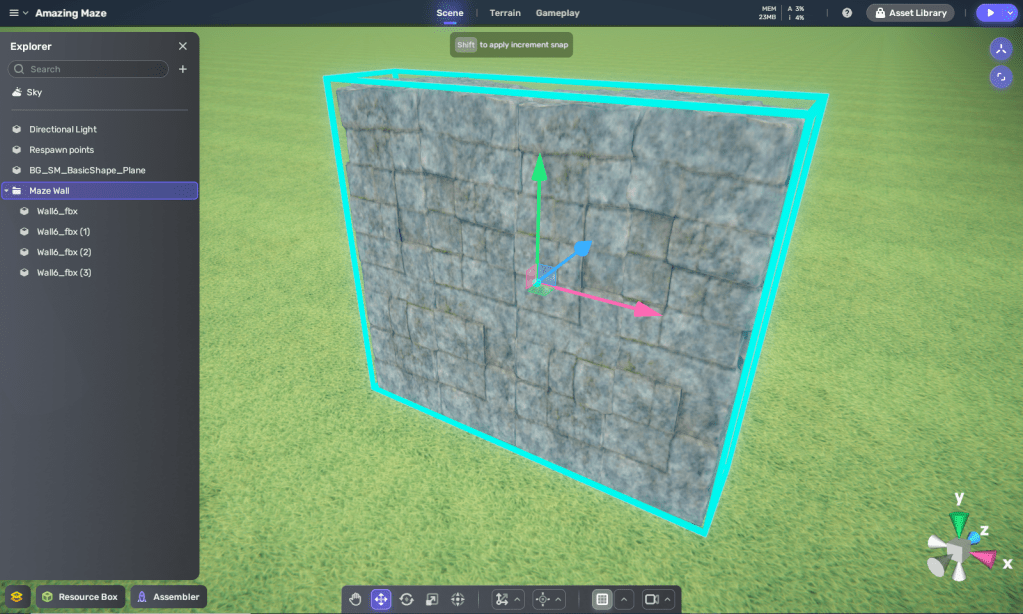
To make it less obvious that this wall is composed of four identical columns, I rotate every other one around its Y axis by 180 degrees. Next, I select each of the four Wall6 objects and right-click to open a menu for grouping them together into a single group. Its default name is Yahaha Group, but I right-click again to rename the group “Maze Wall”.

Unlike when I created the Hedge Maze, I planned this maze out on grid paper first, but I’m not ready to reveal everything to you yet. All I’ll say for now is that the basic structure of this maze will be a 4×4 grid of sections made out of 9×9 Maze Walls. I lay down the perimeter first and then fill in the rows and columns defining each section.
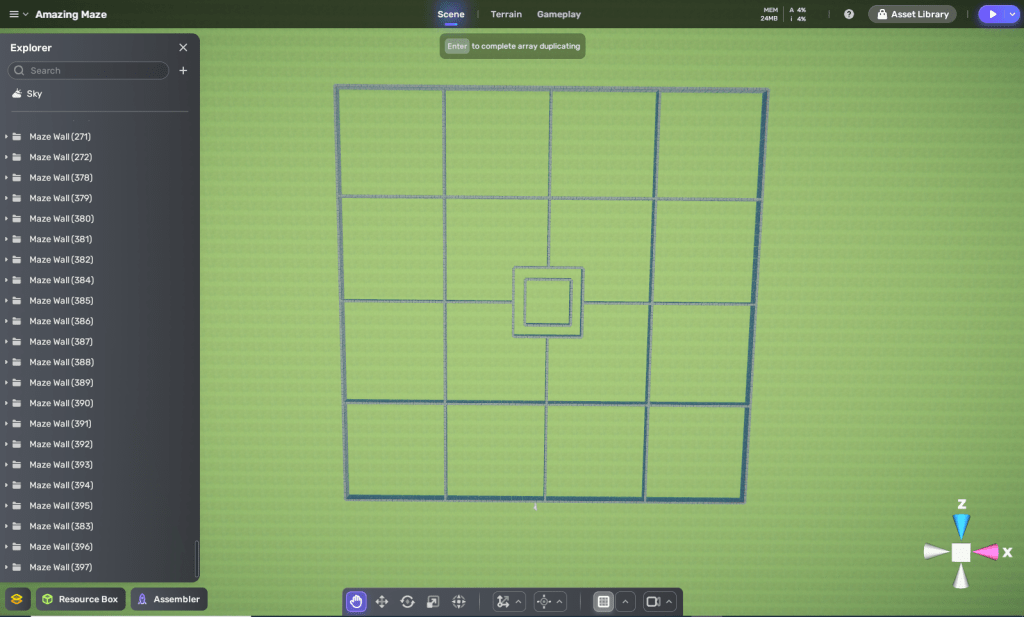
At the center, I put in a 4×4 square withing a 6×6 square. Later (much later), I’ll explain how I’m going to use this central structure.
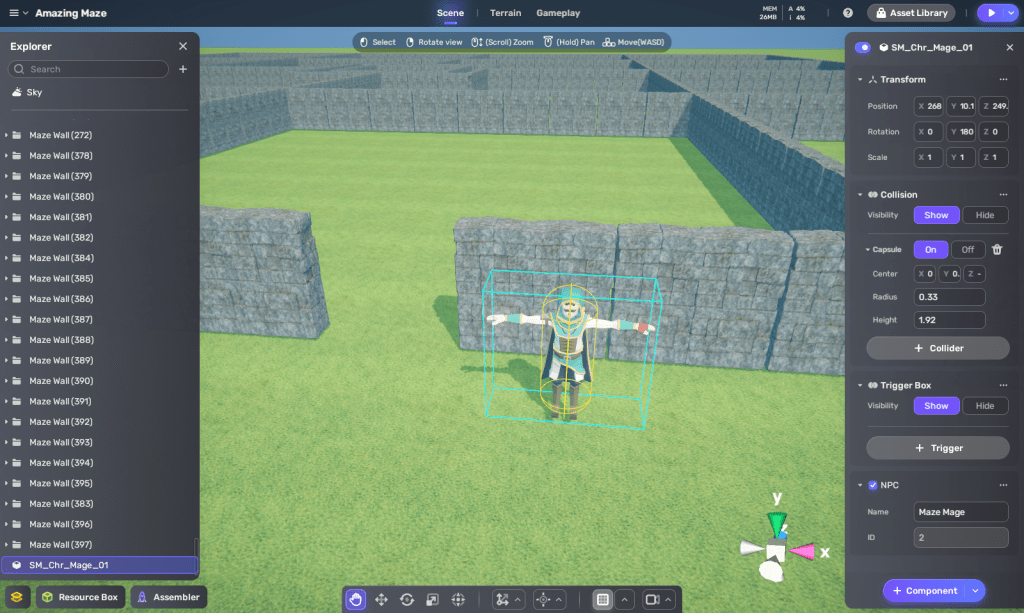
Here’s where the fun begins. I removed a wall from the far-lower, mid-right section of the maze. This gap will be the maze’s entrance. As I did with my Hedge Maze, I place a greeter character at the maze’s entrance to give the player some initial instructions and set the mood. Now, I want this to be a more magical experience than my Hedge Maze, so I choose an object named SM_Char_Mage_01 from the Asset Library. I give this object a Character (NPC) Component and name the NPC (for non-player character) “Maze Mage”.
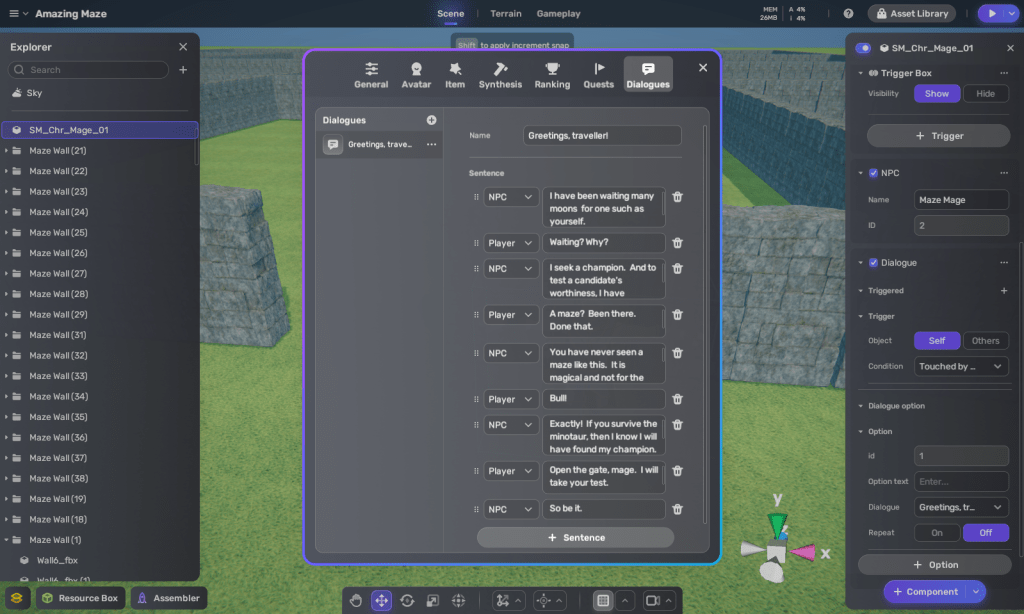
The NPC is supposed to be a greeter character, so he’ll need some greeting dialogue to have with the player. I click on the Gameplay tab, select Dialogue, and write a short conversation, which I name “Greetings, traveller!” Next, I give my Mage character a Dialogue component that players “Greetings, traveler” when the player’s avatar touches the NPC.
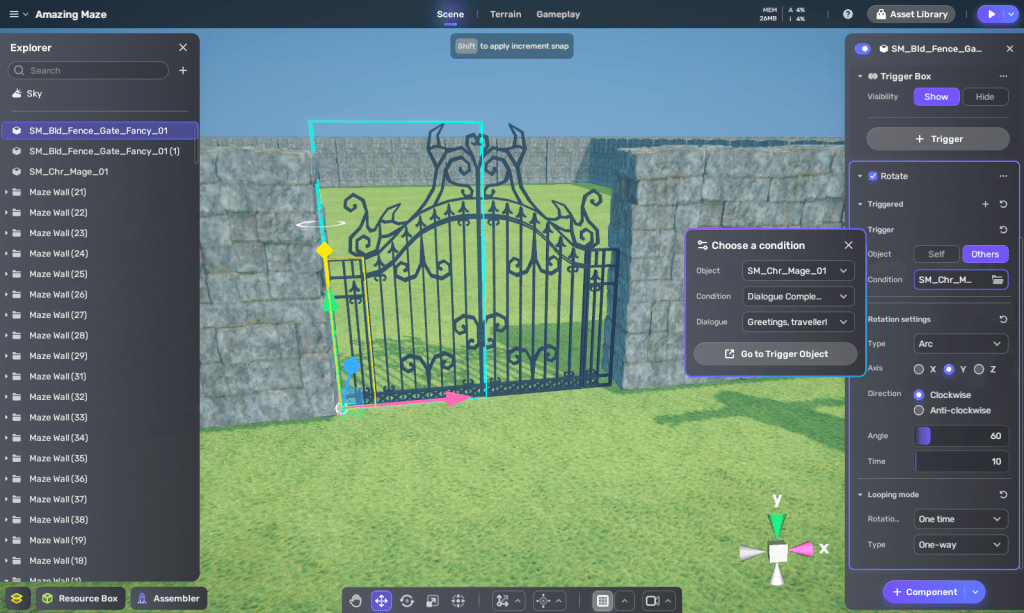
Once their conversation is over, I want a gate to open, allowing the player to enter the maze. After a few minutes searching the Asset Library, I find a fancy-looking gate named, appropriately enough, SM_Bid_Gate_Fancy_01. What I like about this object is that it revolves around its Y axis not in the center, but on the gate’s left side. This will allow me to use a component I haven’t tried before: Rotate. I will have the gate rotate clockwise 60 degrees when the “Greetings, traveler!” dialog with the Maze Mage is completed. But that’s only half of the gate. I duplicate the left gate and then rotate it 180 degrees to be the right side of my gate. However, the right gate (being a “backwards” version of the left gate) will rotate anti-clockwise 60 degrees when the dialog is completed. This will cause both gates to swing open toward the player and allow the player to enter the maze.
That takes care of the visuals, but never underestimate the importance of audio in a game. I give both Gate objects an audio file from the Asset Library called Metal Foley Creek 8. This sound effect is 3 seconds long, so I make sure that each Gate’s Rotate action is 3 seconds long as well, so that the audio matches the visuals.
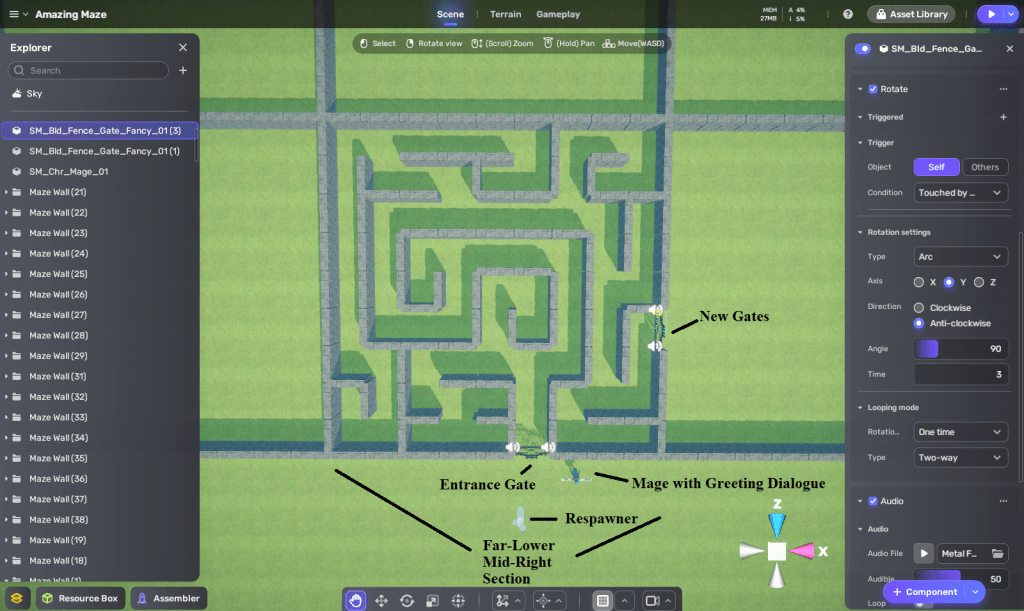
With the Mage and Entrance gate now in place, I create a maze in the Far-Lower, Mid-Right Section using same technique as I did for creating the maze in Hedge Maze, but this time the exit is on the right side of the maze so that it leads to the Far-Lower-Far-Right Section. I then put in two new gates that are triggered by player touch to open 90 degrees. I set the Rotation to be “two-way” so that they will close again after being opened and not block the paths I am about to make next.
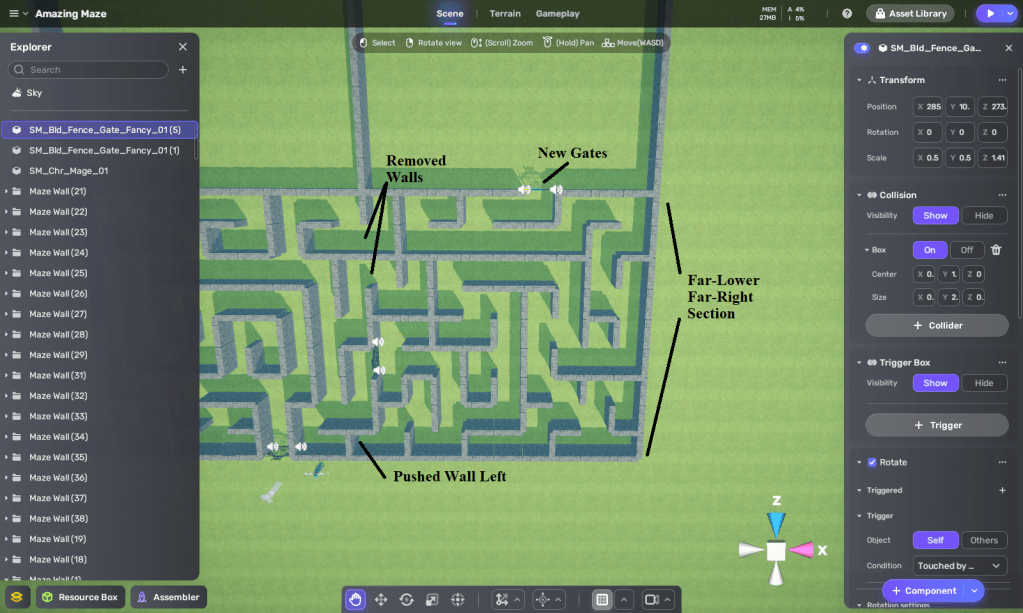
I next create another maze in the far-lower, far-right section that leads from these gates to two new gates that open up into the section above. I put these gates inside my maze because I want to train the player to follow the gates, but then I’m going to fake out the player in the next section. Also, so that my sections aren’t just simple squares, I allow the two section mazes to extend into each other by removing two walls separating them, as well as pushing another seperator wall to the left, all while being careful not to open up additional paths that cross over into existing paths.
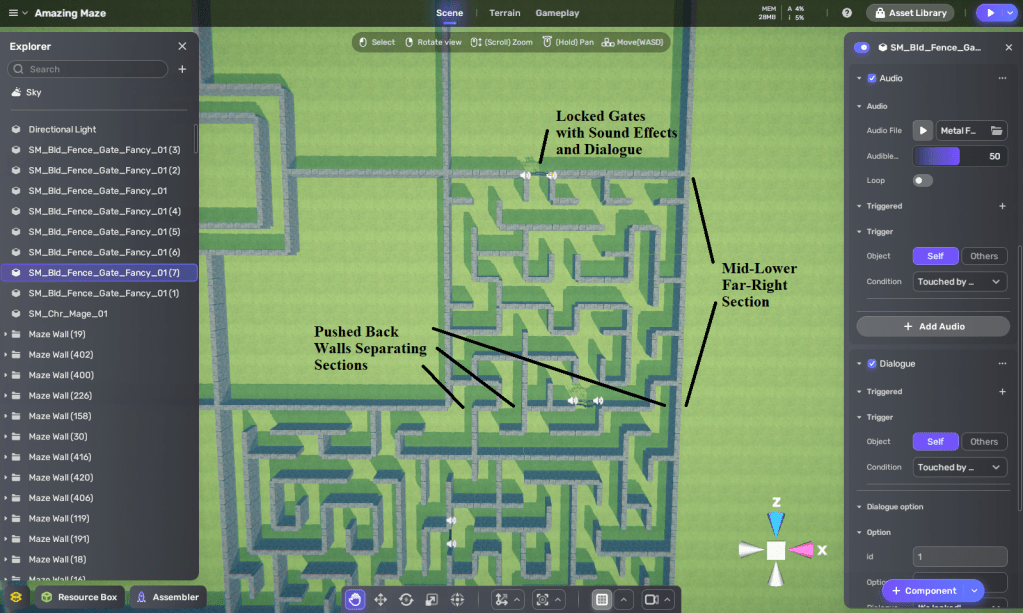
I create a third maze in mid-lower, far-right section leading to a locked gate. This is my fake-out. Not all gates open at the player’s touch. I give this gate a Metal Foley 5 metallic clang audio effect when touched by the player so that player knows it’s locked. I also add dialogue when player touches it, saying “It’s locked! Wait ,what’s on the other side?” What does the player see? That would be telling. You’ll have to wait until my next blog post to find out. So, how does the player get out of this section? That I can tell you below.
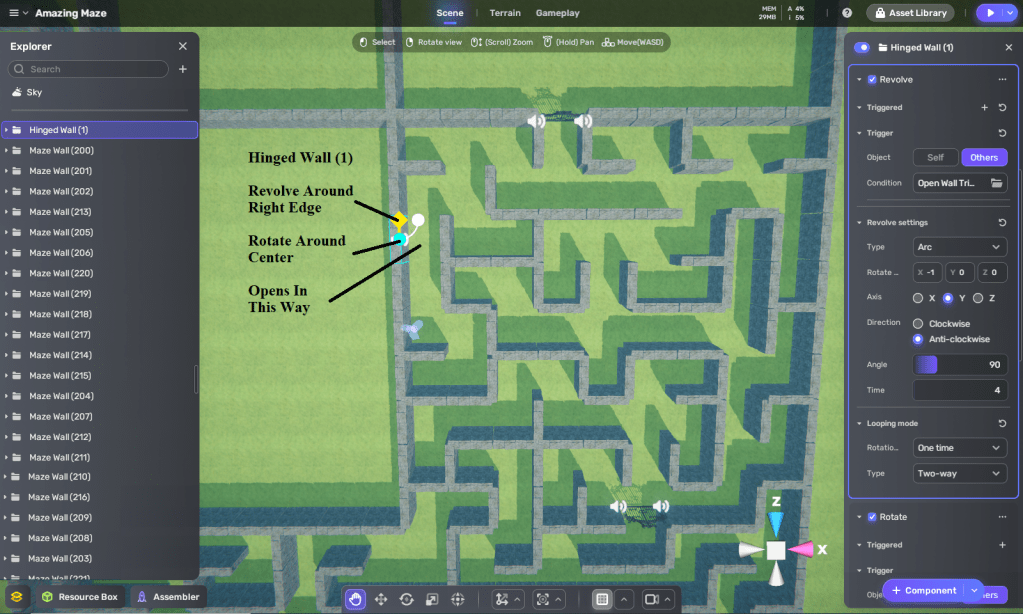
The exit from this section of the maze will be through a hinged wall that behaves like a door. The wall, which I named “Hinged Wall (1)”, rotates anti-clockwise around its Y axis at an arc of 90 degrees, and the rotation type is two-way so that it immediately closes after opening. Now, if I leave it like that, the wall will just rotate like a turnstyle, but I want it to behave more like a door on a hinge. So I also have the wall revolve anti-clockwise at an arc of 90 degrees around a point at the wall’s right edge (when viewed from inside this section’s maze), which required me to set the X value of the rotation to -1. In addition, I have the opening wall play an audio effect called Rock Rumble 8. This sound effect is 9 seconds long, so I set both my Revolve and Rotate time to take about half that long (4 seconds for open and 4 seconds for close, with 1 second to spare for the end of the sound effect).
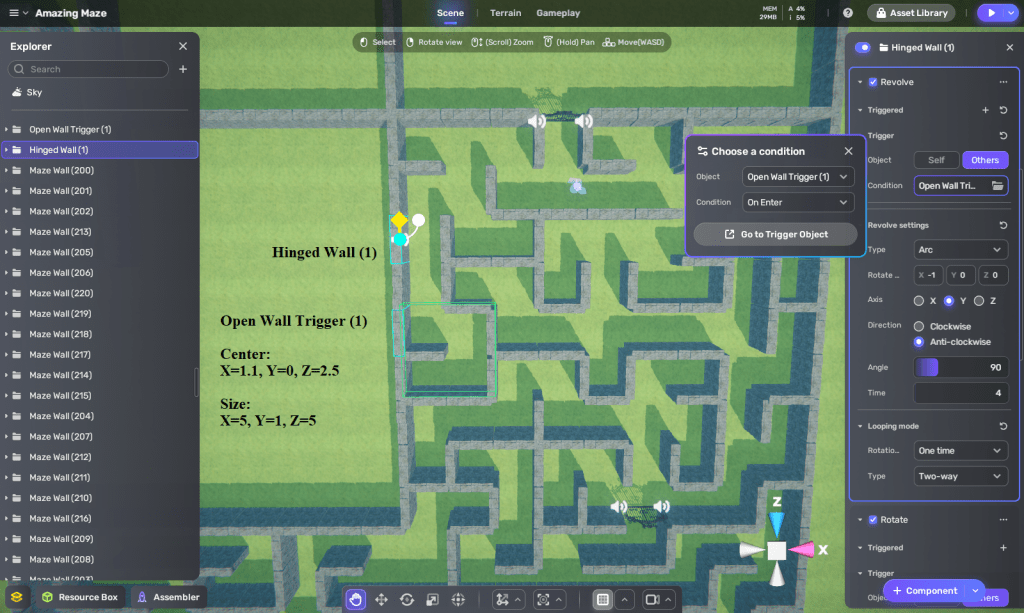
While I initially trigger the wall’s Revolve and Rotation to occur at game start so that I could put my Respawner Point next to it and watch the wall open in-game to make sure my settings are correct, that’s not how I want it to ultimately work. Instead, I want the Hinged Wall to open and close after the player walks past it. So I gave a Trigger component to a nearby wall to its left (which I named “Open Wall Trigger (1)”) and made the center and size of the trigger area such that the player would be able to enter the trigger area only from the passage next to the hinged wall passage.
I then set Hinged Wall (1) to revolve and rotate when the player enters the trigger area. Both actions are set to two-way, so that the wall will automatically close after it opens. I only want the player to be able to enter the trigger area from the passage next to the hinged wall passage. So, the hinged wall will open when the player opens past it. If the player hears the rumble and turns around in time, they will be able to go through the opening before the wall closes again.
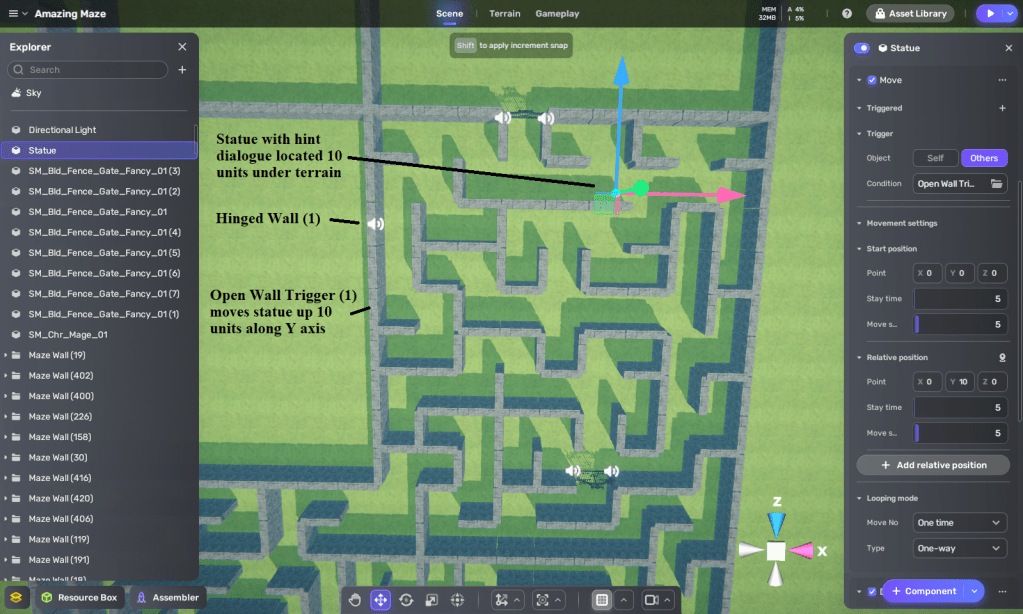
Since this is early in the maze, I want to give the player a hint to listen for moving walls in case they didn’t notice the Hinged Wall opening and closing behind them when they passed by it. I decided to make the hint come from a talking statue, and I want to have the statue block the player from leaving that part of the maze section so that the player can find the Hinged Wall.
Of course, I can’t have the statue blocking the path leading toward the Hinged Wall when the player first approaches it, so I place the statue at Y=0, where it will hidden under the terrain as the player enters the maze. When the player exits Open Wall Trigger (1)’s trigger area, it will activate a Move component in the statue. The default settings of the Move component will move the statue up along the Y axis 10 units, which will place it right on top of the terrain so that the player will see it if they try to leave that section of the maze.
When the player avatar touches the statue, it will trigger a dialogue with a hint about listening (for the opening Hinged Wall). This hint should allow the player to find the moving wall more easily and then go into the next section of the maze, which will be… covered in my next Amazing Maze blog post, along with the use of teleporters, moving stairways, hidden doors, collectible items and additional elements to make this maze more magical. And don’t forget, the Minotaur awaits at the end!
Note that you already have learned more than enough to start making your own 3D games using YAHAHA Studio. In fact, you may even be ready to participate in the YAHAHA Global Game Jam taking place January 30th through February 5th, with a $15,000 prize pool. You can find out more by click on this link.
