YAHAHA and the Amazing Maze, Part 2
Happy New Year, game designers! My first blog post of 2023 is the second part in a series about how to use the low-code game development platform YAHAHA Studio to create a variety of video game genres, beginning with navigational puzzles, or mazes.
In my last blog post, I described how to create a simple hedge maze, but now we going to dive into more complex game mechanics by using additional YAHAHA components such as Rotate and Revolve as well as employing object groups and triggers to begin development of an even more magical maze.

Once again, I am going to start with the Base Template.
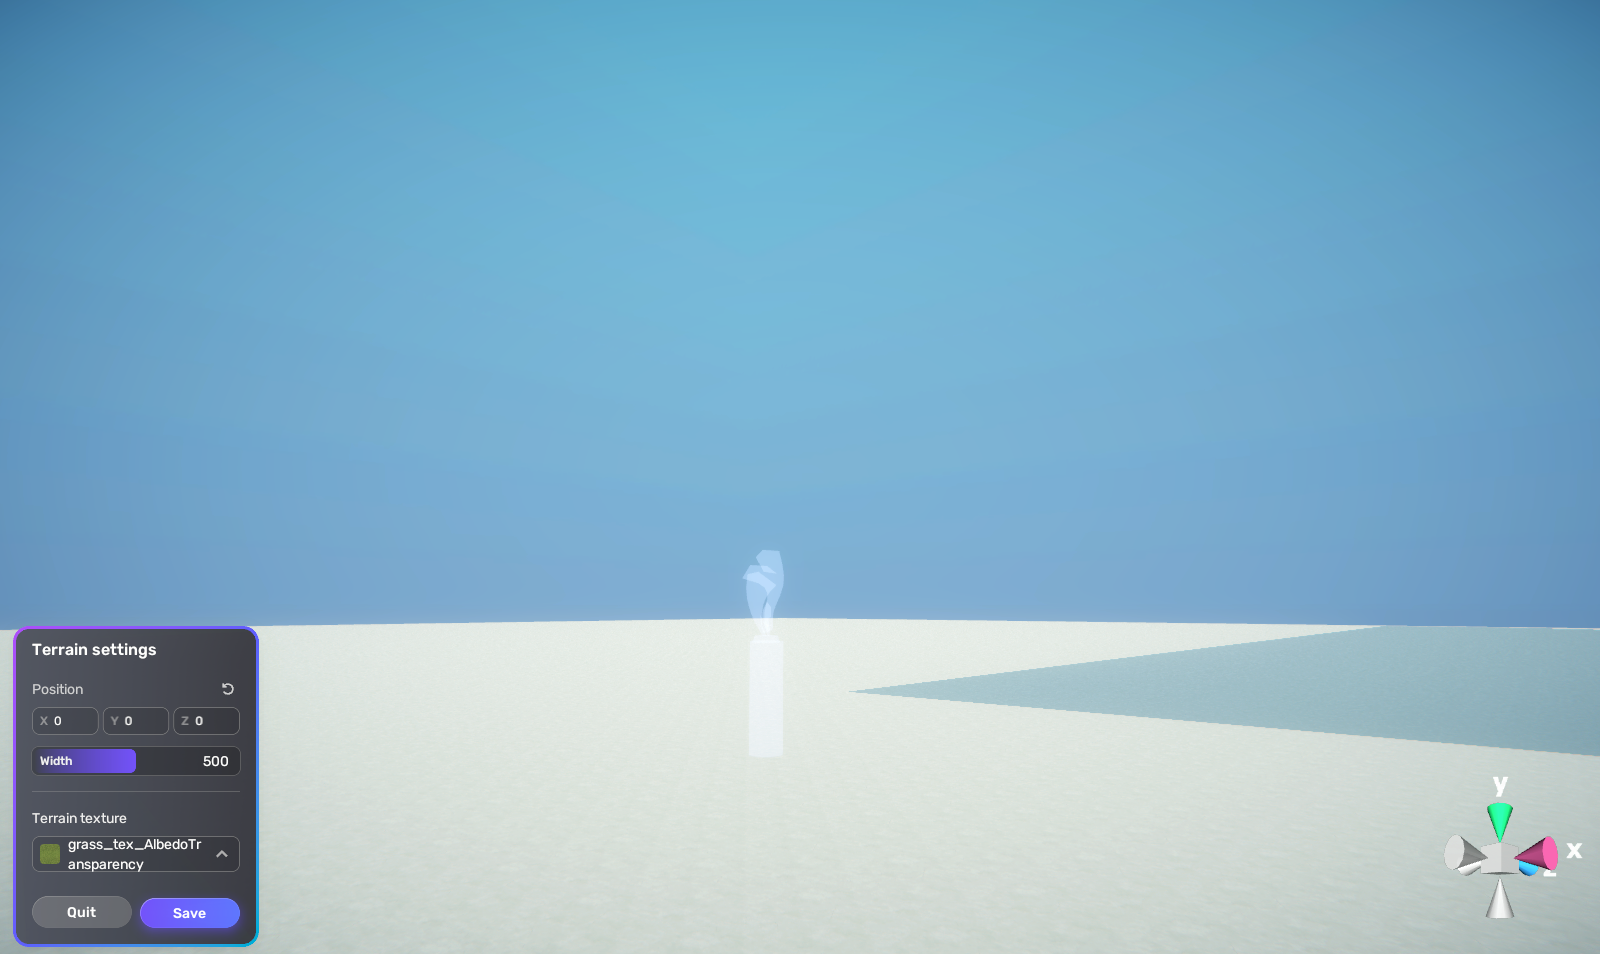
It looks rather desolate, doesn’t it? Just a plane, a directional light, and a Respawn Point. Not too worry! I can quickly create an attractive environment by going to the Terrain tab and generating a new terrain, just as I did with the Hedge Maze. However, this time, I’m going to use a different grass texture, just to mix things up a little. Now, don’t panic if you don’t see it immediately when you create your own terrain, because it is generated at Y=10, which is just above the current point of view.

Next, I click on the Scene tab, open the Explorer, click on the Respawn Point to bring it into focus, open its Transform window, and set its X, Y, Z postion to 250, 10, 250 so that it is resting on top of the terrain’s center position. This actually sinks the Respawn Point a little bit into the terrain serface, but I can use the Move tool to raise it a bit so that the bottom of the Respawn Point’s collision box rests on top of the terrain.
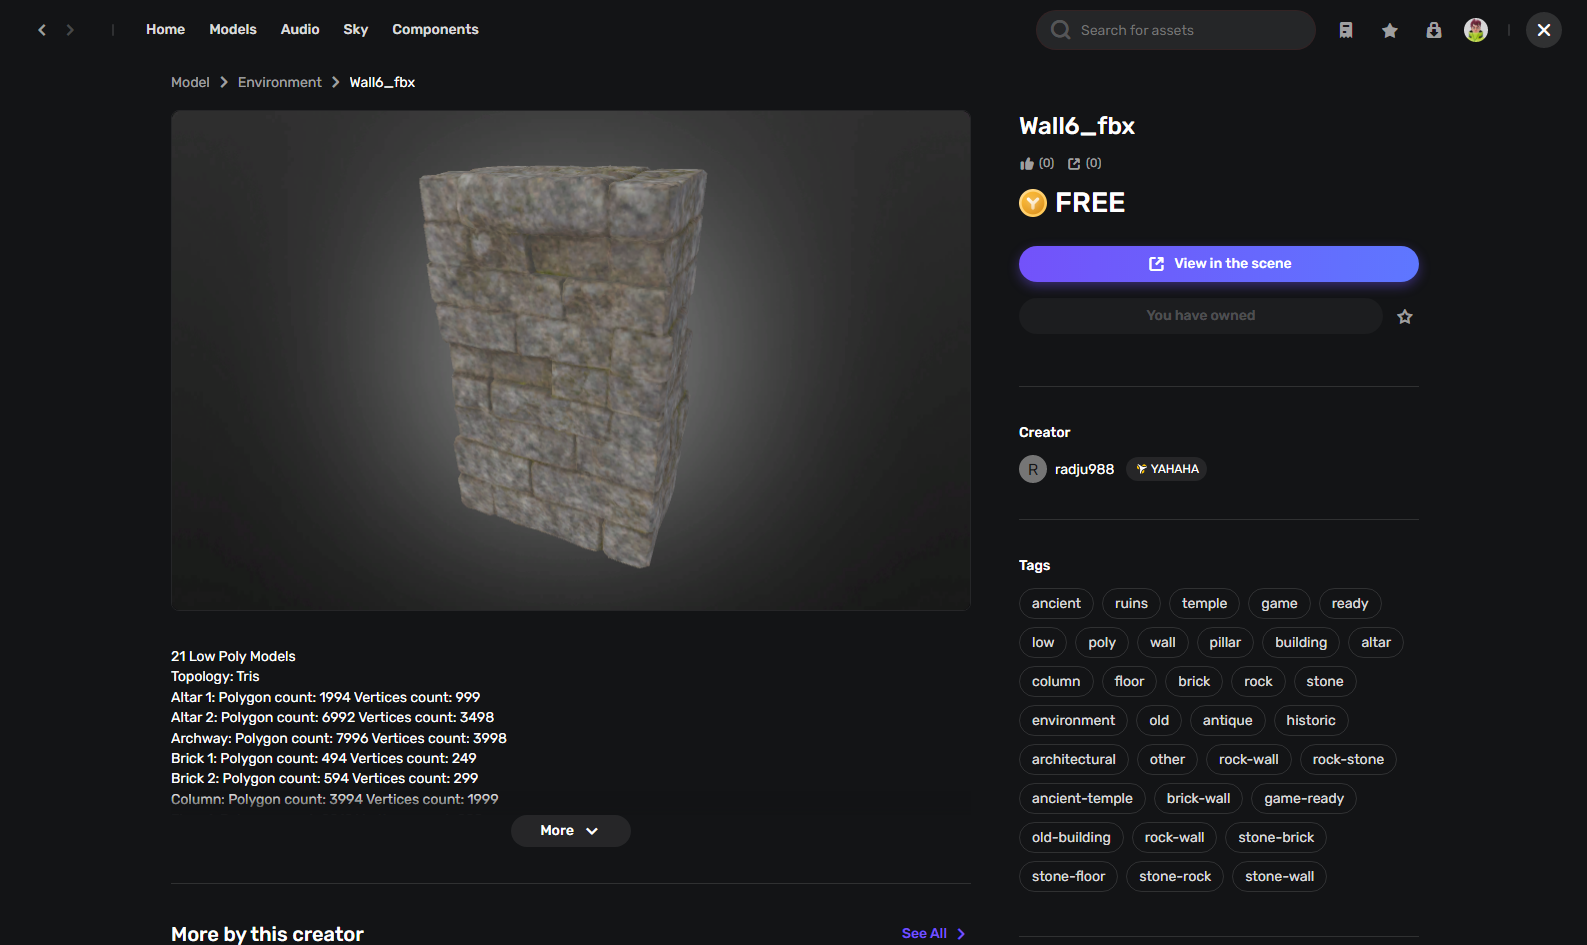
As I wrote a couple of paragraphs ago, I want to mix things up a little this time. Therefore, instead of a hedge maze, I’m going to make a maze out of stone walls. After a quick search of the Asset Library, I found the perfect wall piece, called Wall6.

Maybe I was too quick to call it “perfect”, because when I bring it into my level, I can’t see it because it’s too small. No problem! I simply open its Transform window and scaled it up by 100 in all directions.

Still, it’s more of a column than a wall. I want to be about four times longer, half as wide, and 25% taller. Unfortunately, it looks too obviously stretched out at 400, 125, 50, so, I’ll leave X at 100 and put together four copies of Wall6 into a single object, that I’ll use for building my maze walls.

To make it less obvious that this wall is composed of four identical columns, I rotate every other one around its Y axis by 180 degrees. Next, I select each of the four Wall6 objects and right-click to open a menu for grouping them together into a single group. Its default name is Yahaha Group, but I right-click again to rename the group “Maze Wall”.

Unlike when I created the Hedge Maze, I planned this maze out on grid paper first, but I’m not ready to reveal everything to you yet. All I’ll say for now is that the basic structure of this maze will be a 4×4 grid of sections made out of 9×9 Maze Walls. I lay down the perimeter first and then fill in the rows and columns defining each section.
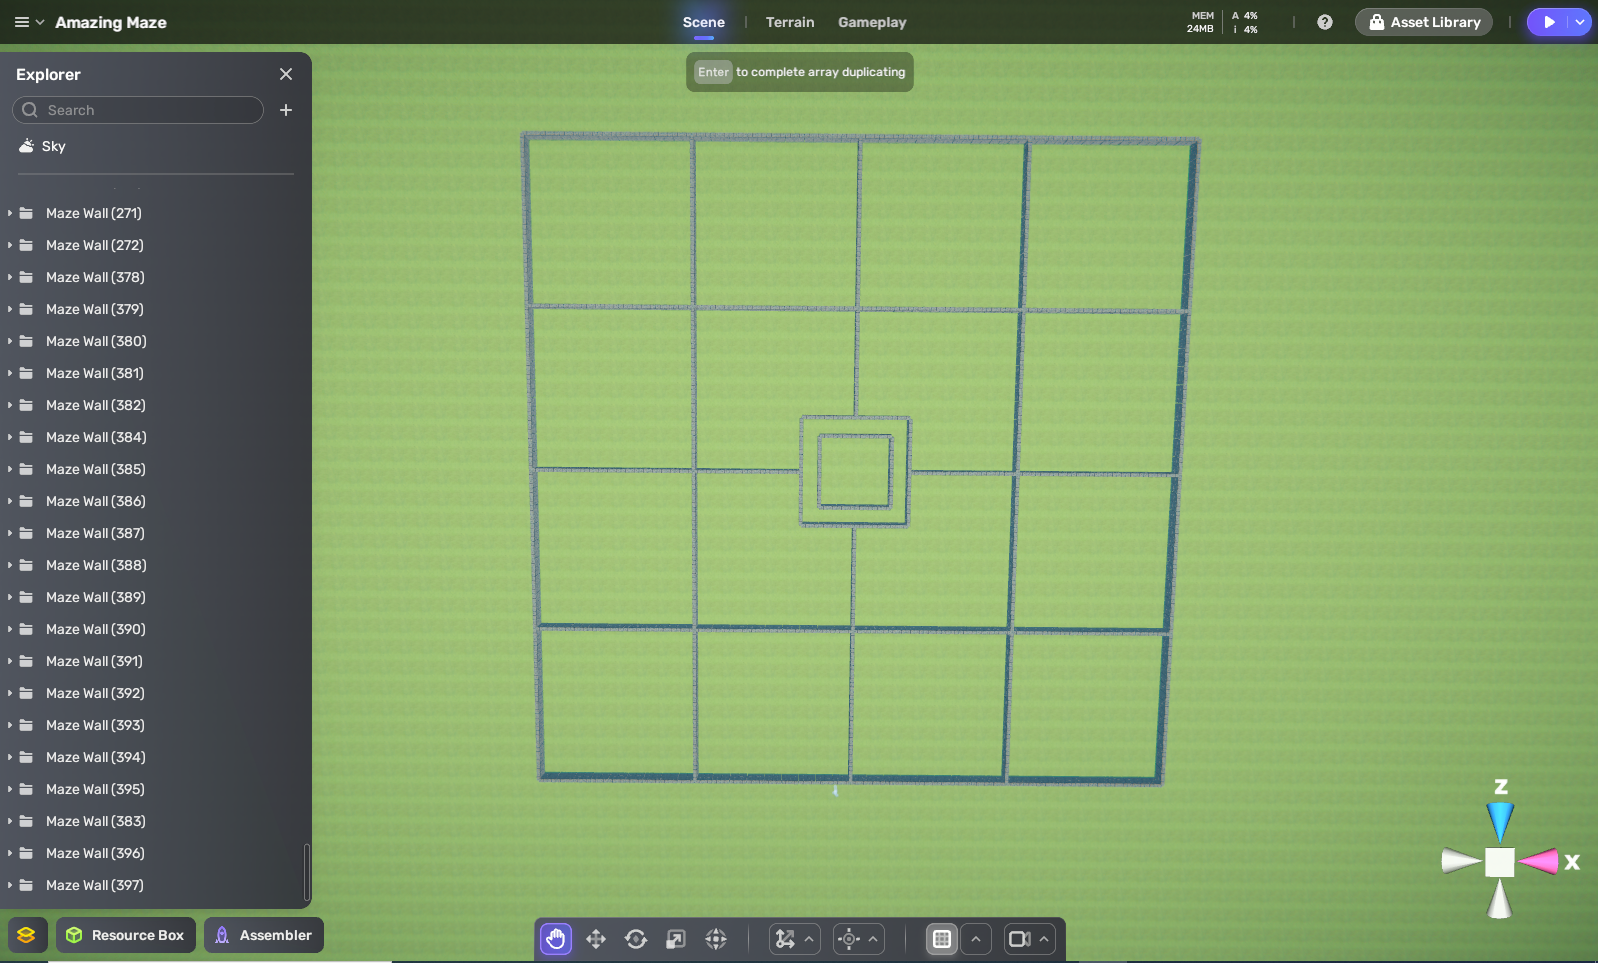
At the center, I put in a 4×4 square withing a 6×6 square. Later (much later), I’ll explain how I’m going to use this central structure.

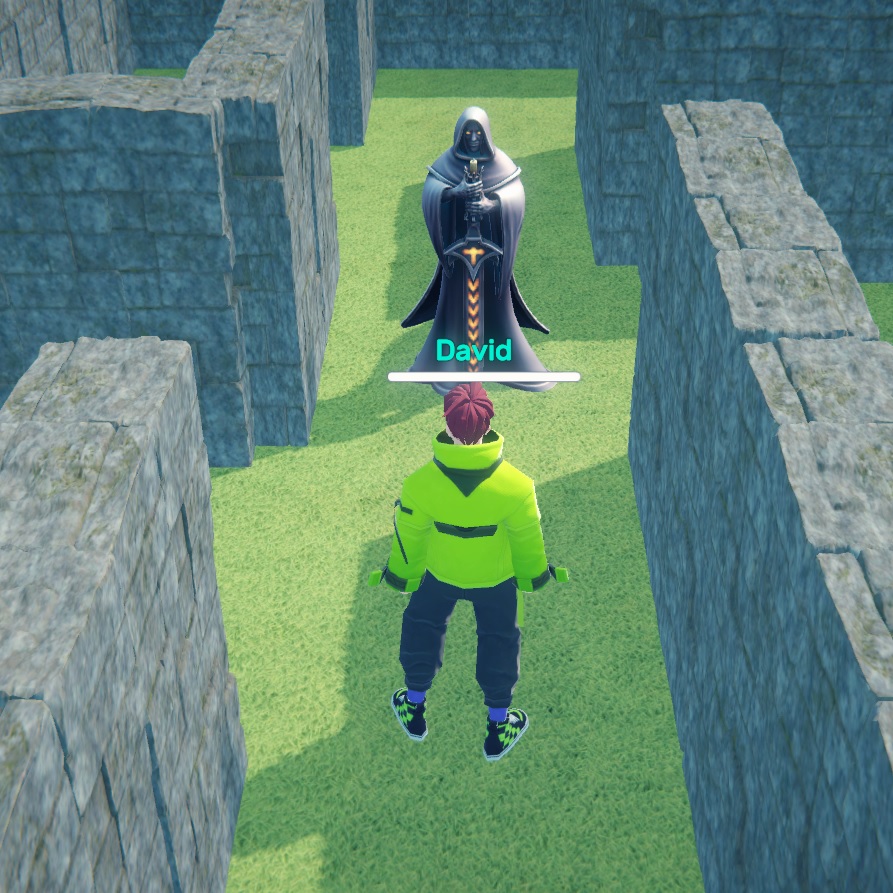
Here’s where the fun begins. I removed a wall from the far-lower, mid-right section of the maze. This gap will be the maze’s entrance. As I did with my Hedge Maze, I place a greeter character at the maze’s entrance to give the player some initial instructions and set the mood. Now, I want this to be a more magical experience than my Hedge Maze, so I choose an object named SM_Char_Mage_01 from the Asset Library. I give this object a Character (NPC) Component and name the NPC (for non-player character) “Maze Mage”.
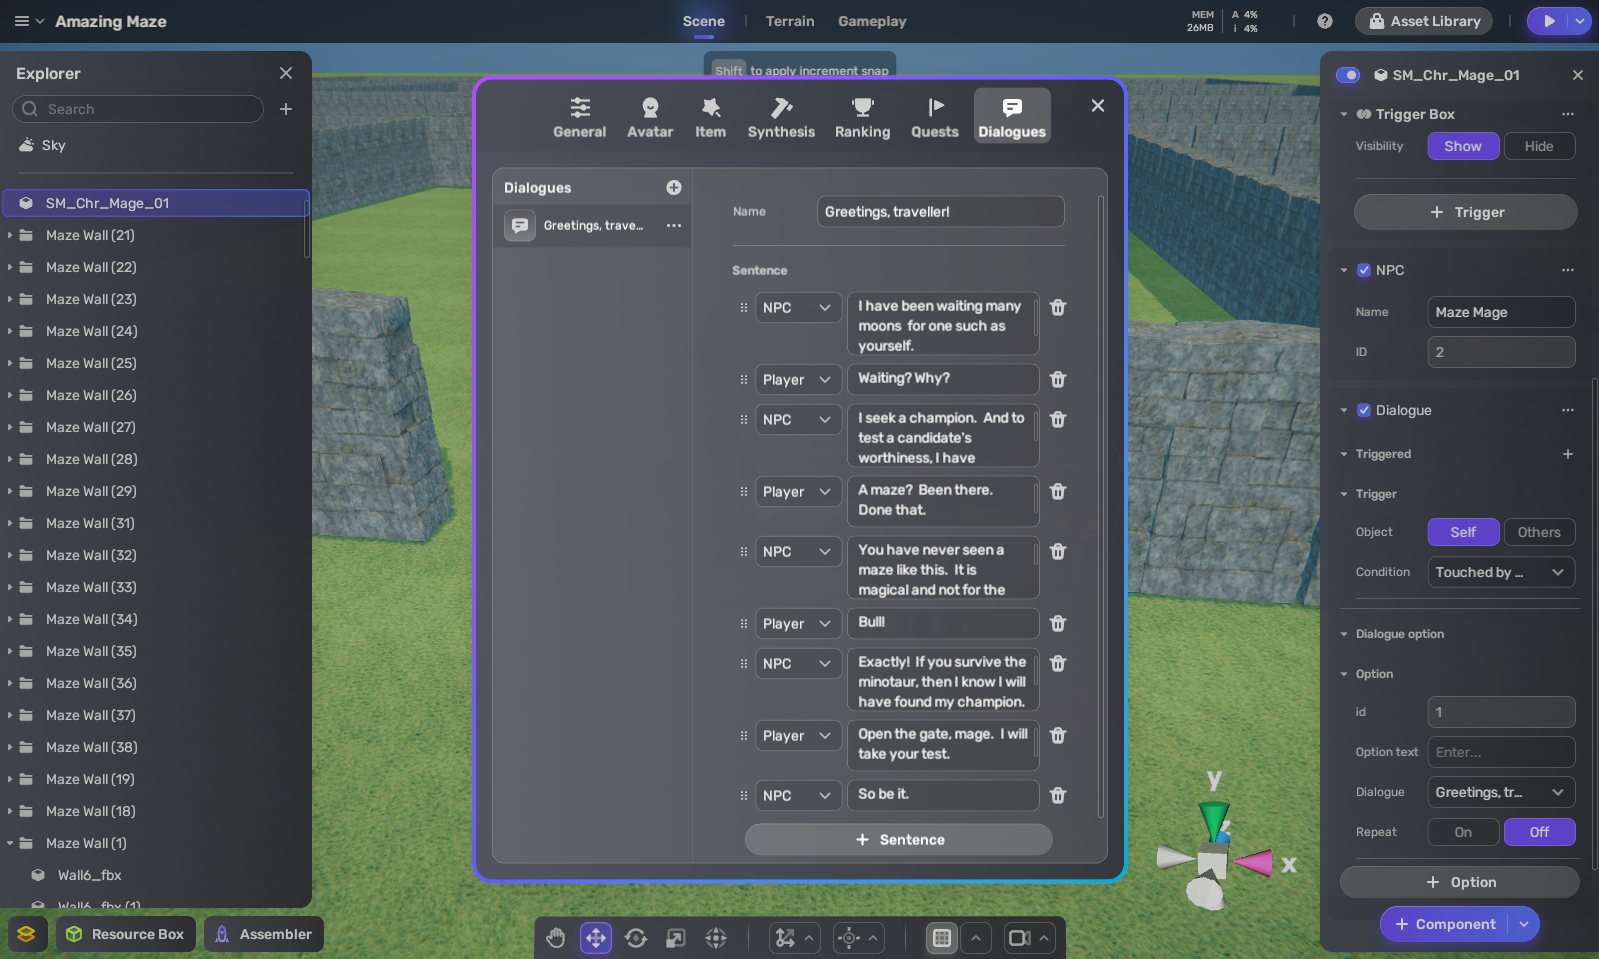
The NPC is supposed to be a greeter character, so he’ll need some greeting dialogue to have with the player. I click on the Gameplay tab, select Dialogue, and write a short conversation, which I name “Greetings, traveller!” Next, I give my Mage character a Dialogue component that players “Greetings, traveler” when the player’s avatar touches the NPC.

Once their conversation is over, I want a gate to open, allowing the player to enter the maze. After a few minutes searching the Asset Library, I find a fancy-looking gate named, appropriately enough, SM_Bid_Gate_Fancy_01. What I like about this object is that it revolves around its Y axis not in the center, but on the gate’s left side. This will allow me to use a component I haven’t tried before: Rotate. I will have the gate rotate clockwise 60 degrees when the “Greetings, traveler!” dialog with the Maze Mage is completed. But that’s only half of the gate. I duplicate the left gate and then rotate it 180 degrees to be the right side of my gate. However, the right gate (being a “backwards” version of the left gate) will rotate anti-clockwise 60 degrees when the dialog is completed. This will cause both gates to swing open toward the player and allow the player to enter the maze.
That takes care of the visuals, but never underestimate the importance of audio in a game. I give both Gate objects an audio file from the Asset Library called Metal Foley Creek 8. This sound effect is 3 seconds long, so I make sure that each Gate’s Rotate action is 3 seconds long as well, so that the audio matches the visuals.

With the Mage and Entrance gate now in place, I create a maze in the Far-Lower, Mid-Right Section using same technique as I did for creating the maze in Hedge Maze, but this time the exit is on the right side of the maze so that it leads to the Far-Lower-Far-Right Section. I then put in two new gates that are triggered by player touch to open 90 degrees. I set the Rotation to be “two-way” so that they will close again after being opened and not block the paths I am about to make next.

I next create another maze in the far-lower, far-right section that leads from these gates to two new gates that open up into the section above. I put these gates inside my maze because I want to train the player to follow the gates, but then I’m going to fake out the player in the next section. Also, so that my sections aren’t just simple squares, I allow the two section mazes to extend into each other by removing two walls separating them, as well as pushing another seperator wall to the left, all while being careful not to open up additional paths that cross over into existing paths.
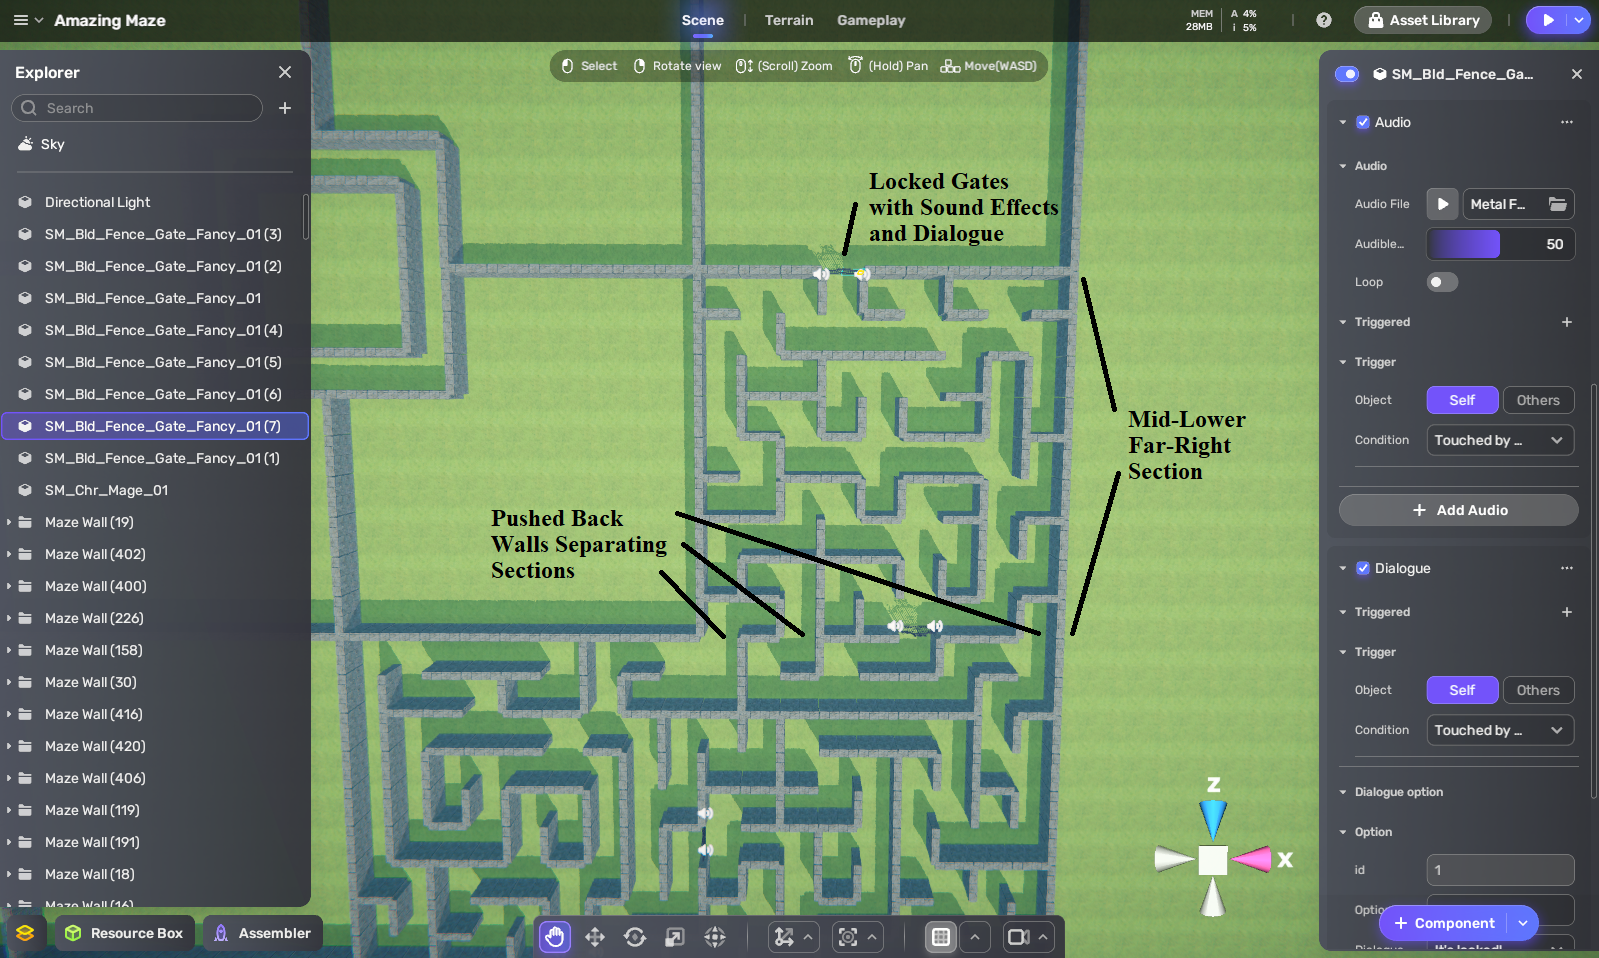
I create a third maze in mid-lower, far-right section leading to a locked gate. This is my fake-out. Not all gates open at the player’s touch. I give this gate a Metal Foley 5 metallic clang audio effect when touched by the player so that player knows it’s locked. I also add dialogue when player touches it, saying “It’s locked! Wait ,what’s on the other side?” What does the player see? That would be telling. You’ll have to wait until my next blog post to find out. So, how does the player get out of this section? That I can tell you below.
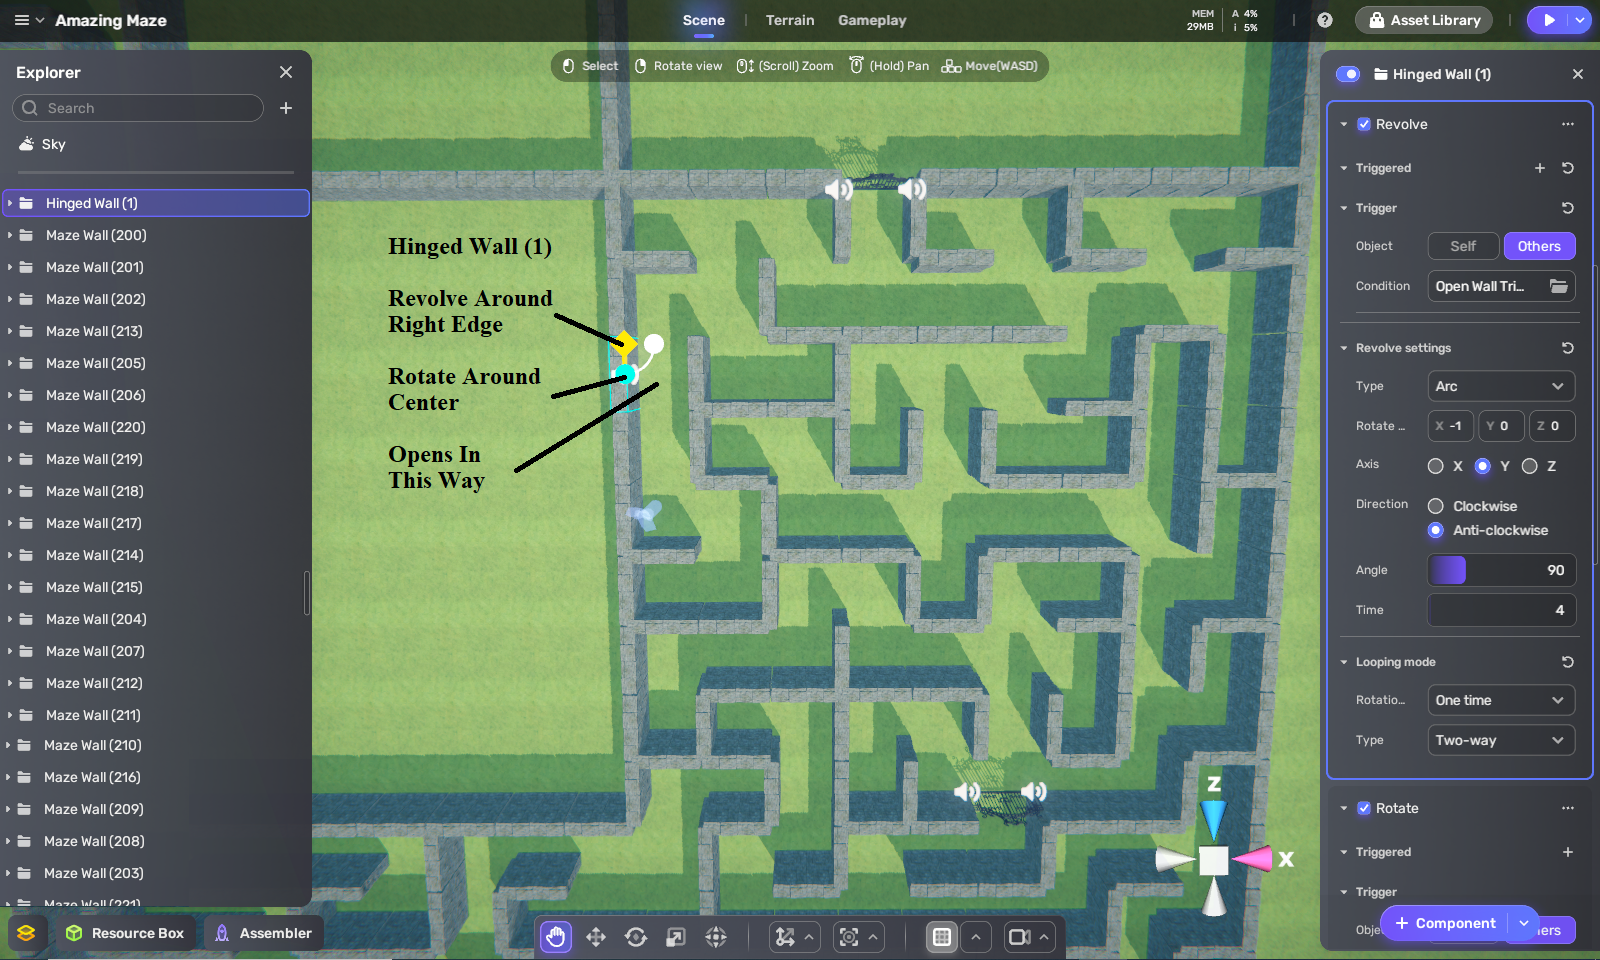
The exit from this section of the maze will be through a hinged wall that behaves like a door. The wall, which I named “Hinged Wall (1)”, rotates anti-clockwise around its Y axis at an arc of 90 degrees, and the rotation type is two-way so that it immediately closes after opening. Now, if I leave it like that, the wall will just rotate like a turnstyle, but I want it to behave more like a door on a hinge. So I also have the wall revolve anti-clockwise at an arc of 90 degrees around a point at the wall’s right edge (when viewed from inside this section’s maze), which required me to set the X value of the rotation to -1. In addition, I have the opening wall play an audio effect called Rock Rumble 8. This sound effect is 9 seconds long, so I set both my Revolve and Rotate time to take about half that long (4 seconds for open and 4 seconds for close, with 1 second to spare for the end of the sound effect).

While I initially trigger the wall’s Revolve and Rotation to occur at game start so that I could put my Respawner Point next to it and watch the wall open in-game to make sure my settings are correct, that’s not how I want it to ultimately work. Instead, I want the Hinged Wall to open and close after the player walks past it. So I gave a Trigger component to a nearby wall to its left (which I named “Open Wall Trigger (1)”) and made the center and size of the trigger area such that the player would be able to enter the trigger area only from the passage next to the hinged wall passage.
I then set Hinged Wall (1) to revolve and rotate when the player enters the trigger area. Both actions are set to two-way, so that the wall will automatically close after it opens. I only want the player to be able to enter the trigger area from the passage next to the hinged wall passage. So, the hinged wall will open when the player opens past it. If the player hears the rumble and turns around in time, they will be able to go through the opening before the wall closes again.
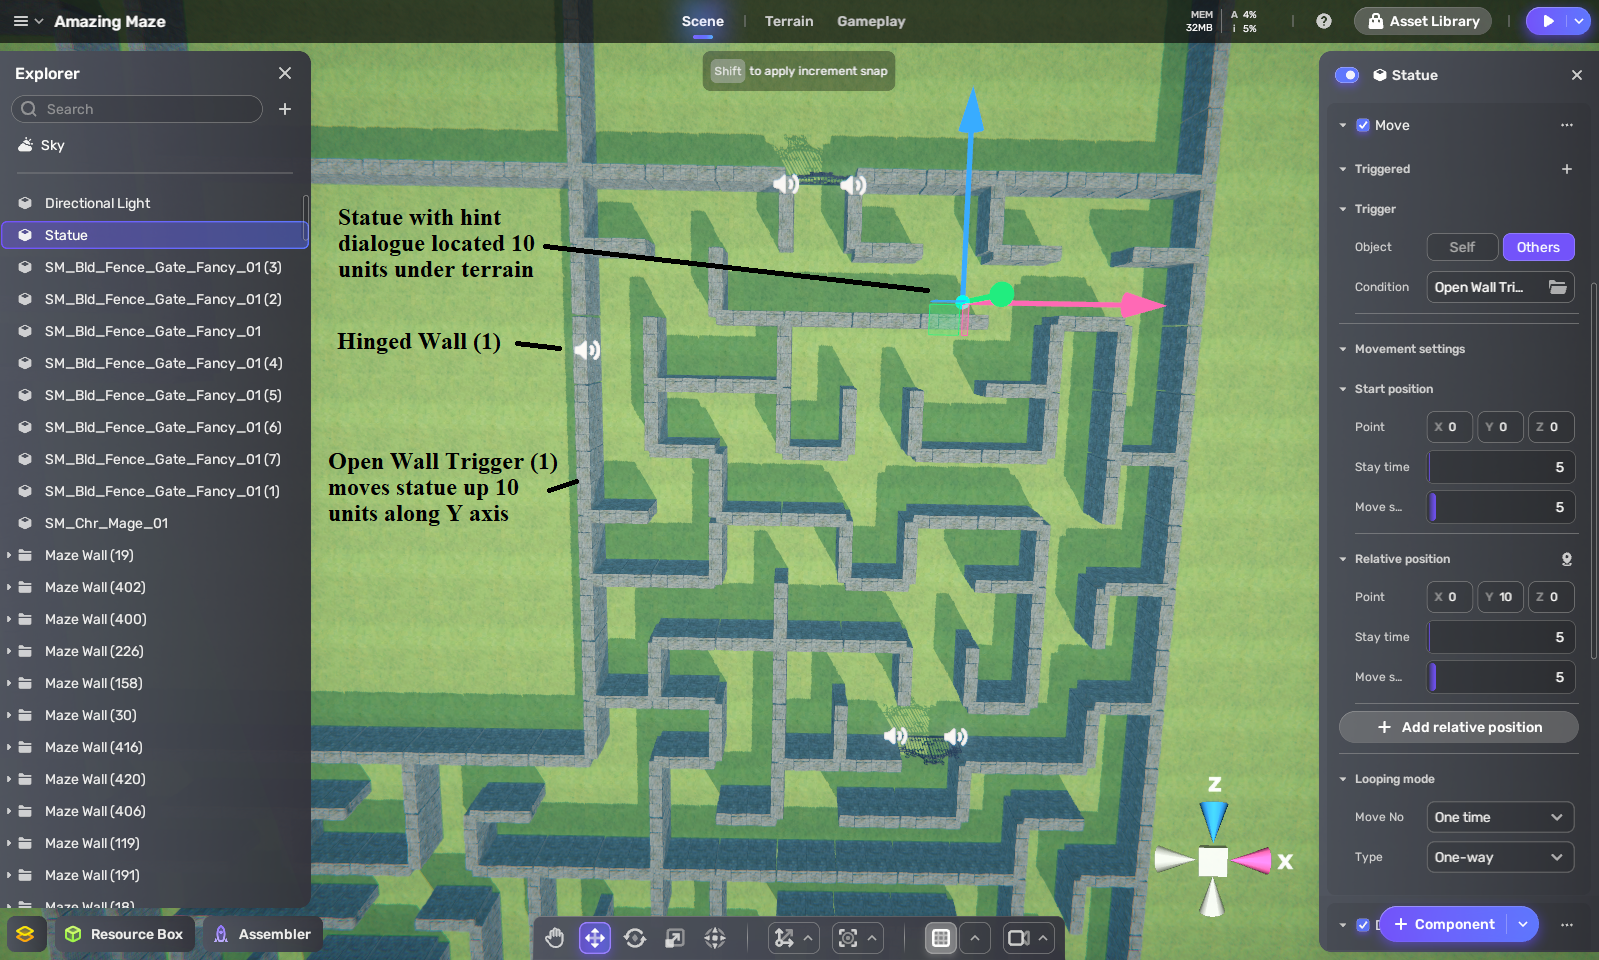
Since this is early in the maze, I want to give the player a hint to listen for moving walls in case they didn’t notice the Hinged Wall opening and closing behind them when they passed by it. I decided to make the hint come from a talking statue, and I want to have the statue block the player from leaving that part of the maze section so that the player can find the Hinged Wall.
Of course, I can’t have the statue blocking the path leading toward the Hinged Wall when the player first approaches it, so I place the statue at Y=0, where it will hidden under the terrain as the player enters the maze. When the player exits Open Wall Trigger (1)’s trigger area, it will activate a Move component in the statue. The default settings of the Move component will move the statue up along the Y axis 10 units, which will place it right on top of the terrain so that the player will see it if they try to leave that section of the maze.
When the player avatar touches the statue, it will trigger a dialogue with a hint about listening (for the opening Hinged Wall). This hint should allow the player to find the moving wall more easily and then go into the next section of the maze, which will be… covered in my next Amazing Maze blog post, along with the use of teleporters, moving stairways, hidden doors, collectible items and additional elements to make this maze more magical. And don’t forget, the Minotaur awaits at the end!
Note that you already have learned more than enough to start making your own 3D games using YAHAHA Studio. In fact, you may even be ready to participate in the YAHAHA Global Game Jam taking place January 30th through February 5th, with a $15,000 prize pool. You can find out more by click on this link.
Posted on January 5, 2023, in Game Design, Game Education and tagged game design, Yahaha. Bookmark the permalink. Leave a comment.


Leave a comment
Comments 0