YAHAHA and the Amazing Maze, Part 1
I have always been captivated by adventure games, and it’s no mystery to me as to why. They combine two of my favorite things — storytelling and puzzle solving. Some of my favorite games in this genre are The Hitchhiker’s Guide to the Galaxy, Grim Fandango, and Myst.
It was my love of storytelling that sent me on my career in game development. While I was taking an introductory programming class in college and waiting in the computer lab to use the shared printer to print out a copy of my homework, I started coding a Star Trek game. As I was deciding what actions the player should be able to do in the game, it struck me that players were the protagonists of an story that they were telling by the choices they make.

The idea of interactive storytelling was so exciting to me that I changed my major to computer science. The following year one of my instructors hired me as a clerk in the computer store he owned, and it was there that I met the founder of a software company called Edu-Ware Services, which I joined as a game designer and programmer after I graduated. One of the first games I made at Edu-Ware was an adventure game that went on to become sort of a cult classic, The Prisoner.
My fascination in puzzles predates even the first video game consoles. As a child I was constantly filling out puzzle books and crossword puzzles, solving physical puzzles like sliding puzzles and the Soma cube, and collected puzzle boxes that contained secret components discovered by sliding sections of the box in the correct order. It was my love of puzzle solving that made game design so interesting as a medium for storytelling.
What I am now going to do is take you on a journey through the process of designing video games. So that we can focus on the creative aspects of game design without getting distracted by technical challenges, I am going to use a powerful new low-code 3D game development platform called YAHAHA Studio for creating game examples. You can download a free copy of YAHAHA Studio at this link so that you can follow along with me.
Movement is unquesitonably the most common action performed in games, so I will start our game designer journey with a puzzle based on movement. Specifically, I’m going to create a navigation puzzle known as a maze. Now, it shouldn’t surprise you that I’ve always been fascinated by mazes, too, and I used mazes as the heart of my first adventure game, The Prisoner, as well as another adventure game I developed afterwards, Empire I: World Builders. I used an AI regression algorthim to randomly generate mazes in those games, but in this first step on our journey, I’m going to go old school and create a maze by hand, albeit a virtual hand.

I’ll begin by selecting the Base Template in YAHAHA Studio and call my new project “Amazing Maze, Part 1” (spoiler: there’s going to be a Part 2). The first thing I will do is create a grass terrain, because this maze is going to be a hedge maze located on the grounds of a hoity-toity estate. I will keep the terrain defaults at 500×500 with an origin of 0, 0, 0.
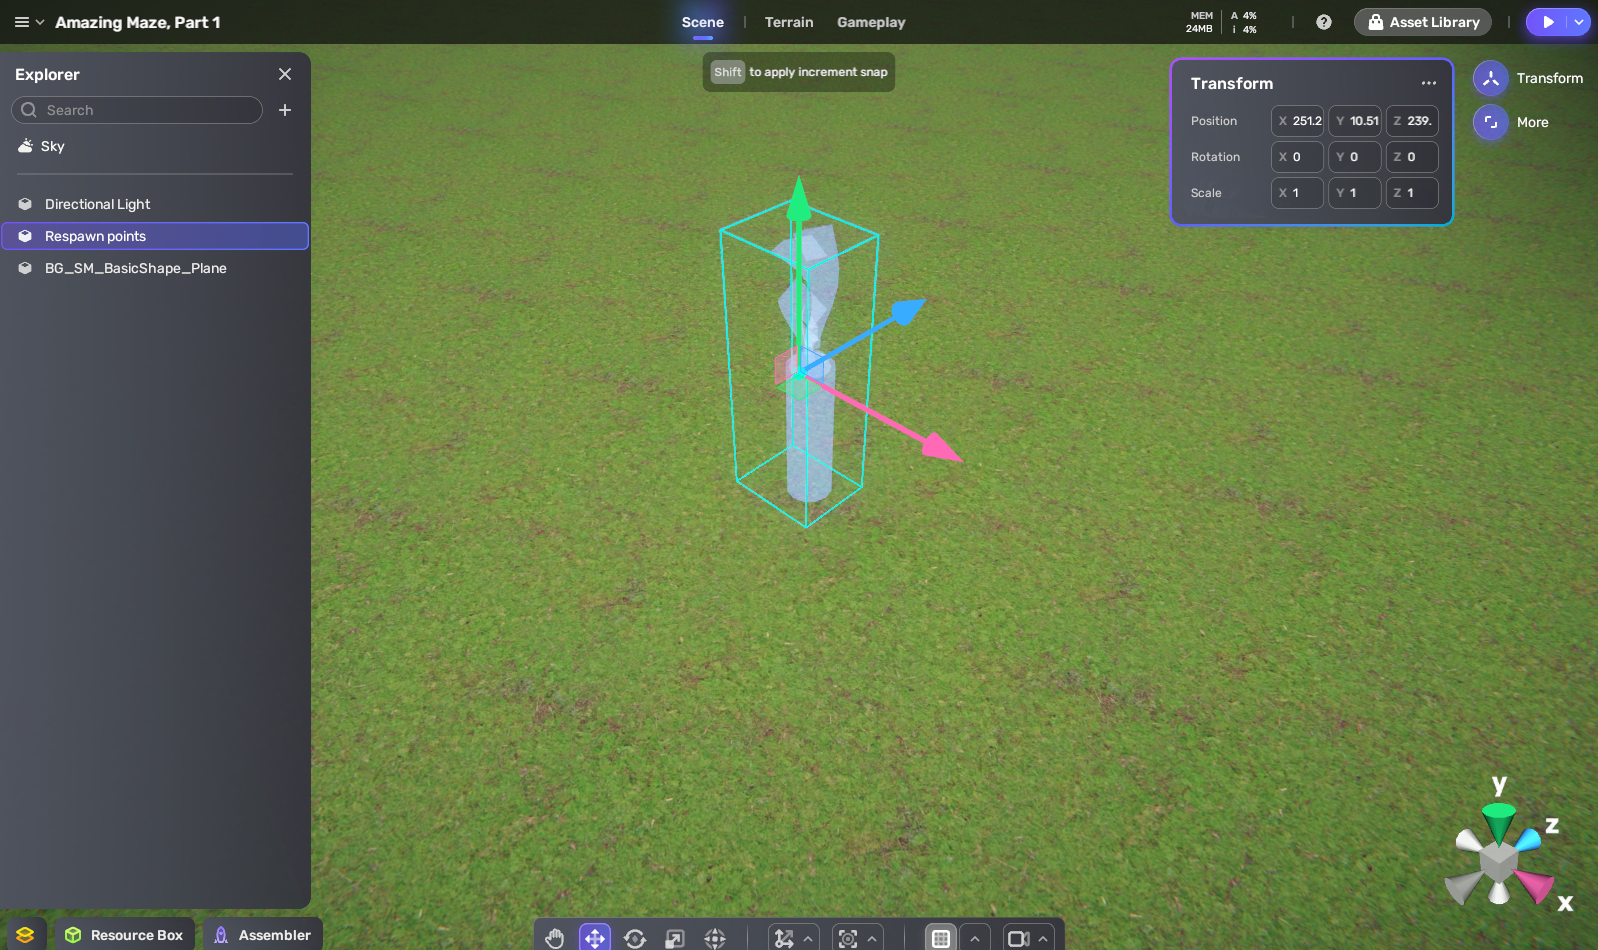
Next, I’ll place my Respawner (which determines where my avatar will enter the level), right in the middle of the terrain, where I’m going to build my hedge maze.
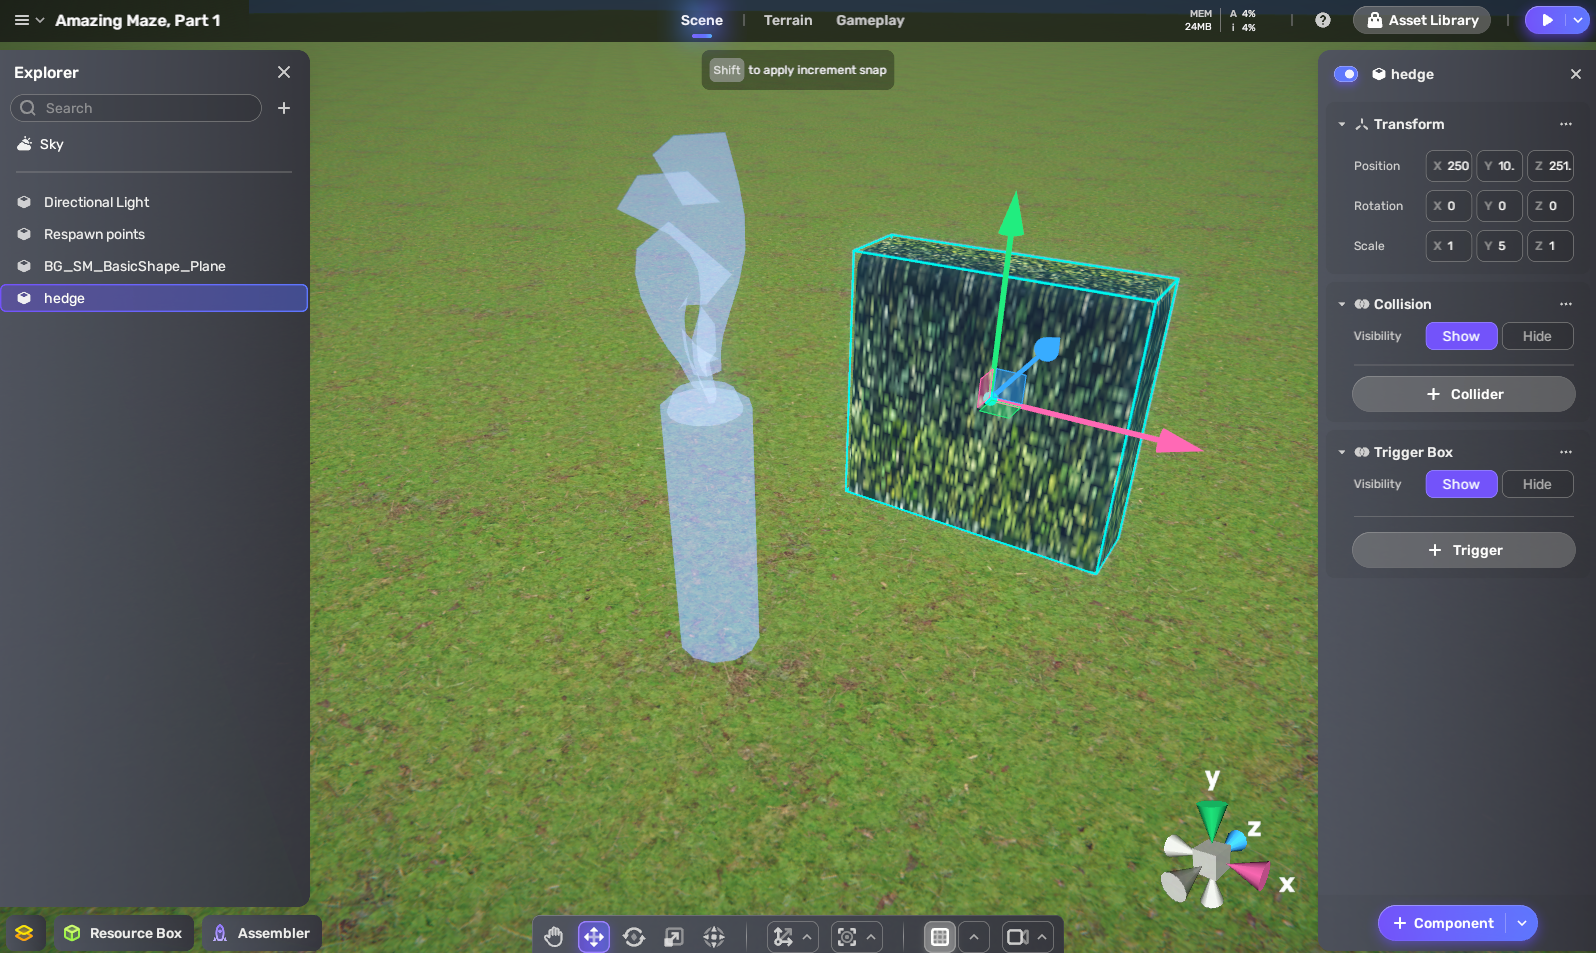
Of course, to build a hedge maze, I’m going to need a hedge. Fortunately, YAHAHA Studio has lots of assets to choose from in its Asset Library, and I quickly found a nice little hedge to add to my Resource Box. However, it’s a little bit too little. I don’t want my player to see over the top of the maze too easily, so I scaled it upwards along its Y axis by a magnitude of 5 using the Scale tool, so that it will be just above my avatar’s head.
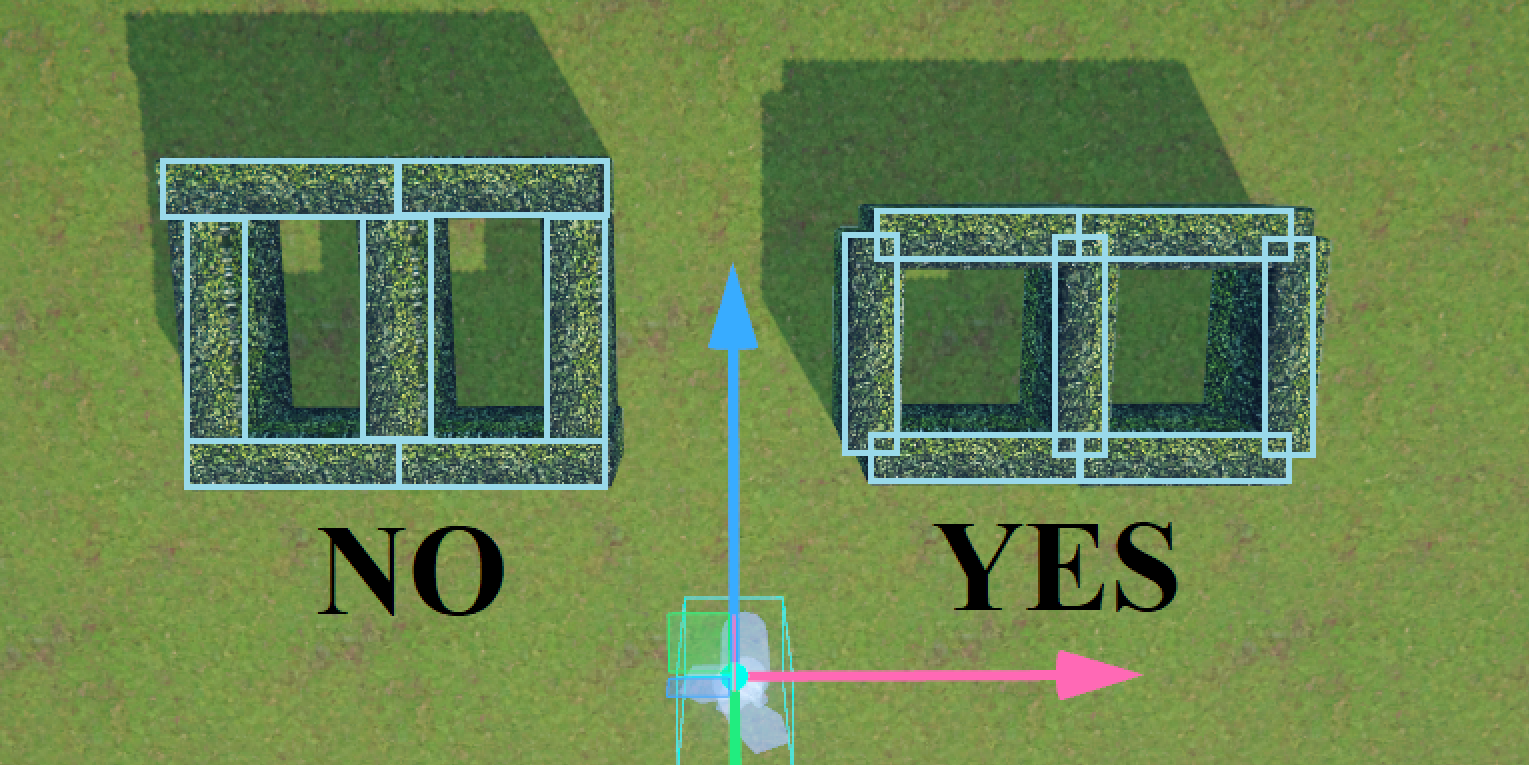
As I begin laying out my maze’s rows and hedges, I want to make sure that I place them so that I end up with a maze that has a proportional length and width. Instead of placing the face of the row hedges against the side of the column hedges, I will center the row hedges on the sides of the column hedges. This will leave my maze with jaggy corners, but I can fix that later by scaling up the length of individual hedges later so that they cover the gaps.

After I place the first of the hedges for each of the maze’s rows and columns, filling in the rest of the maze is easy thanks to Array Duplicate. This feature allows me to select on hedge and then drag it along the direction in which I want duplicate hedges to be placed. In no time at all, I have a grid of hedges.
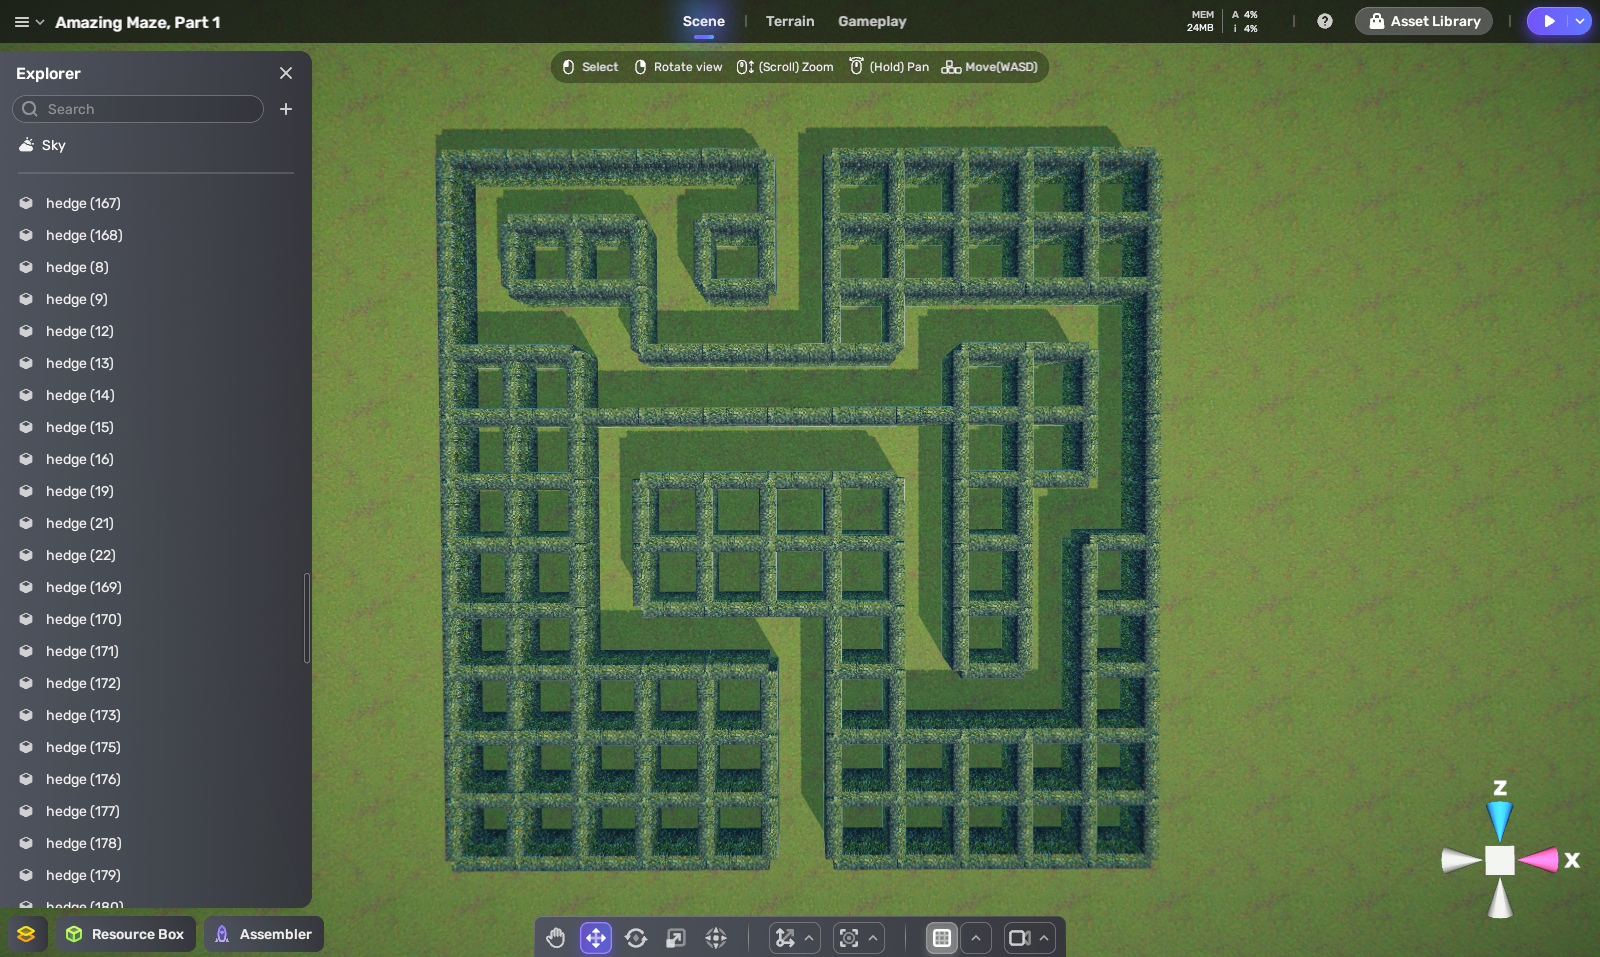
Now to actually make my maze. A puzzle is a problem that has only one solution, while a maze is a naviation puzzle that has only one path from the entrance to the exit, making it different from a labyrinth, which is a complex network of paths that may have many ways to go from the entrance to the exit. For this maze, I will have the entrance be at the bottom center and the exit at the top center, and I will create a path leading from the entrance to the exit, being careful not to cross over my path at any point and inadvertantly creating multiple paths.

Of course, we now need some alternate paths so that the player does not know which path is the correct one. At various points along the solution path, I make a new path that does not cross into any existing path, until I can’t make that new path go any further.
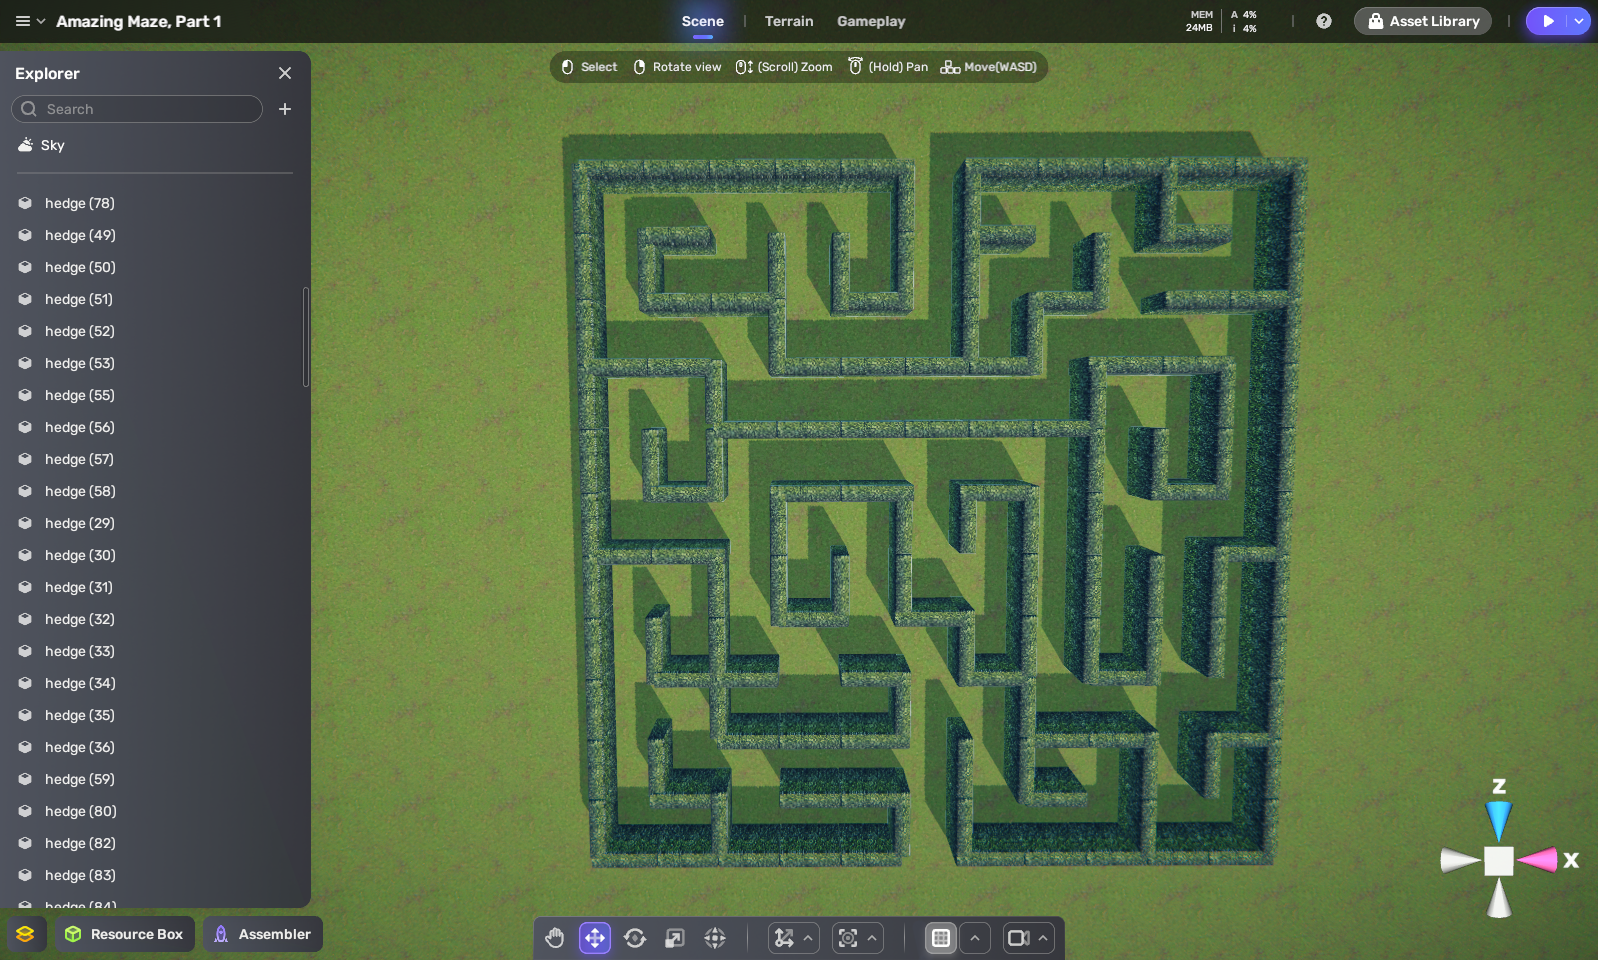
I continue adding paths until I can add no more, and then my maze is done! Well, not quite. I scaled some of the hedges lengthwise to fill in the gaps I had at corners.
Now, I know what you are thinking. Why didn’t I just make a maze on graph paper and then lay down only the hedges I needed for wall? I guess I find this way to be a little more fun and perhaps easier to make sure that all of my hedge walls are aligned properly. Also, if you’re like me and are a bit rusty at using a 3D editor, this is great practice at placing objects in a 3D space. But hey, if you would rather design your maze on paper first, you do you.

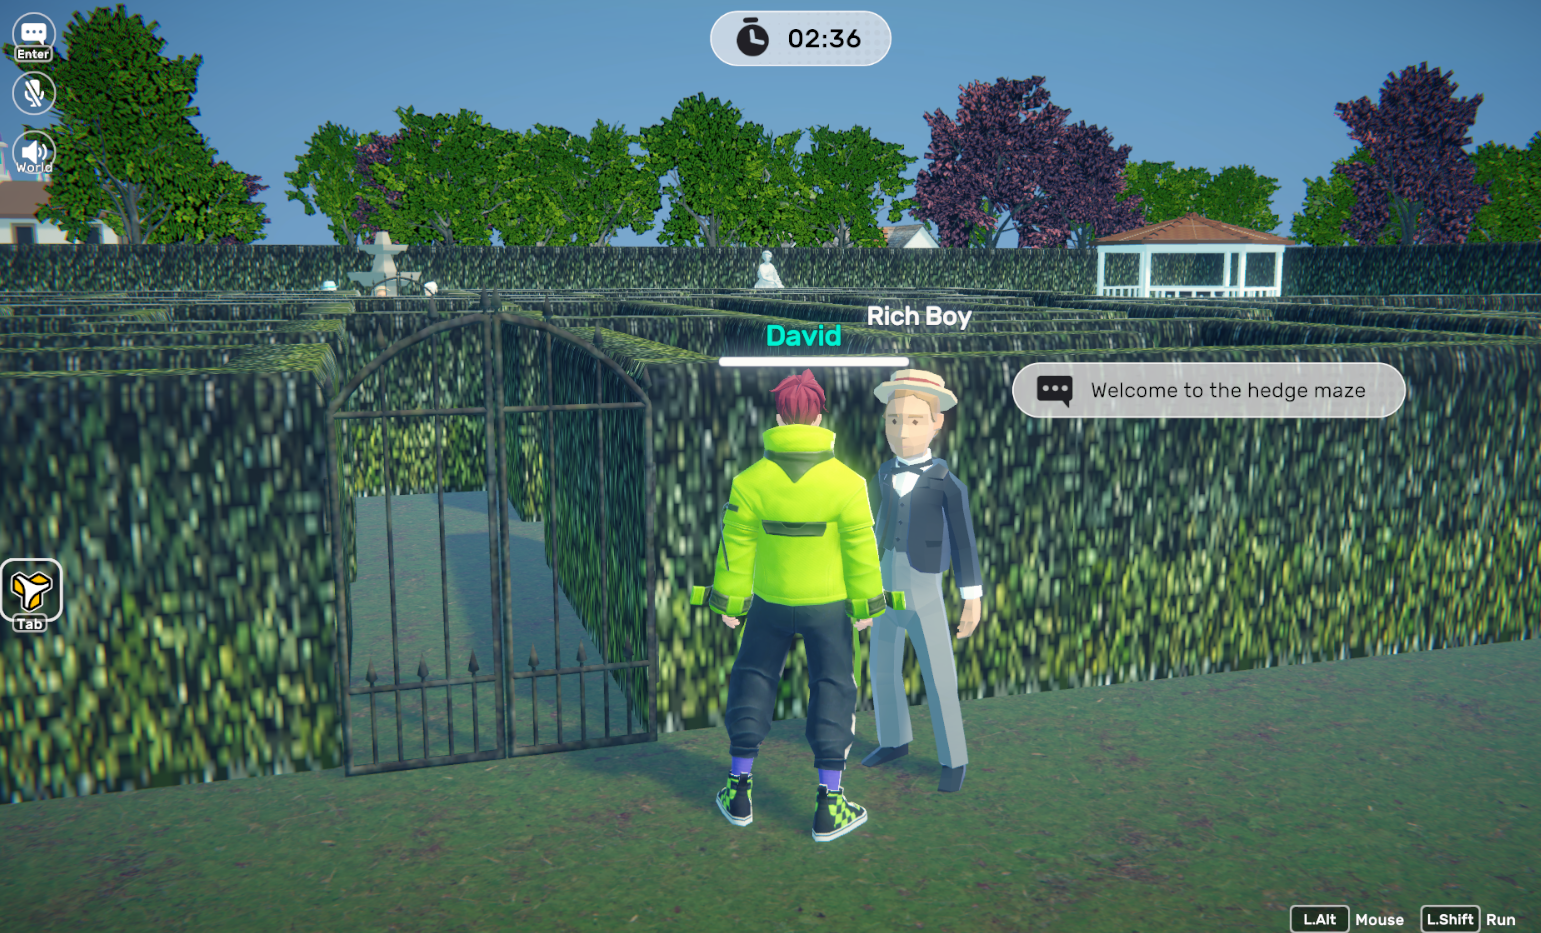
I may have a maze, yet for this to be the start of an adventure game, it needs some storytelling and that means character interactions. I looked through the Asset Library and found a “Rich Boy” character who is just perfect for this fancy estate setting. I then gave him a Character component so that he would become an NPC (non-player character) with a default set of animations. (Don’t worry, he will look more lifelike during actual gameplay, when the animations kick in).

I also gave him a Dialogue component so that it would give him a non-repeating welcome message that I had written for when the Avatar touches him. Dialogues are written in the Dialogue section of the Gameplay pop-up window as a series of sentences spoken by the NPC or the Player. Once you write a dialogue, it can be accessed by any NPC and triggered by a varity of game events.
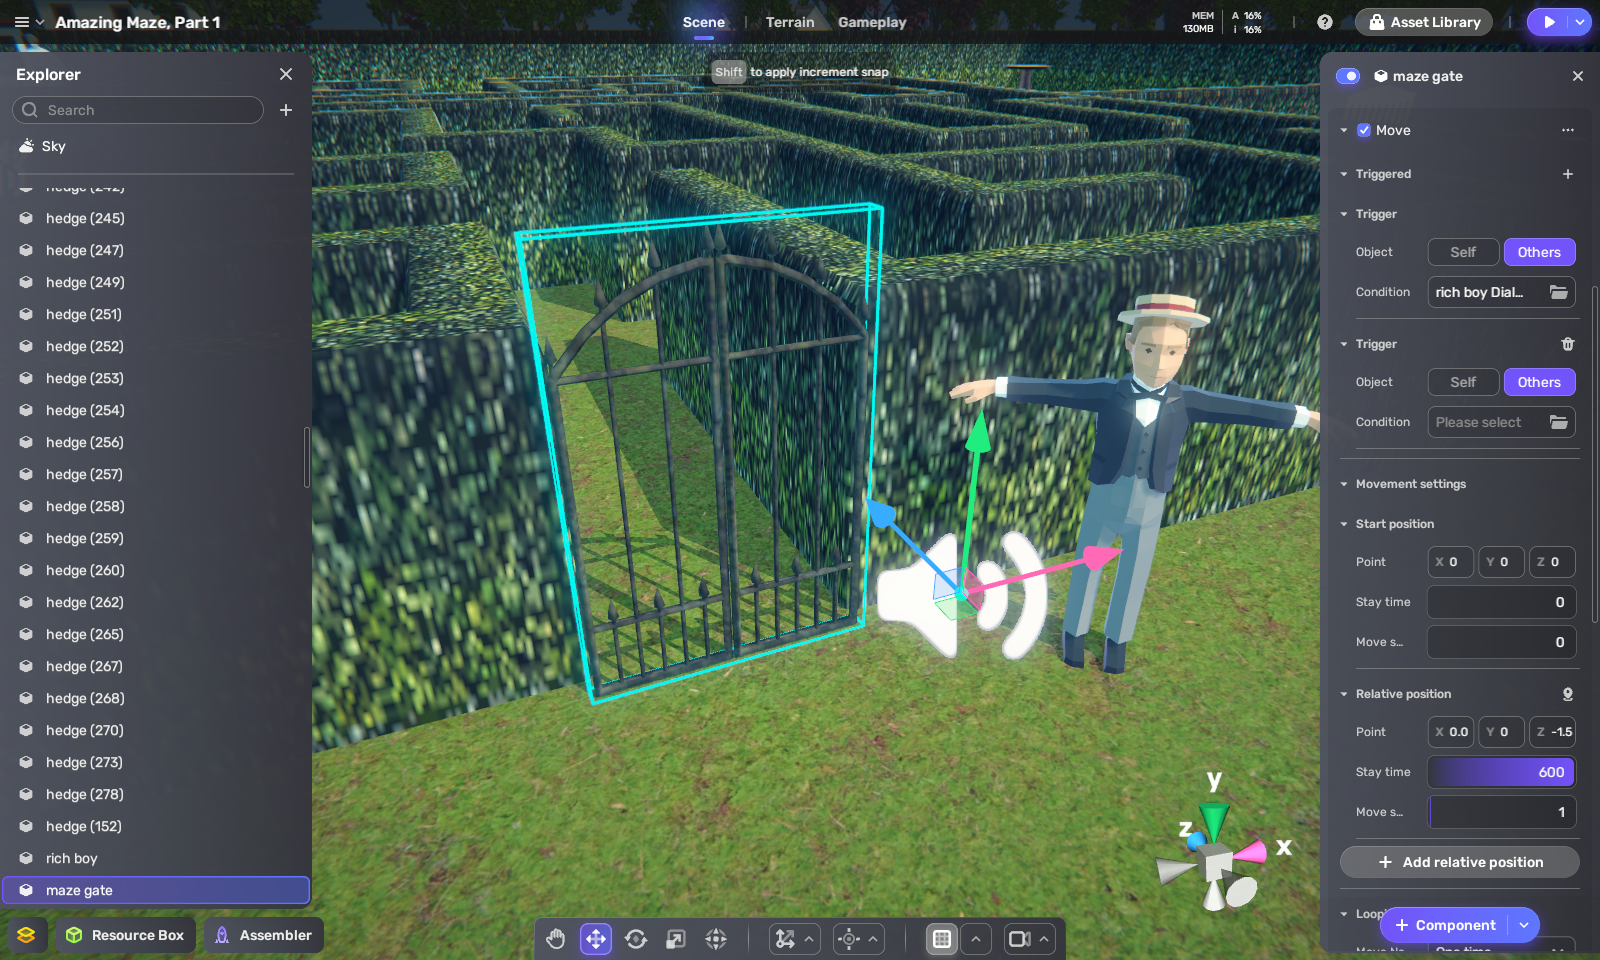
For this short bit of dialogue to be meaningful, I need to have something happen as a result of it. Another check of the Asset Library gave me a gate that I use to block the maze’s entrance. I then gave it a Move component that would move the gate to the right, allowing the player to enter the maze, when triggered by completion of the Rich Boy’s “Welcome to the Maze”. I even have it play a metal squeak audio effect when it opens.

The maze’s exit also needs something special for the player to feel a sense of accomplishment after successfully navagating the maze. I made a duplicate copy of Rich Boy but gave him some congratulatory dialogue with which to greet the player at the maze’s exit. I also placed a couple of rich-looking well-wishers behind him, as well as a fancy fountain to visually anchor the game’s ending scene.

We are not yet done. Even a simple maze game can benefit from soe bells and whistles. I added trees, houses, hedge walls, and other objects to the environment. Also, because one should never underestimate the immersive value of audio, I added background music and ambient sound effects to a couple of objects. To provide some tension to navigating the maze, I set a three-minute time limit in the Gameplay section. Finally, as a reward to players who solved the maze, I put in a little surprise at the end, but you’ll have to play the game to fine out what it is.
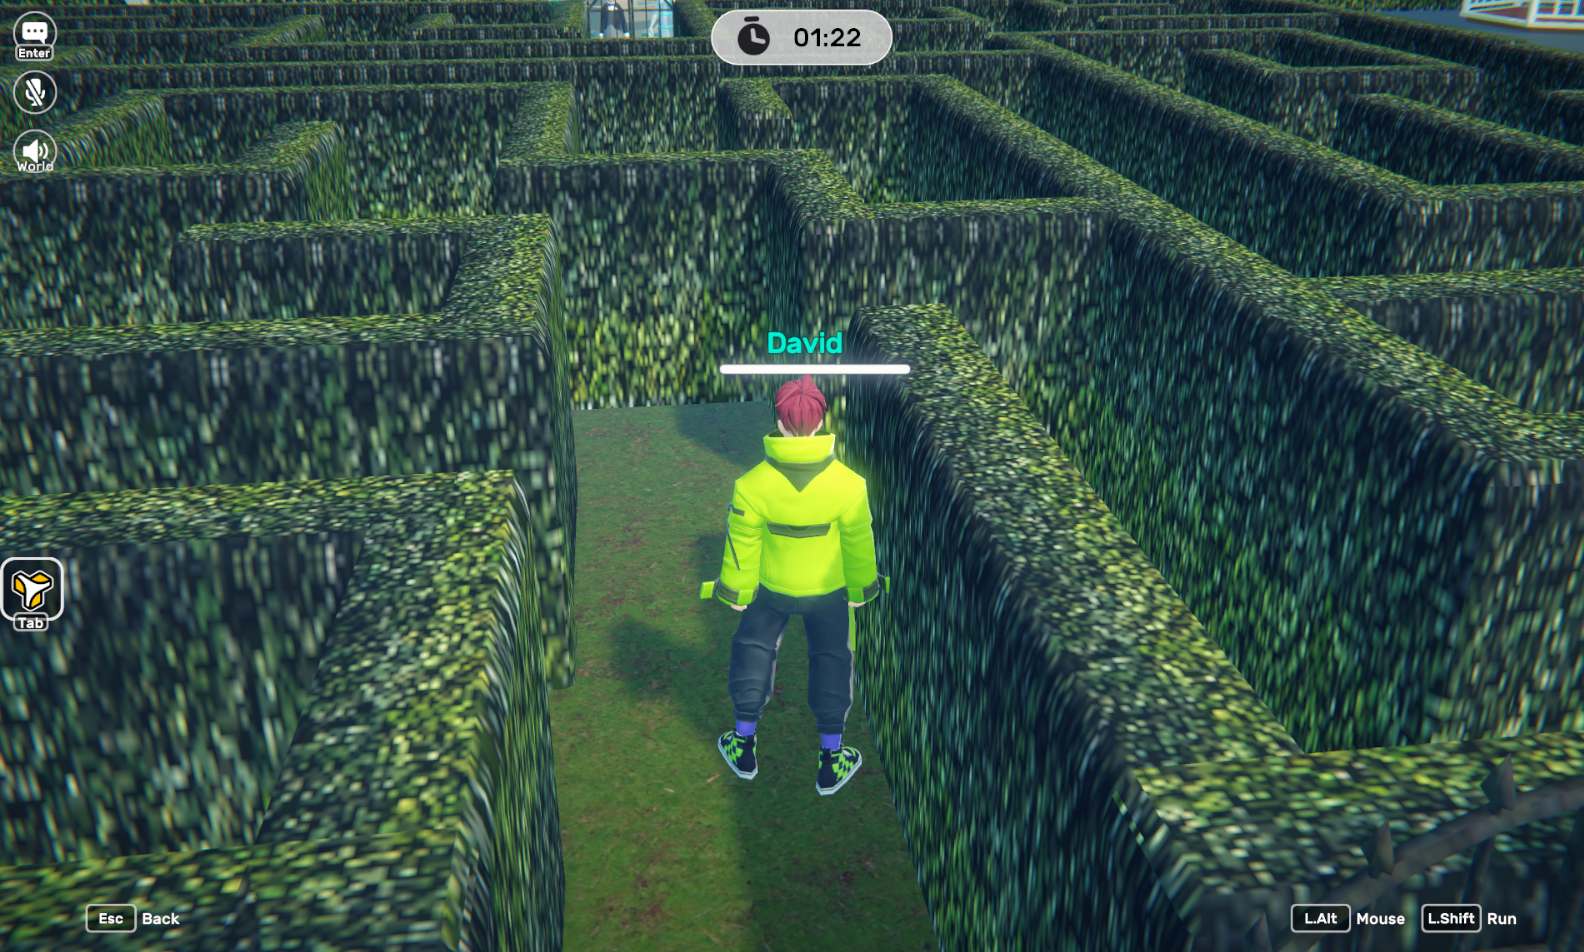
Here is what the final overall exprience looks like:


Did I say final experience? That’s a lot more to add to the maze using YAHAHA Studio components — hidden doors, rotating hedges, moving platforms, collectable items — but I’ll save all that for YAHAHA and the Amazing Maze, Part 2. In the meantime, I invite you to take a stroll through the Hedge Maze.
Note that you already have learned more than enough to start making your own 3D games using YAHAHA Studio. In fact, you may even be ready to participate in the YAHAHA Global Game Jam taking place January 29th through February 15th, with a $15,000 prize pool. You can find out more by click on this link.
Posted on December 22, 2022, in Game Design, Game Education and tagged game design, Yahaha. Bookmark the permalink. 2 Comments.


I’m so happy to see your blog still being active!!! ♥
Thank you! I did take a couple of years off, but I’m getting back into blogging again!