In June 2023, Slitherine Games invited me to Milan, Italy to appear as a guest on their YouTube series The Geek Recipe, a cooking and interview show — it’s a bonkers concept but it works! Slitherine Games was a terrific host for my trip, and I had a great time talking to CMO Marco Minoli about my four-decade-long career in games, all while we were making eggplant parmesan.
Now dinner is served, as the first episode of The Geek Recipe’s second season has premiered on YouTube today. Buon appetito!
In a recent blog post I revealed that I had been working part time as a ride operator at nearby Six Flags Magic Mountain theme park. The winter break between terms at ArtCenter College of Design, where I teach game design courses, was approaching, and I wanted to earn some extra money during the holidays. This part-time job was perfect: it was a ten-minute drive from my home, the hours were flexible, and I’ve been a theme park fan all of my life. What I didn’t realize is that I would enjoy the work so much, I wound up staying with it for nearly a year.
Six Flags did make things too easy. When I applied for the ride operator job over the phone, the representative approved me as a candidate in about three minutes. The next step was an onsite interview with Human Resources. Even though I said I had a commitment to speak at a game conference in Kiev in December, I was hired within the hour. Next was an online course with a trainer at Six Flags headquarters in Arlington, Texas on company philosophy and history, and then a couple of days of onsite training at Magic Mountain about policies and procedures.
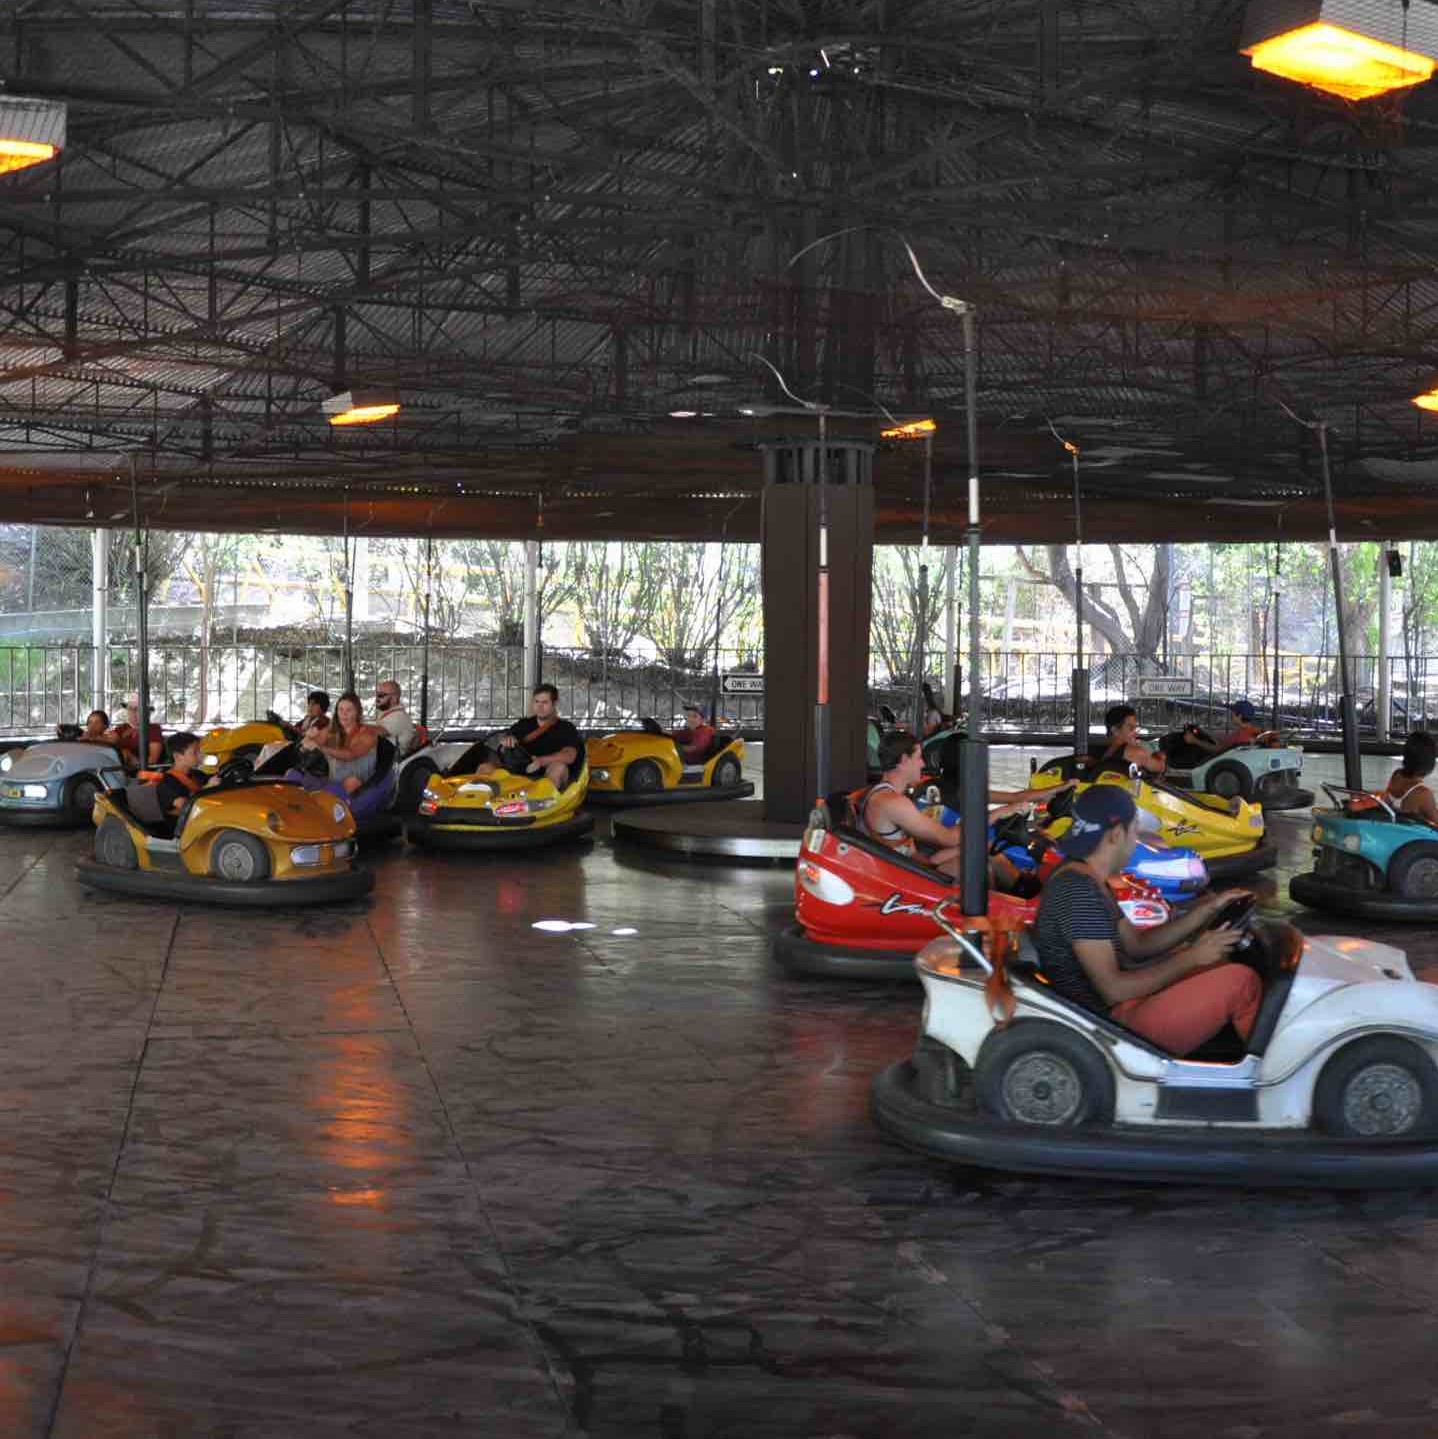
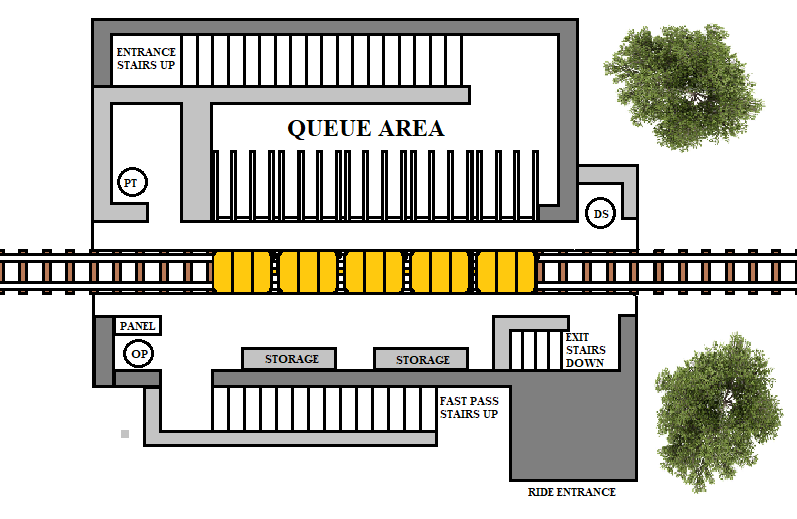
One thing I learned is that Magic Mountain is divided managerially into six areas, and new employees got to pick (or at least request) which area to work in. I requested Area 4 because it had the greatest variety of attractions — the new pendulum thrill ride Crazanity, the (air conditioned!) dark ride Justice League: Battle for Metropolis, the stand-up looping coaster Riddler’s Revenge, the spinning ride Scrambler, and a couple of the theme park’s opening day rides — the Jammin’ Bumpers bumper car ride and Gold Rusher terrain coaster, and I will describe my brief time working on those two attractions today.
Jammin’ Bumpers
This bumper car ride was a sister attraction to Crazanity; that is, Crazanity’s ride superviser also supervised Jammin’, as we called it, and everyone who was assigned to work at Jammin’ that day also spent time working at Crazanity. However, while everyone in our area loved working at Crazanity, not many enjoyed working at Jammin’. This was because Jammin’ required only one employee to operate it, so that meant working alone. However, I loved working on it because I liked being in total control of the guest experience. So did a fellow teammember, Dennis, who was the only rider operator in Area 4 who was about my age.
Ride Operations
Operating Jammin’ was a breeze, and it only took a couple of hours of training to become a “cert” at this attraction. Unfortunately, I didn’t actually get assigned to actually work on Jammin’ until about six weeks after my training ended, but I located a Jammin’ training manual a couple of days before and brushed up on what I needed to know.
Getting it ready in the morning was simple enough. I and another Jammin’ cert would check that the gates leading to secure areas were locked; make sure that Mechanical, Electrical, and Staff had already signed off on the attraction; check that the correct number of bumper cars were on the floor (Jammin’ had a maximum of 20, but most of the time I worked there, only about 16 were operational and the ones needing repairs were kept in storage); reset the last two digits of the turnstyle counter to “00”; and then do a safety ride. It was because of the safety ride that two certs were required to open the ride — one would ride a car (that was usually me — I love bumper cars) while the other made sure the ride would automatically stop using three different methods: turn off the panel key, pushing the emergency stop button, or take your foot off the “dead man’s” pedal under the panel. We also made sure the ride area, cars, and queue were clean.
Our shifts operating the ride averaged about one or two hours, although sometimes it was only 15 minutes if we were just covering for someone while we were on break.; A couple of times I did a three hour shift because we were short-staffed; my ride supervisor was usually very apologetic when that happened, but I would remind her that I was one of the few who enjoyed their time at Jammin’.
As I said, I was in total control of the ride experience, and here is the protocol I eventually evolved from I found through trial and error provided the best guest experience. First, I would check to see if there were any private tours or disabled guests waiting at the disabled entrance, and if so, I would unlock the gate and let them in first. (Much to my disappointment, one guest angrily complained to me that I had immediately let in a family with a son in a wheelchair despite the angry guest having waited in line for 30 minutes. Dude, would you really rather trade places with the disabled kid? Count your blessings.)
I would then announce to the guests waiting the queue something like “Welcome to Jammin’ Bumpers! I have 16 cars in need of drivers and riders. If this is your jam, come right up!” As guests came through the turnstyle into the waiting area, I would ask if they were riding alone or with someone else. Once I had enough people for the available cars, I would tell the next people in the queue that they would be on the next ride.
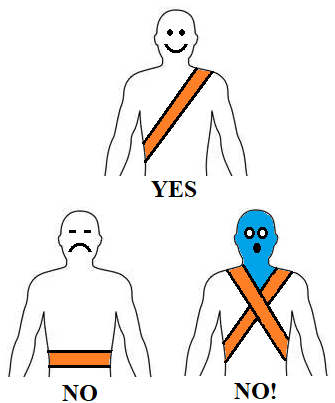
To the people in the waiting area, “How many of you are ready for the most exciting ride at Magic Mountain? Well, too, bad, you’re at Jammin’ Bumpers instead. (This always got a laugh). But I promise you a great time anyway. Before I let you onto the track, here are a few things you should know. If you have anything too large to fit in our pocket — backpacks, purses, souvenier bottles — please place them next to the fence around the track. They can’t go in the car with you. But if it does fit in your pocket, it must stay in your pocket. Use of phones and cameras are not permitted on any Six Flags attraction. Once you get into your car, you’ll find two safety strap attached to the pole behind yout — one per rider. Place one arm through the loop, and pull the other end of the over your head an onto the opposite shoulder so that it goes diagonally across your body. (I showed them using a spare safety strap used for demonstrations, like the safety belt used by airline attendants). Wear it like a sash, not like a belt. Okay, I need to check the height of some of you, so walk through the gate slowly.”
Of course, as I opened the gate, it was the little kids whose height I needed to check who would race through, and I would have to call out “Hey, hey, hey, come back here, please!”. Jammin’ Bumpers has two height limits — you need to be at least 54″ tall to drive and at least 42″ tall to ride. Despite there being a height check at the ride’s entrance, it would always amaze me how parents would wait with their kids in line for 30 minutes, only to have me turn a tearful child away because he or she wasn’t tall enough to ride. This may be due that many of our guests are Spanish speakers, and I suggested to management several times that our signage needs to be in both English and Spanish.
Once they got into the car, I walked to each car, making sure their straps are on correctly and that they put their loose items off to the side. I then walked back to the panel and spoke into the microphone. “Great job getting ready, everyone. I do have a few rules of the road for you before we begin. Jammin’ Bumpers is a one-way street, so drive only in the direction of the one-way arrow signs posted around the track. Head-on collisons are not allowed, but you can bump each other from the side and back as much as you like. Keep your arms and legs inside the car at all times — so no high-fiving each other, picking up a hat you dropped on the track, or pushing off the side of the track with your foot if you’re stuck. If you are stuck, just keep turning your steering wheel in the same direction until you get going again. If you need me to stop the ride for any reason, put one hand in the air and the other over your mouth. All right, enough talking. Let’s… get… this… jam… started!”
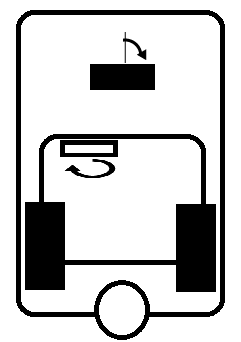
Yeah, that’s a lot of instructions for a three-minute ride, but it was all necessary, so I tried to at least make it somewhat entertaining. Once I started the ride, the cars would start up and the music would play (there was a loop of about six upbeat songs). I would clap with the music while keeping an eye out for any problems. The most common problem was riders getting their car stuck on either the center or outer curb of the ride area. This happened because steering a bumper car does not work like steering a regular car. Instead of the steering wheel turning two front wheels a limited arc either right or left, it would turn a single front wheel a complete circle clockwise or counter-clockwise, and if you turned the wheel 90 degrees perpendicular to the two back wheels, the front wheel would act as a break and stop the car from moving forward. So, I would frequently have to call out to a stuck rider, “Just keep turning your steering wheel in the same direction”, and usually that worked. If it didn’t, I would ask the other drivers to be a good neighbor and give the car a gentle push from behind. That also usually worked, unless the other drivers wound up pinning the stuck car against the curb, and there were a few occasions where I felt so bad for a someone who spent their entire time on the ride trying to get their car going, that I’d let them ride in the next cycle without having to go back into line.
As the music ended and the cars coasted to a stop, I announced something like, “Oh snap, you’re ride has come to and end, but don’t feel sad! You still have four hours of fun ahead of you at Six Flags Magic Mountain, where you can make a big splash on Jet Stream. Don’t forget to check your car for any small items that might have fallen out of your pocket or to pick up any large belongings you left against the fence before making your way out the exit gate opposite me. Thank you for riding Jammin’ Bumpers and enjoy the rest of your day in the park.” After following the last of the guests to the exit gate and checking that it was firmly closed, I would check the cars for belongings that somebody had invariably left in their car — park maps,, hats, sunglasses, even phones, which I would bring back to the panel in case their came back looking for them.
If it was close to 45 minutes after the hour, before letting in the next group of guests, I’d go over to the turnstyle and write down the numbers, and then call the Crazanity ride operator on the phone to report my attendance figures and estimated wait time. Then it was time for another cycle of Jammin’ Bumpers.
Memorable Moments
As I wrote above, I really enjoyed being in control of the guest experience, and for the most part, the guests themselves were enjoyable too. However, when I did have problems, it was always with parents. Parents of young kids had a natural instinct to want to help if their child in another car gots stuck. I tried to talk the child over the microphone into getting his or her car going again, but sometimes a parent would attempt to grab their child’s car and attempt to pull it free. That’s dangerous, and I’d warn the parent to keep their arms in their car. There were a few parents who wouldn’t listen to me, and so I stopped the ride early and ask them to leave for not following the safety rules.
Another time I had a difficult mom who was in one car while her husband and one child were in another. As I did my car check, I saw that mom had brought her purse in her car with her. When I told her that she needed to put her belongings next to the perimeter fence, her husband started yelling at me about what a stupid rule that was. Sorry, its for everyone’s safety, since items can go flying around if her car gets hit hard enough. The mom stopped the argument by putting her purse away, but not before pulling out a phone that she brought back into the car with her. “I’m sorry, ma’am. You can’t hold onto your phone during the ride. You need to put it in your pocket,” I told her. “But I’m waiting for an important call!, she replied. “Well, if you need use your phone, you can do it from outside the attraction, not while you’re riding.” With a huff, she got out of her vehicle and stomped out through the exit gate. When I got the ride going, she started taking photos of her husband and son in the car. Now if she had been honest with me, I would have allowed her to take pictures of them before the ride started, but apparently she wanted action shots and that’s another dangerous thing to do from the car while vehicles are moving around.
There was a Jammin’ danger I didn’t expect, but that happened while I was operating Crazanity next door. As I was sitting at the panel and operating the ride, I got a call on the telephone from the Jammin’ ride operator. She told me that there were spider webs all around the front of the attraction, and that black widow spiders were dropping on guests who were sitting on the benches outside of it. I called Ride Operations and asked them to send someone over to clear out the spider webs but shivered at the thought of black widows dropping on me while I was operating the ride.
Gold Rusher
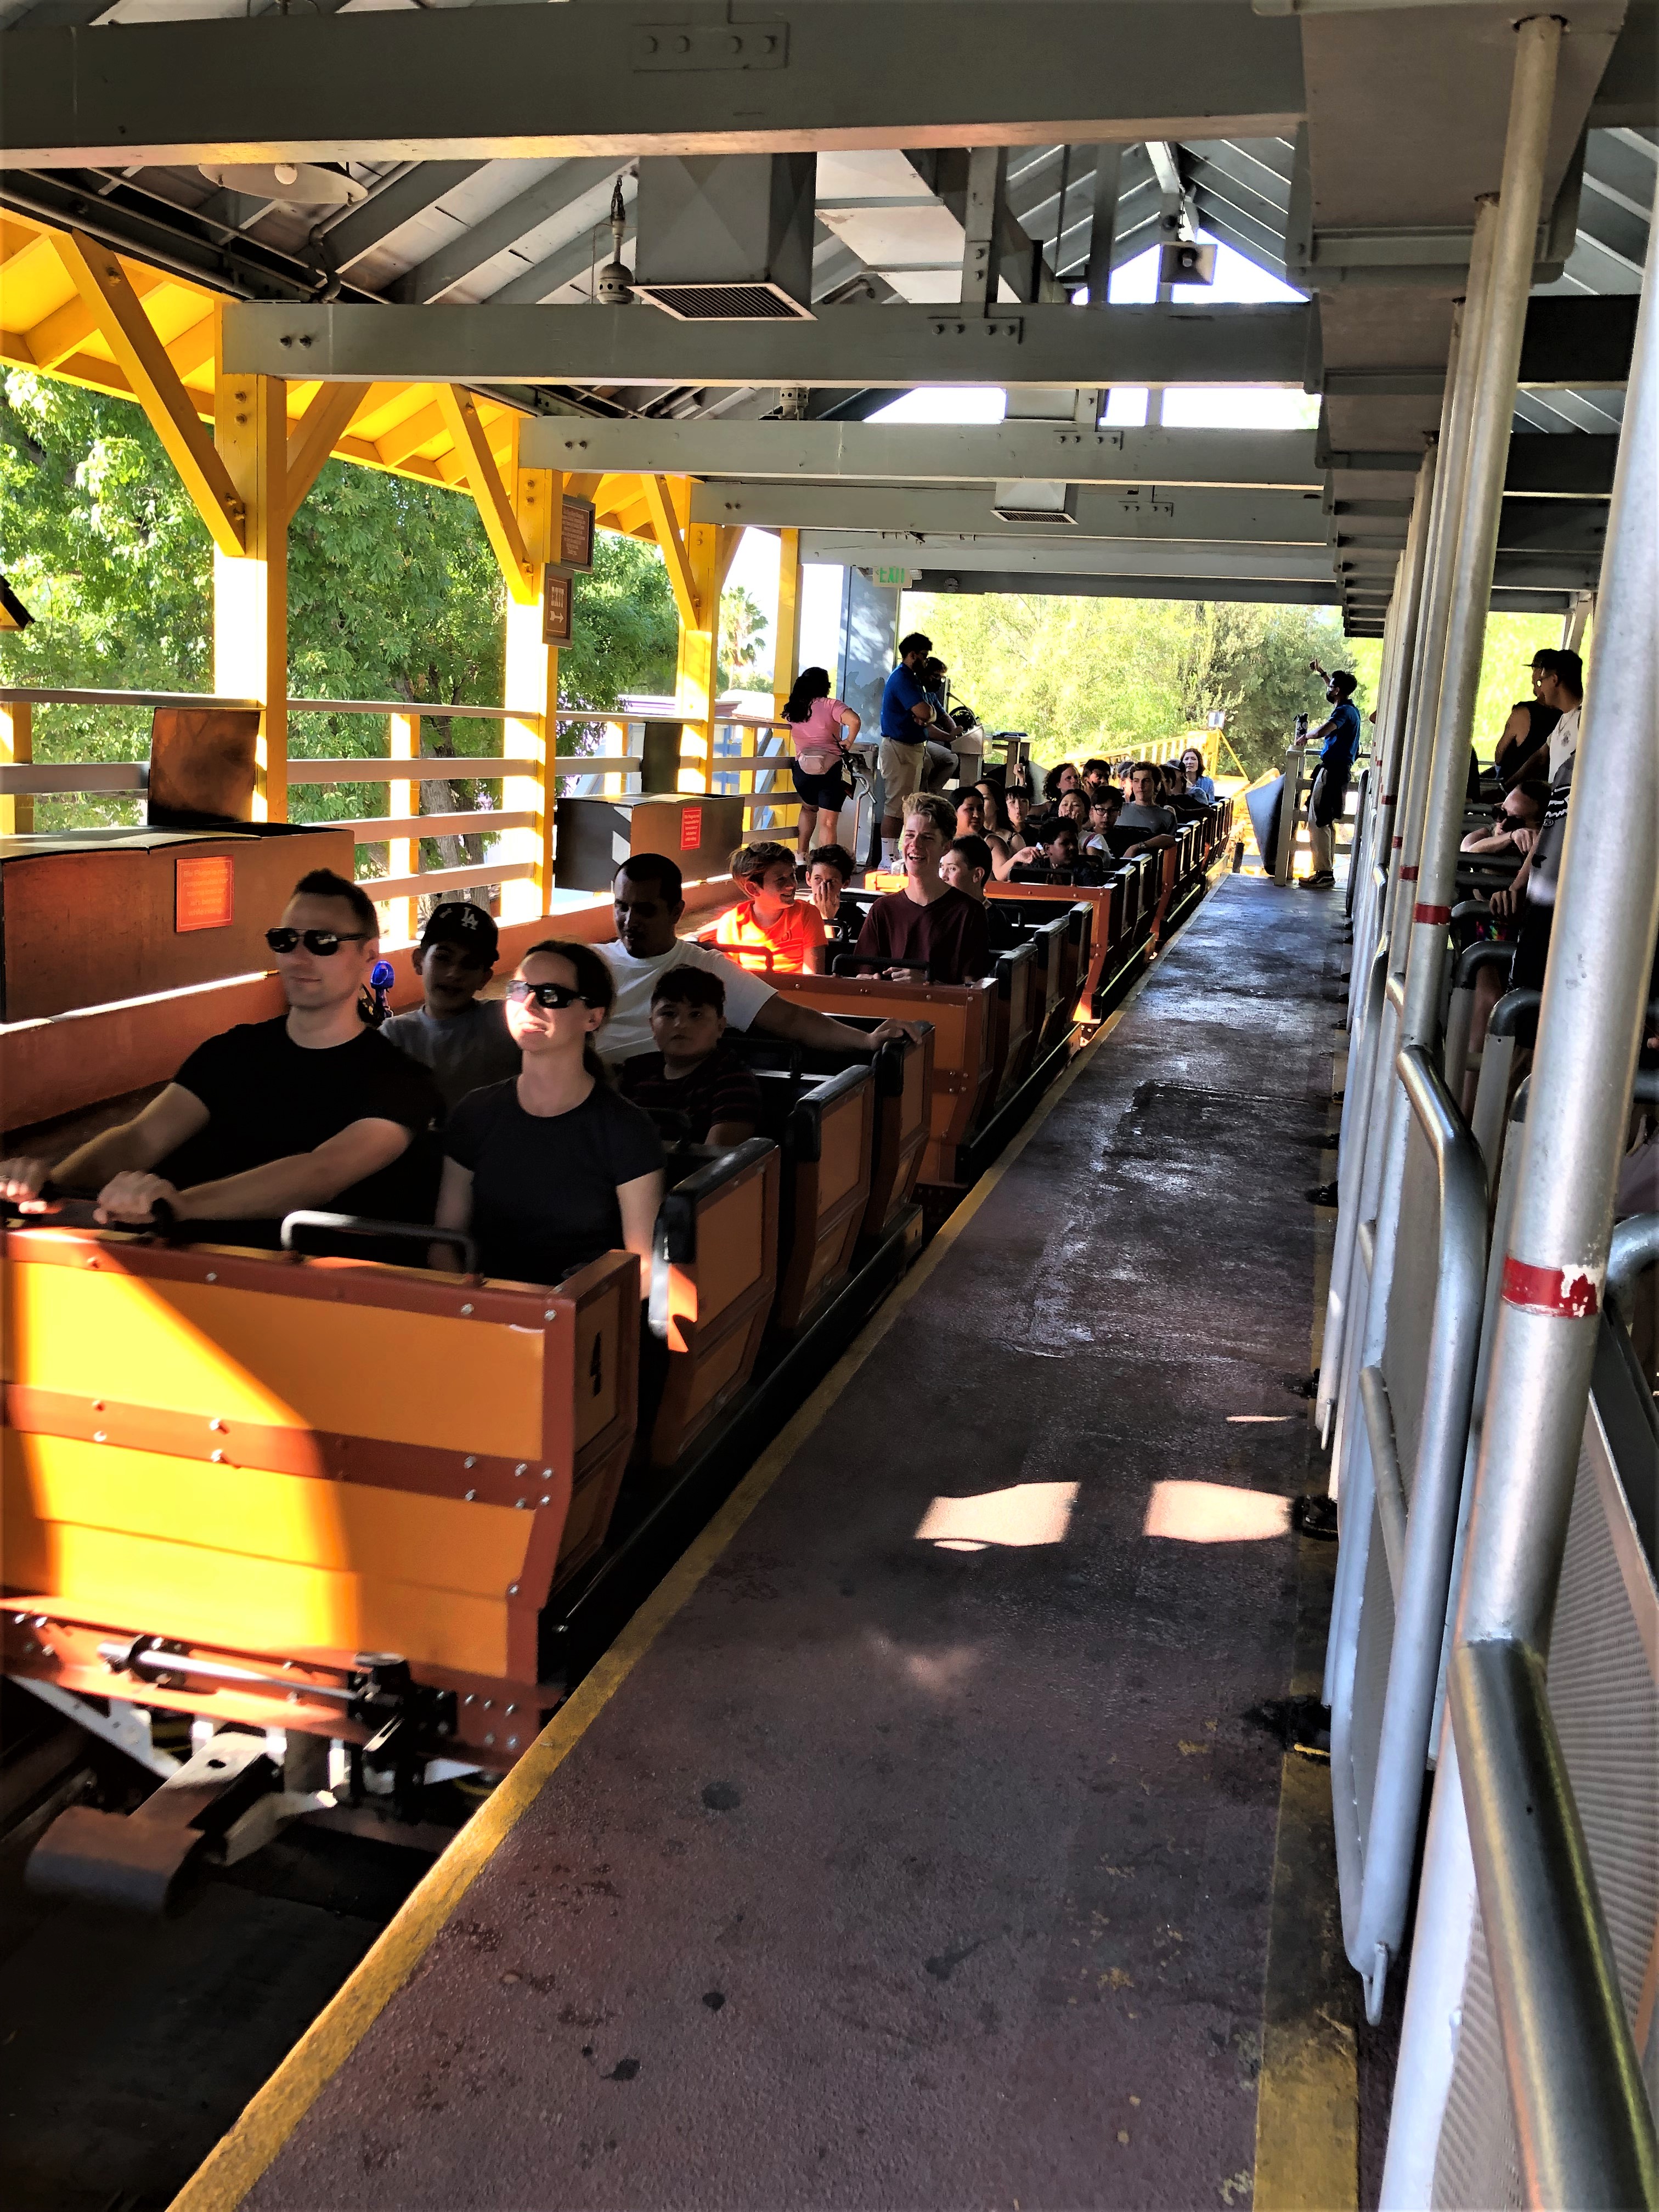
I spent perhaps a total of twenty days spread across nearly a year working at Jammin’, but I worked only a few days at Gold Rusher, or just “Rusher” as we called it. Rusher was another opening day attraction, a rather tame “terrain” coaster that followed the contours of the “mountain” at a top speed of 35 miles per hour. It was one of my favorite rides when visited Magic Mountain as a kid because I liked how the track wove in and out among the trees. I also remember about to board the ride during a visit in 1988 and seeing that Chevy Chase was in the train right before us; he had been filming scenes for National Lampoon’s Vacation at Magic Mountain, which stood in for the fictional theme park Wally World. That memory made working Rush feel a little bit more special for me.
Ride Operations
My first experience with Rusher was in assisting the Rusher team with their morning safety check before going to the ride to which I had actually been assigned that day. Rusher had two lift hills in the first half of its track circuit and two break points in the last half. During the long safety check protocol team members had to stand at each of these four stations to test that the Emergency Stop and Restart buttons worked when the Ride Operator called out over the loudspeaker to test them. This was my favorite thing about working at Rusher because to get to the various stations, we got to hike up tree-lined trailers through the hill slopes. It was also thrilling to be at one of these stations as the train whizzed by, just inches from you during its safety check.
Daily operation of the ride was also fun. Rusher has three positions: the certified Ride Operator and two attendent positions, Point and Dispatch. We attendants were responsible for the loading and unloading of passengers on the train. Dispatch, at the front of the train, was responsible for the first two cars, while Point was response for the back three cars.
We each had to ensure that guests met the height requirements and that they put away all of their belongings in the storage bins on the unload, or right, side of the train. Once all the guests were seated, we told them to raise their hands as we lowered the lap bar and then pulled up to make sure the lap bars were secure.
I prefered working Dispatch position because I used a control box at my station to automatically open the loading gates when it was time for guests to get onto the train. I also got to press the green Dispatch button in unison with the Ride Operator at panel to send the train off after all three of us had given the “thumbs up” sign that the station was clear.
The Point position had a special responsibility when a train was arriving. Point used a clicker to count the empty seats on this train. At 45 minutes after the hour, Point would report the clicker number to the Ride Operator, who would then calculate and report the number of riders we had.
Once the train pulled into the station, both Point and Dispatch stomped down on large foot petals at left front corner of each car, and this would release the lap bars so that the guests could exit. We would then direct them to go down the stairs at the front of the station.
Memorable Moments
I think I worked at Rusher only a total of five days in my time at Magic Mountain. I never even got to start training to be a Rusher Ride Operator, so I don’t have many memories of this attraction to share. However, I do have two.
I’ll start with the bad one. I was working Point, and after all the guests had unloaded from the train, one remained slumped over to the side. As I walked toward him, he slowly got up and exited, but I saw that he had thrown up on the left side of the train. I called out to Dispatch not to open the gates, and I went over to the Ride Operator to find out how the procedure for cleaning up vomit on this attraction, because that was a situation I hadn’t experienced or been trained for here. Unfortunately, the ride operator was having a phone conversation, and despite all the hand waving I did, I couldn’t get his attention. So, I filled up my personal water bottle from the station’s water container and poured it over the vomit. I did this several times until I couldn’t see any more of the protein present, but I couldn’t find any cleaning supplies and the Ride Operator still wouldn’t give me his attention. So, I just told Dispatch to let guests onto the train.
My good memory is of working at Dispatch. Since this was a Western-themed ride, I wore a Western-style hat I brought from home (Six Flags was very laid back in regards to employee headwear) and I liked to take on the role of an old prospector. When the train dispatched, I would wave at them and tell them to keep an eye out for gold. One day while I was at Dispatch, one of my favorite team members, Natasha, was working at panel. She saw how I was interacting with guests, and so when she dispatched a train, she would tell them, “Everyone wave good-bye to my friend David.”
I didn’t stop there. Whenever I was about to lower the lapbar, I would say, “Everyone raise their hands… and do jazz hands” as I waved my own hands. One girl laughed and said to her fiend, “This guy is the only one at the park who has any personality!” With validation like that, you can see why I was reluctant to leave what was originally supposed to be a short-term gig.
The Battle for Metropolis
Obviously, one of the best things about working at Magic Mountain for me was interacting with guests and roleplaying a bit. Now there was one ride that gave me a great enviroment for role-playing — Justice League: Battle for Metropolis, and I will tell you all about that attraction in my next blog post. Until then, theme park fans, have a Six Flags day!