Author Archives: David Mullich
YAHAHA and the Amazing Maze, Part 3: Teleporters, Visual Effects, and Movement Paths
In my previous post about using the low-code game development platform YAHAHA Studio to create a navigational puzzle, I discussed how to use the Rotate and Revolve components to create walls that opened and closed like a door with a hinge. In this post, I will describe how to use the Teleporter component and visual effects to make the maze even more magical.

YAHAHA makes getting started with teleporters easy. The platform comes a built-in model called “Gear Teleporter”, which already has Teleporter, Trigger, and Audio Components installed. So, all I need to do is download this bad boy from the Resource Box.

As you may recall, I am building my maze as 16 sections, which, looking down from above, appears as 4 columns x 4 rows. I am calling the columns, left to right, FarLeft, MidLeft, MidRight, and FarRight. The columns are, bottom to top, FarLower, MidLower, MidUpper, andFar Upper.
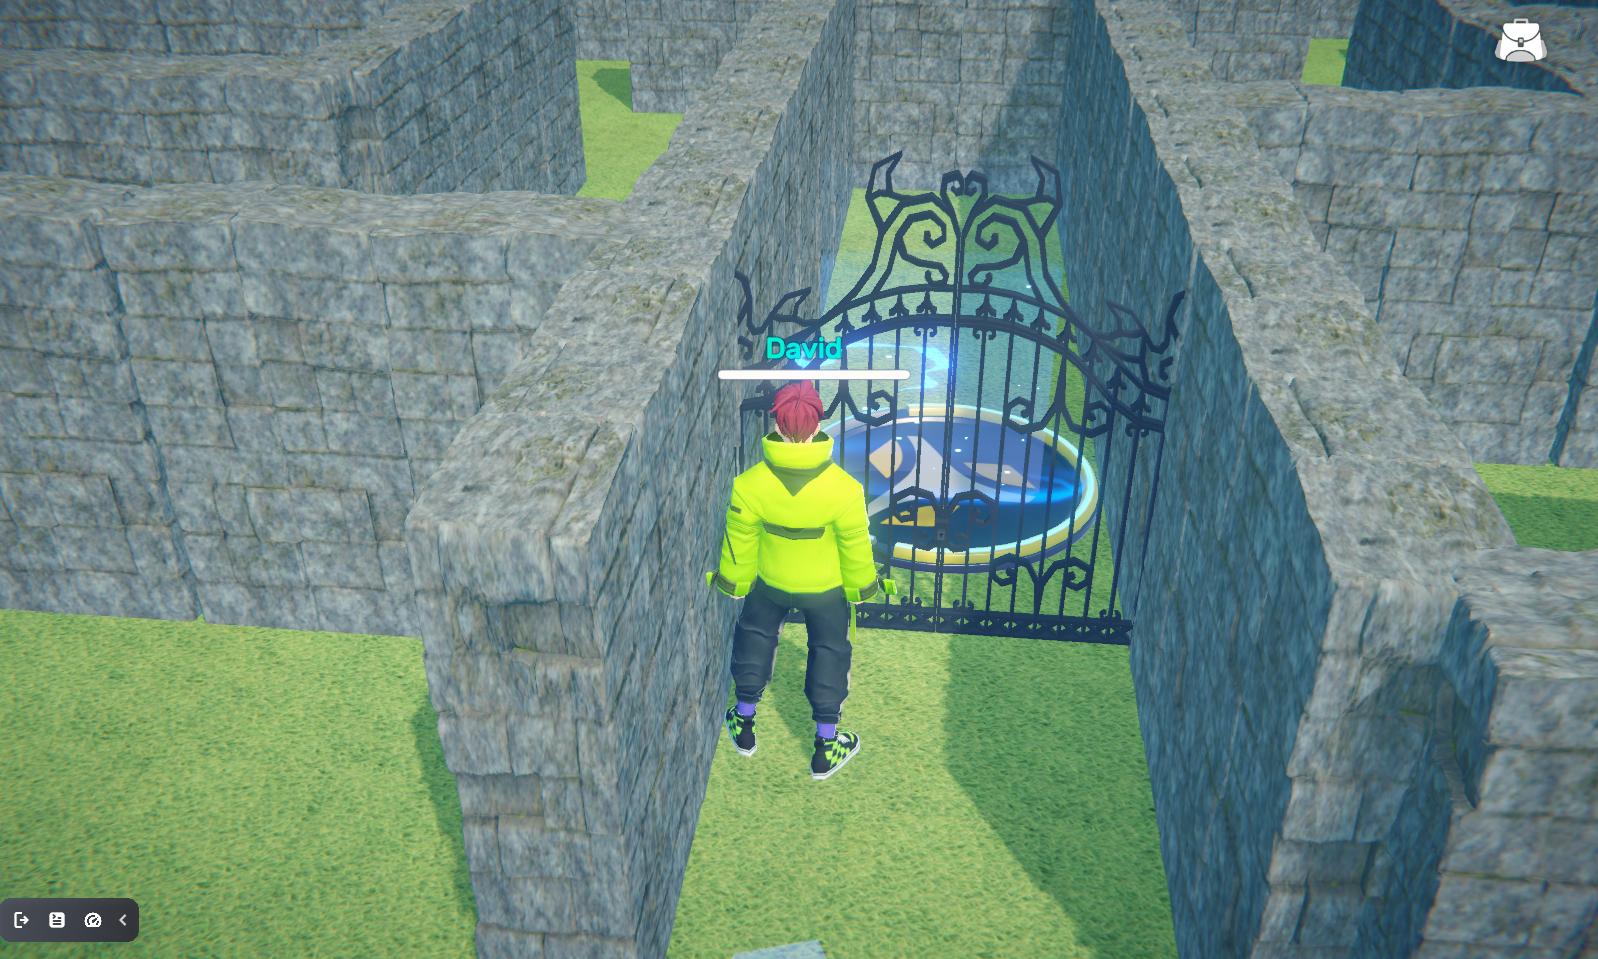
I am placing this Gear Teleporter in the next section I am constructing, MidUpper-FarRight (MUFR), right behind the Locked Gate I previously added to separate section MLFR from section MUFR. My goal here is to give the players a clue that they need to teleport into section MUFR but they need to find a corresponding teleporter first.
When I first placed the Gear Telporter (which is called “Teleporter_Normal” in the Explorer), I found that it was much too large in comparison to my maze walls. No biggie. I just scaled it down to .3/.3/.3. I then had set its Audio component to play an audio file called “Teleport 1-1”, which I downloaded from the Asset Library, and set the audio to play when the player entered the object’s trigger box.
I always tell my students to test out their games periodically to make sure they work as intendend, and it’s a good thing that I followed my own advice. When I put the Resawner near the teleporter and playtested the game to see if the teleporter sound played when I had my avatar walk on top of it, I discovered that the trigger zone was too low to detect entry. Again, no biggie. I changed the Y value of the trigger box sized from 0.6 to 5.0, tested it again, and everything worked perfectly!
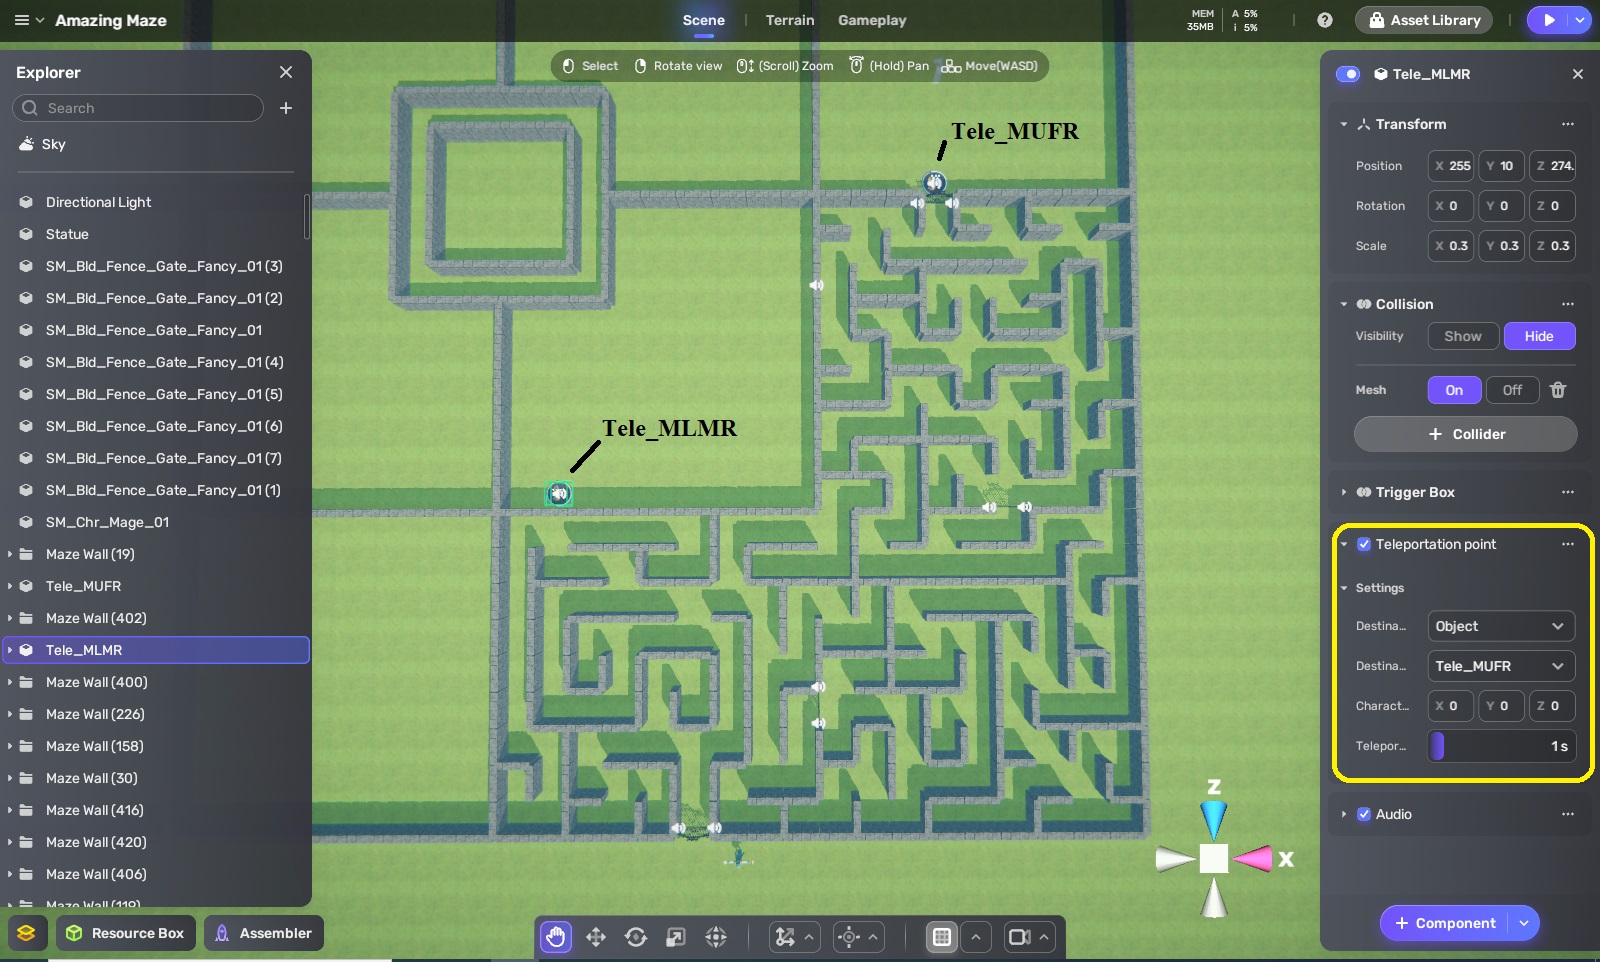
Now that one teleporter is working, time for the corresponding one. I duplicate the teleporter in section MUFR and move the duplicate to the next section I will work on, MLMR. Too more easily tell which is which, I name one “Tele_MUFR” and the other “Tele_MLMR.” Next, I set Tele_MLMR’s Transportation Point component to use Tele_MUFR as its destination.
I immediately test to see if this works, and I find that the teleportation takes too long for my impatient tastes, so I lower the teleport delay from 3 seconds to 1 second.

Remember that hinged wall I created when I made section MLFR for my last blog? That’s the real exit for the section, not the locked gate, and I want the player to open the hinged wall and find the path to the teleporter in section MLMR. As always, I follow my mazemaking process of filling in the entire area with horizontal and vertical walls, and then remove the ones necessary to form the path I want from the maze’s entrance (Hinged Wall) to its exit (Tele_MLMR).

The final step in making this maze is to remove some more walls to create passages branching away from the main path. Also, even though I originally created my sections as 9×9 squares, I don’t want them to be too semetric, so I remove some walls around section MLMR’s border so that paths can lead into and out of my initial bounding area. Of course, I still want the sections to be separated so that there are no shortcuts into the solution path, so I also add some walls to preserve a (non-square) boundary between each section.

Oops. Did I use the word “final” too soon yet again? As I checked out my “completed” maze section, I realized that the teleporter needed to be more dramatic — more magical — since that was this secton’s distinctive feature. Fortunately, as I checked the Resource Box, I found a built-in VFX (video effect) that would do nicely, VFX Teleporter_Normal_Keep 2. I scaled it down to .4/.1/.4 and place a copy on each of the two teleporters. Finally, I walked my avatar around the maze to make sure it effect isn’t too obvious from nearby paths.

*Head slap* I keep using “final” before I’m finally satisfied that things really are finally final. I’m now concerned that this section is still fairly early in the maze experience, and the player is still learning the rules of how my devious mind works. Since I don’t want some players to get frustrated trying to find a way out and trying in vain to open the hinged wall from this side, I’m going to re-use my “hint statue” from earlier. In fact, I’ll use three of them. One says the dialogue, “Walking alone will not get you through the gate. Find the teleporter. It is some distance from the wall opening.” Another says “You are half the way there.” A third says, “It is near.”

On to Section MUFR, where the other teleporter is located. I place a normal Gate as an exit, but what else to do? I think I’ll have some more fun with hinged walls, since the player has had an experience with one. So, I duplicate the Hinged Wall (1) from the section below and place the copy here.
Here is how I will start off this maze section: the player teleports in from Section FLMR, only to see there’s there’s nothing here but a locked gate and a short passage leading nowhere. However, if the player enters Hinged Wall (2)’s target box, which I put just in front of the wall, the wall revolves and rotates like a door, accompanied a rumble sound, just like the one in the secdtion below. However, this wall opens in a different direction, and so it took about three minutes of experimenting to figure out that rotation needed to be clockwise and the revolve needed to be anti-clockwise around a point where Z=1.
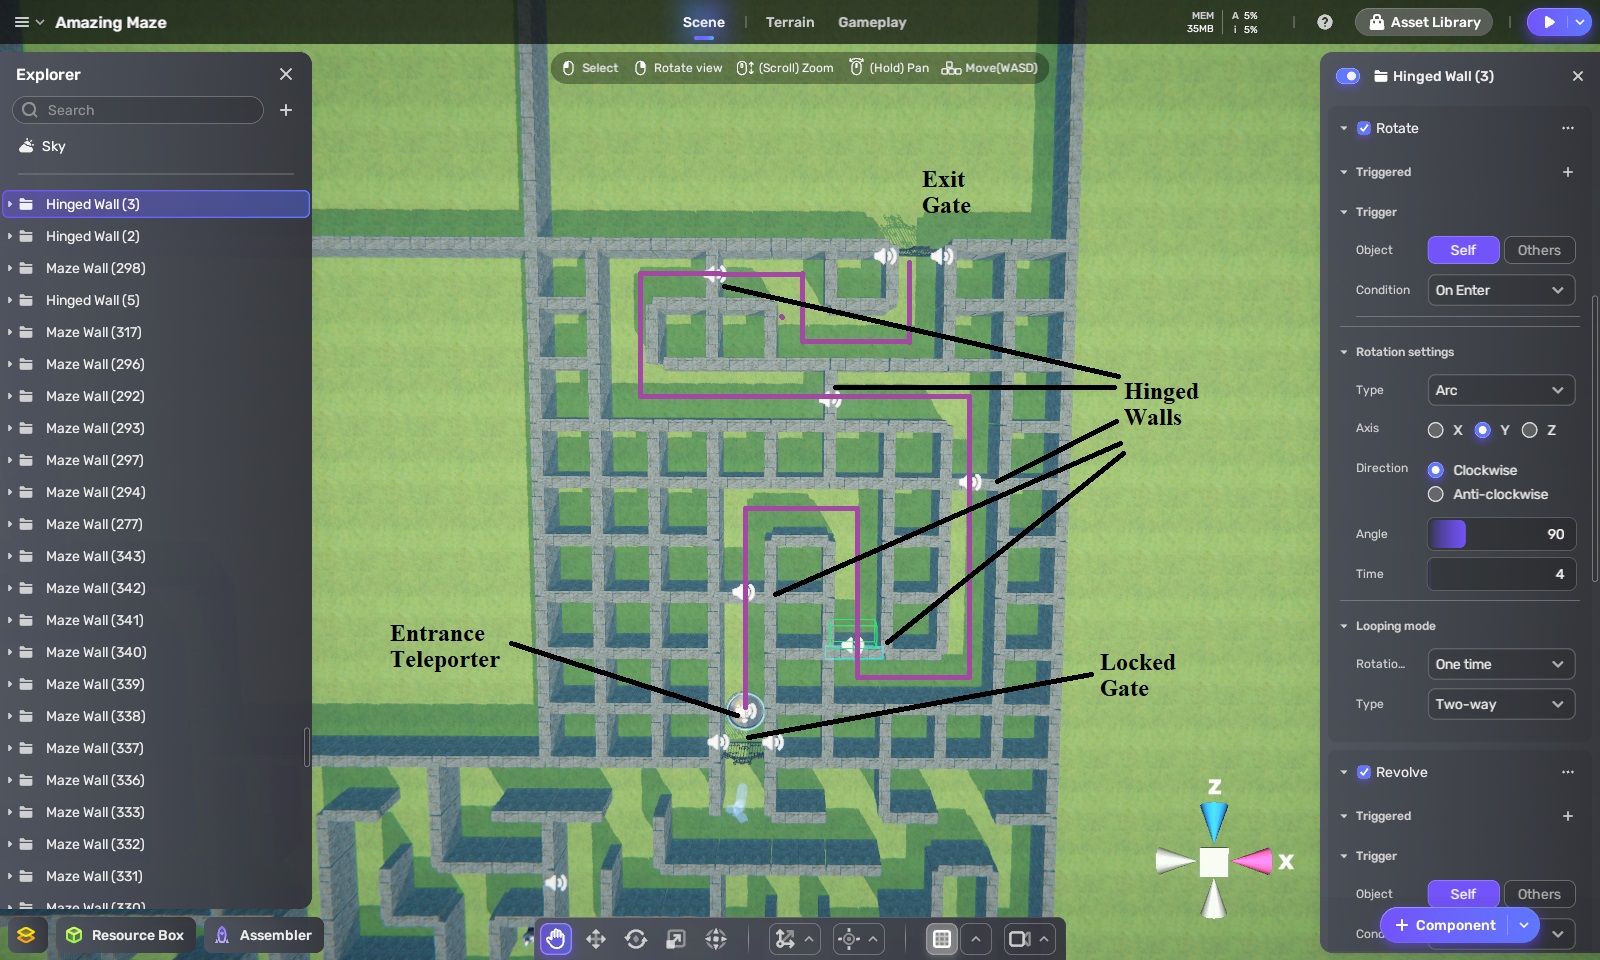
I now create rows and columns of walls and then carve out a solution path to the gate at the exit. However, along the solution, path, I add in a series of hinged walls.

Add in some side passages and allow a couple of the passages from the section below to extend into this one, and I have a maze. Should I add some hint statues, too? No, I don’t think this is necessary. You see, the hinged walls, which open only one way, serve as closure points, making the solution space smaloler and smaller with each wall the player goes through. My feeling right now is that the solution is simple enough to not require any hints.

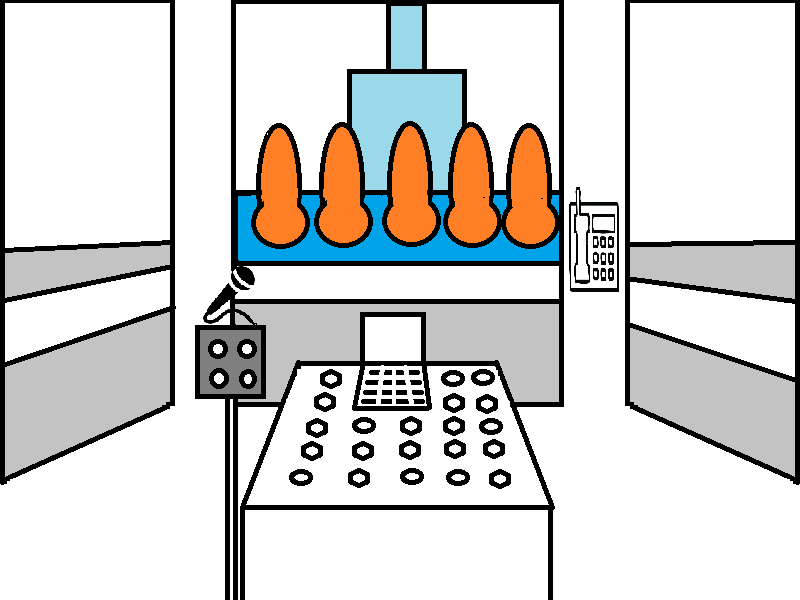
It’s time for some teleporter fun. I dived Section FUFR into 8 rooms, numbered 1 through 8 (not consecutively, as you can see), and I place a locked gate along the left wall of room 6. I copied the Teleporter object to create 9 Pads, and placed one in each room, with the ninth just outside of the locked gate. In each room I place three portals, using the Blue Circle, Green Circle, and Yellow Circle built-in VFX. I scale each of these portals to 2/2/1 and rotate them on their 9 axis 90 degrees so that they would be upright, like a door rather than a hole. Since they are circles, I give each a spherical trigger box rather than a box-shaped one, and then set up audio component to play teleporter sound effect which triggered.

These color portals are going to work as an order of operations puzzle. The player needs to go through the portals in the correct order to exit out through Pad(9). I used the above chart to work out this puzzle. The correct path is Blue-Green-Yellow-Blue. If players choose any of the wrong portals (Green or Yellow) in Room 1, they will bounce around between Rooms 2, 3, 4, and 5 until they eventually wind up in Room 1 again, where they can start over.
If players make choose the wrong portals in Rooms 6, 7, or 8, they will be sent into Rooms 1, 2, 3, 4, or 5. So, there is only one sequence of portals leading to Pad(9), and any other sequence eventually leads back to Pad(1). After I was convinced that this plan worked as I wanted, I set the Teleportation Point of each color portal to go to the appropriate pad.

Since maze sections are 9 x 9, divding FUFR into 8 sections resulted in rooms that weren’t all the same dimensions. That’s okay. I don’t want these sections to necessarily be symmertical. I just move some walls and add some others so that the each room looks a bit different from each other. I also rearrange the color order of the portals or move the location of the pad in most of the rooms.
I also set each of the teleporters’ Y rotation position so that players would be facing direction I wanted when they teleport into the room. For example, when telporting into room 6, I want players to be facing the locked gate so that they see the exit pad (Pad(9)) on other side.
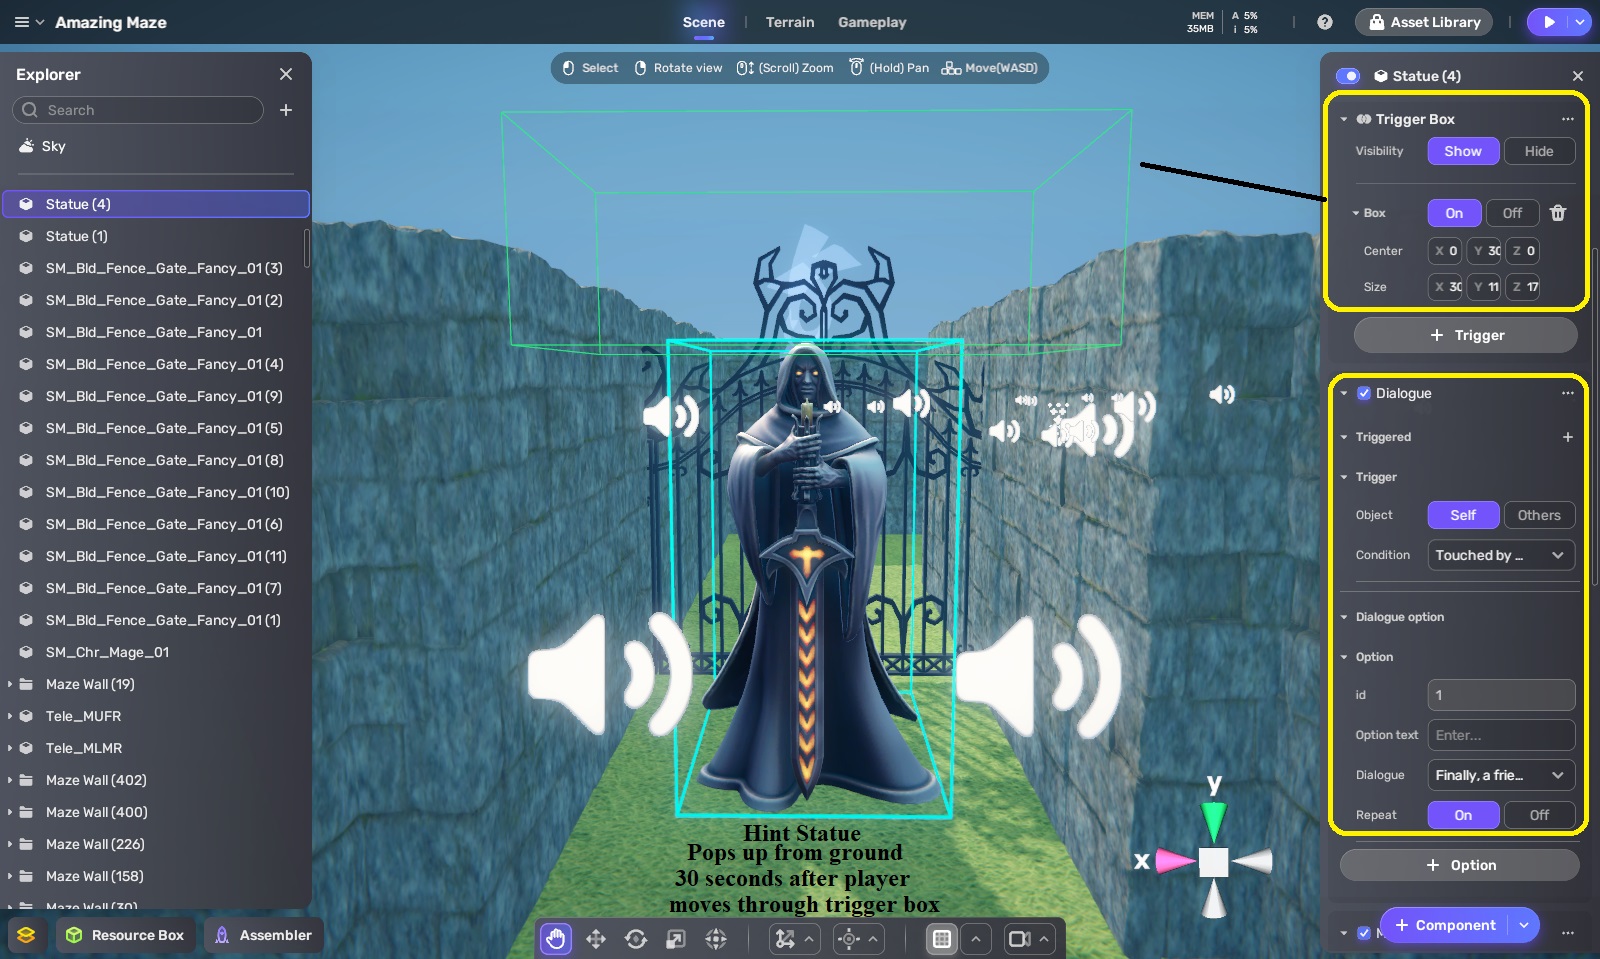
This maze definitely needs hints and therefore, a hint statue. Need hints. This time I placed it under the terrain between the gate and Pad(1); however, I put a trigger box over its head so that the trigger extended above the ground while the statue was underneath. When the player walks through the trigger box, the statue will pop up about 30 seconds later, so that if players wind up back in room 1 again, the statue will tell them what order of color portals to go through to reach the exit of this section of the maze.

For Section MUMR, I am going to combine portals with hinged walls. Well, it’s mostly going to be portals because this section will be like an endless runner. When players teleport onto Pad(9), they will find themselves in a long, straight passage with a yellow portal at the end. When they go through that portal, they find themselves at the end of another long corridor that has a yellow portal at the end. After going through several of these, they be in a corridor that leads to a locked gate. That gate looks onto Section MUML, which is the final section of the game. Eventually, there will be a fierce Minotaur there, guarding the maze’s exit!
But let’s not get ahead of ourselves. Let’s get back to the yellow portals of Section MUMR. Instead of the portal teleporting them to a pad object this time, I’m having it teleport to a specific position in another corridor. How do I figure out the custom coordinates to use for the position? I’ll use a pad object, but I will move it to where I want the player to appear, write down the pad’s coordinates, put them into the corresponding portal’s teleportation point, and then move the pad to figure out the teleport point for the next portal. I do this for all 8 yellow portals and then delete the pad object, as its work is done.

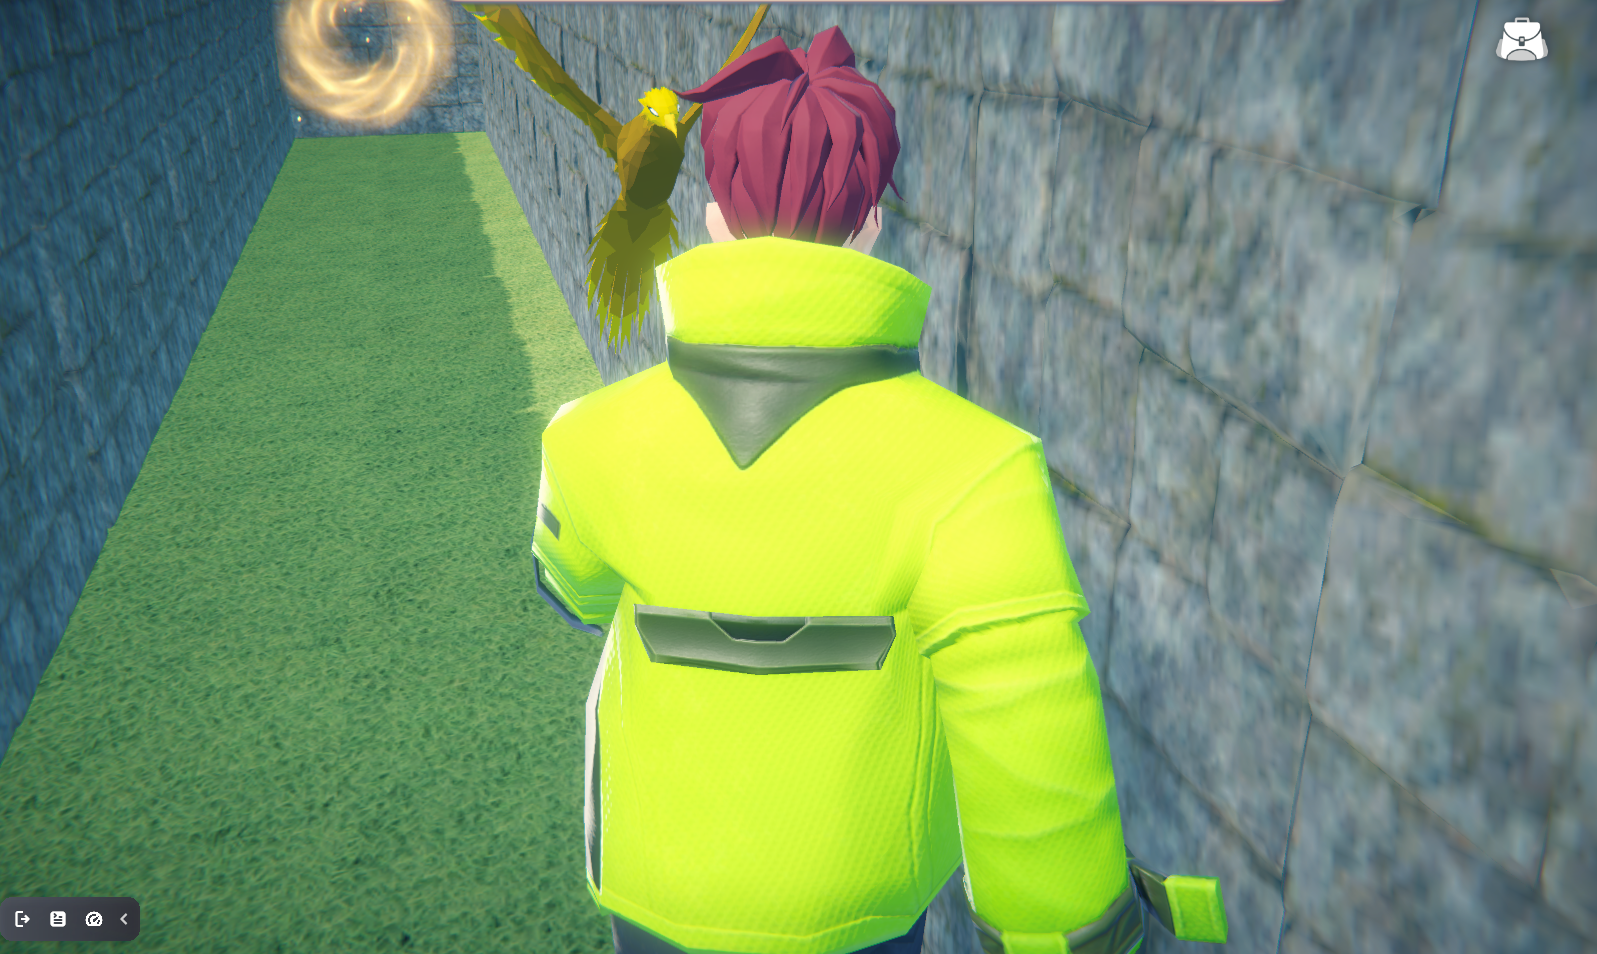
After playtesting this endless runner section, I realized it needed more and decided that some of the yellow portals should have yellow Phoenix’s flying out of them as an obstacle for the player. I download an animated yellow Phoenix model from the Asset Library and placed it under the terrain in front of the yellow portal in Corridor 3. I then put a large trigger box attached to the wall behind the portal that ran from the wall to most of the length of the corridor. When the player enters the trigger box, a bird sound effect will play and then the Phoenix will move through four waypoints. It will first pop up 5 units from under the terrain so that it appears in front of the portal. It will then fly 10 units down the corridor towards the player. If it hits the player, it will push the player back. The Phoenix then drops back down 5 units so that it disappears under the terrain again and then moves back 10 units to its origin point. This will happen every time the player enters the trigger box from the end of the corridor opposite the player.
I do the same for Corridors 5 and 7, but with each one, the trigger box is a little shorter, and the Phoenix appears in a slightly different position in front of the portal and then flies toward the player a little faster. For Corridor 8, I have two Phoenixes come out of the portal. After playtesting it, I find that it makes this section of the maze much more interesting while not being punishingly difficult — this is more of a puzzle game, after all, and not an action game.

I have one more trick up my sleeve for when the player finally reaches the corridor leading to the locked gate looking into Section FUML with the Minotaur. I set up a trigger box so that when the player comes to the gate, a hinged wall behind him opens and closes. When players turn around, they may miss seeing the wall closing, but they will see a green portal at the end of the other end of the corridor. If they decide to go through that portal, they will go into another endless runner sequence involving two long corridors with a green portal at the end of each. Unfortunately for the player, that last green portal leads right back to Pad (9), and they’ll have to do this section of the maze over again.
However, if they do notice the hinged wall and pass through before it closes, they will enter a long corridor with another hinged wall at the end. This leads us into Section MUMR containing… what I will dicuss in my next YAHAHA and the Amazing Maze entry. This time we covered a lot of territory — teleporters, video effects, and movement waypoints — but there’s more coming in my next post. In the meantime, here are some screenshots of what these latest features look like while playing The Amazing Maze.

Note that you already have learned more than enough to start making your own 3D games using YAHAHA Studio. In fact, you may even be ready to participate in the YAHAHA Global Game Jam taking place January 30th through February 5th, with a $15,000 prize pool. You can find out more by click on this link.
Confessions of a Coaster Operator, Part 1: Crazanity

I have a confession to make. From November 2021 to September 2022, I worked as a ride operator at Six Flags Magic Mountain. Until now, I’ve shared this with only a few people, but now its time for me to me to write about my experiences as a sixty-something game developer and college professor who spent almost a year operating roller coasters and other theme park attractions with coworkers who were barely old enough to drive.
Don’t get me wrong. I love theme parks. When I was growing up in Los Angele’s San Fernando Valley, my family was constantly visiting Disneyland, Knotts Berry Farm, Universal Studios, Bush Gardens, Sea World, Marineland, and of course, Magic Mountain. I remember going on Disneyland’s Pirates of the Caribbean after it first opened and then buying a souvenier book on how the attraction was made. That book inspired me to want to become a Walt Disney Imagineer myself and make immersive theme park attractions when I grew up.

My career path took a slightly different turn when I focused on digital immersion by becoming a game designer. I was hired by The Walt Disney Company in 1987 to be its very first staff game producer and had the opportunity to pitch several games based on Disneyland attractions. Sadly, none of those projects were green-lit, nor was I hired when I interviewed to be a producer at Walt Disney Imagineering when I couldn’t seem to get any of my other game projects green-lit during my last year at Disney. Later, I interviewed to be a theme park producer at Landmark Entertainment and just a couple of years ago, Universal Creative asked to interview me for a producer position at Universal Florida. I didn’t get either of those positions, so working on theme park attractions continued to be an elusive dream.
It’s funny how difficulties can lead to unexepected opportunities. It was October 2021, and a client for whom I had been producing an educational game had suddenly and unexpectedly canceled the project (we think that their budget had been cut). Christmas was coming up soon, and I wouldn’t be paid for my teaching position at ArtCenter College of Design between terms from mid-December to mid-January. I was going to need extra money for the holidays, and so I looked on the internet for short-term work. And there it was: Ride Operator at Six Flags Magic Mountain. Perfect! It was a ten-minute ride from my home, the hours were flexible, and it sounded like fun.
Well, it was so much fun, and I so enjoyed working with my young teammembers that I wound up working at Magic Mountain for nearly a year. However, after a year-long lull period in contract work, I started to get so many offers to work again as a game designer and producer that I could no longer avoid returning to the real world.
Now that I’m back in the real world, I can tell you about my secret life as a ride operator. I will describe each of the attractions I worked at — Crazanity and Jammin’ Bumpers in this article, and Justice League: Battle for Metropolis, Gold Rusher, and Riddler’s Revenge in future articles. For each of these attractions, I will describe the ride attendant and operator responsibilities in one section for those of you who are interested in the details of ride operations, followed by a section about some of my more memorable experiences on that attractions — such as when a motor coupler blew out while I was doing the morning safety check on Crazanity, how a lady snuck a dog aboard under her coat at Justice League, or how a bear wandered onto the park grounds and entered the Riddler’s Revenge loading station.
Crazanity
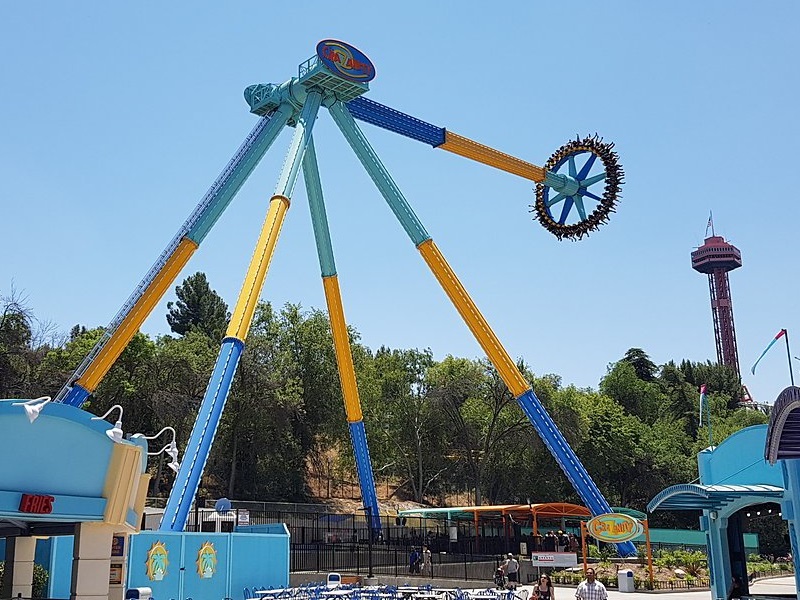
I was fortunate to be assigned to Crazanity, the world’s tallest pendulum swing ride, as my first attraction. It was the ride that everyone in my area most wanted to work at. Not only was it a fun, thrilling, and relatively new ride, it had a joyous atmosphere around it. The area was colorful, speakers around the area played music, and you worked out in the fresh air. Even when the weather was harsh, there were covers to provide protection from the rain and sun. Also, the ride operator booth was air conditioned and provided a momentary respite during the summer’s heat.
Ride Operations
Like most park attractions, Crazanity had two tiers of positions: attendent and operator. Attendant positions required only an hour or true of training, followed by a multiple choice test about the position’s responsibilities, as well as general park knowledge, policies, and safety. Once you pass the attendant test, you are said to be “attendicized”.
Operator positions, however, required many hours of training, followed by a much more extensive test that includes ride engineering, daily operation procedures, and ride evacuation procudures in the case of potential mechanical or evironmental problems. Those who pass the operator test are said to be “certified”. Cranazity’s attendendant postions are called Load and Unload, while its one operating position is called, unsurprisingly, Ride Operator.
Attendent Responsibilities
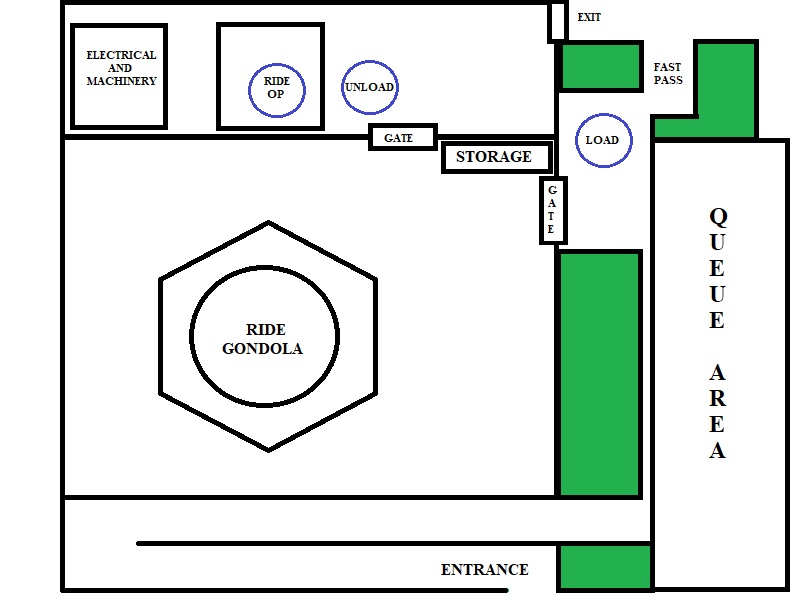
When the ride is ready for boarding, the attendant at the Load positions opens the rntrance gate and then unhooks the queue area chain to let guests aboard. The gondola holds a maximum of forty riders, so Load has a clicker for counting the number of guests coming through into the boarding area. I liked using the clicker (somtimes saying “pew, pew” as I pointed it at guests and clicked as they came by, which usually got me a big smile or laugh from them) so much that I bought my own, because sometimes a clicker wasn’t available at the ride that day. Sometimes, the person working in the Load position would put the clicker in their pocket and forget to turn it in at the end of their shift (I did this once myself).
As guests come by, Load also discretely checks a height limit sign to make sure each guest is tall enough to ride. If someone looks too small, Load will have them stand against the sign and, if they are close to the limit, place our name tags flag on the top of their head to measure more precisely. If they are even a quarter-inch too short, Load won’t let them aboard. One mother once pleaded with me when I told her that her daughter was no tall enough to ride, “It’s her birthday? Can’t she be tall enough, just this once?” Sorry, lady, your child’s safety is more important to me than her fun. I don’t want her fallling off the ride while she is 170 feet in the air because she’s too small for the harness. Not on my watch!
In addition to the regular queue, Crazanity has a shorter waiting line for guests with Fast Passes, which is Six Flag’s paid reservation system for getting onto rides more quickly. If there is anyone waiting in the Fast Pass entrance, I would let them on first (to a maximum of about ten) before letting on the other guests. Now, Six Flags has Fast Pass workers whose only resonsibility is to use a smartphone to scan their Fast Pass QRC code or wrist band to make sure it was time for them to board, but for most of the time I worked at Crazanity, we didn’t have a Fast Pass person assinged to us, so I got to scan Fast Passes when I worked in the Load position, which gave me something to do during the three minutes the ride was running.
Another one of Load’s responsiblities is to manage the storage cabinet where guests can put their belongings during the ride. The ride gondola can generate a strong gust of air as it swings by at 75 miles-per-hour, and if their belongings are not locked in the cabinet, they could be blown away or create a hazard. Even though Load tells guests to put their belongings in the cabinet, and the Ride Operator issues reminders over the loudspeaker, I was always shocked with how often people didn’t listen and put their belongings on the ground or on top of the cabinet. We would frequently hold up starting the ride for 5 minutes or more until whoever the guest was who left their souveneir cup on top of the cabinet or their backpack on the ground would get off the ride to put it away, because park policy was that employees couldn’t move guests’ belongs without their persmission. (I wrote a suggestion for management that they put a sloping top on the cabinet so that people can’t put their belongings on it.)
But once both guests and belongs were secure, Load would close the cabinet and the entrance gate, scan the area to make sure there were not guests in restricted zones, and give the thumbs up that the ride could start.
Unload’s main responsibility was to make sure that guests were secure in their seats. We often had two people working the Unload position, but when we didn’t, Load would help out with the Unload responsibilities. As guests are boarding, Unload would try to space them out around the gondola when there were only 10 to 30 guests riding, so that there was an even distribution of weight. If it looked like there was going to be a full complement of 40 riders, then Load would try to seat guests so that there were no empty spaces between them; this was so that we wouldn’t have to split up groups of family or friends who boarded lasts. Sorry, there’s no preferred seating on this attraction.
Unload personnel would caution people not to lower their harnesses; these come down automatically before the ride starts, and if guests lower try to lower the harnesses themselves, they may damage the equipment. Once the harnesses do come down, Unload goes around and checks that their belts are buckled and harnesses are tight. Another thing that Unload checks for is that no guests has any phones out — it is forbidden to hold phones or cameras on any Six Flags attraction, for reasons you will see below — as well as to make sure they have their shoes with them, either on their feet, attached to their belt or harness, or under butts.
Why is there a need to check for shoes? Well, a lot of guests take off their shoes because they are afraid that they will fall off their feet during the ride. However, they need to have their shoes with them because someone vomits on the ride at least once a day, and we can’t have guests walk into a puddle of vomit in their socks or bare feet when they disembark. Which reminds me, another of Unload’s duties is to get out the hose and wash down vomit off the seat and platform when a guest throws up. The Ride Operator then runs the ride empty for one cycle to dry things off. For some particularly vomitous guests, we needed to do this twice. That was my least favorte part about working the ride. One time as I was working Unload, I barely dived out of the way in time as a guest projectile vomited in my direction before he could reach the trash can in the exit area. Folks, if you’re going to eat the Spicy Cheetohs, please stay off the thrill rides for at least an hour to digest!
Ride Operator Responsibilities
I became a Crazanity Ride Operator about 8 months after I was attendicized. The reason it took so long is that after I worked at Crazanity for about a month, I was mostly scheduled to work at other attractions and only occasionally worked at Crazanity. So, squeezing in the 10 hours or so of training required to be a ride operator was difficulty.
Still, the wait to becoming a Crazanity “cert” because the position had a lot of responsibility. When certs come in before the park opens, there are several responsibilities that they might share with the Ride Supervisor, who is the person in charge of that ride and manages the ride’s operators and attendents. The first task may be to stop off at the Ride Operations office and pick up “the box” — a plastic case containing the keys to the attraction, the personnel assignment schedule, and other paperwork.
Once they walk to the attraction, the supervisor or cert will do a “gate walk”, which is checking that all of the attraction’s gates are locked (Crazanity has a total of five), and that no maintanance personnel was working anywhere in the attraction area. After verifying that Electrical, Mechanical, and Staff personnel had already signed off on the ride, we would then go through an operational checklist to make sure that the ride was in good working order and that all of the safety sensors and devices were functional. This included checking that the panel controls could lock and unlock the gates, open and close the loading platfrom, and start up and shut down the ride itself. The final step in the checklist is for one of the certs to do a safety ride. Being paid to ride a theme park attraction? I didn’t have to be asked twice if I wanted to do the saftey ride that day!
Other things we would do before the park opens is check that the crew who closed the attraction the day before had cleaned up the area before they left and that the water container was full (most mornings, we sent an attendant to the one of the nearby food service locations to fill up the container with ice and water).
Once the park was opened, the real fun would begin, and working at panel was the most fun of all. There was a microphone for doing “spiels” like “Welcome to Crazanity? As you enter through the gate, please put any belongings on to the storage shelves to your right. Not on top of the cabinet and not on the ground. Then please, follow the attendant’s instructions for seating. There is no preferred seating on this ride.”
After the attendents seat everyone, I announce, “Everyone please raise your hands because your harnesses are coming down!” I push the apprpriate button on the control panel, and then as the attendents do a harness and belt check on every rider, I say “As the attendants come around to check your harness, please do not swing your feet! They have been known to kick back!”
When the attendants come back from their check and give me a thumbs up, I check the display on my panel and verify that all the harneses are locked and then give them a thumbs up back. “Saftey check complete”. The attendendants leave the ride area, and then I scan the area myself through the booth windows to make sure there are no guests or obstructions. Once I’m satisfied that the area is clear, I lock the gates and open the loading platforms. “At this time I’d like to give you a friendly reminder that photography is not permitted on this or any other Six Flags Magic Mountain attraction. If I see you with a camera or phone in your hand during the ride, I will shut the ride down early and have you do the walk of shame out of here. So don’t be that person!”
A final check that Load and Unload are giving me a thumbs up from their respective positions, and I start the ride. “Get ready for Six Flag’s craziest ride… 17 stories up and 17 stories down over a concrete slab. The crazy train is leaving Crazanity station! Is anyone scared? Me too. It’s my first time operating this ride! Have fun! Remember, the louder you scream, the higher your go!”
During the three mintures that the guests are riding, there are other things for me to do. There are two clickers on the panel — one for counting the number of cycles (rides) there have been that hour, and another for counting the number of empty seats on each ride. At the end of each hour, I use these two numbers to calculate how many riders there were in the hour, and then give all my numbers to Ride Operations when then call on the telephone.
The booth’s telephone is also used by the entire staff to clock in and out of their two 15-minutes breaks and their 45-minute lunch (assuming they are working a full shift), as well as clocking out at the end of their shift. (We clocked in at the Employee Services Office near the employee entrance at the start of our shift). It is the Ride Operator’s responsibility to write down everyone’s clock in and clock out times on the day’s paperwork, while keeping an eye out that no one on the ride has their phone out, no one in the queue is jumping the line, and there are no other problems.
As the ride begins to come to a stop, it’s time for me to get back on the microphone. “Welcome back, riders! Was that the scariest ride at Six Flags? No? To bad, I was going to let you go again. Hey, is it hot out there? I wouldn’t know. I’m inside this nice, air conditioned booth, sipping an iced tea.” I close the loading platform. “You may now unbuckle your saftey belts. Please raise your arms, because your harnesses are coming up.” I open the harnesses and unlock the gates so that the attendants can come in and help anyone who needs assistance. “Thank you for riding Crazanity, and for more sky-high thrills, be sure to check out Superman: Escape from Krypton!”
As you can tell from my spiel, I had a blast operating this ride, but unfortunately, I didn’t get to do operatie it all day long. I also had to still trade off with the other team members to work the Load and Unload positions or maybe sweep up trash if we already have a full crew working. If my shift ended at park closing, then I also had to stay to clean the attraction area, empty trashcans, and other tasks to make sure that everything was clean and ready for the next day’s guests.
Memorable Moments
Remember what I said about photography being prohibited on the ride? One sunny day I working in the Load position and then heard a loud, metallic “Thunk!” A guest hadn’t paid attention to the warnings and dropped their phone onto the roof of the queue area. Unfortunately, there’s no way to retrieve it during park hours. Luckier guests drop their phones onto the concrete. I’ve retrieved several phones with cracked screens, but at least I could return them to the guests so that they could pull their photos and data off of them..
Every so often we have to temporarily shut down a ride. It might be because we had to clean up a “protein present” left behind by a nauseous guest or maybe we had problems locking one seat and needed to have one of the maintenance staff come and inspect it. Whatever the reason, we will send a team member to the ride’s entrance to tell guests that the ride is closed at this time. When asked “What’s wrong with it?”, our standard response is “Sorry, I don’t know.” (even if we do). That’s also our response to “When do you think it will open?” because we don’t want to tell people that it should be open in ten minutes but have them get mad if it actually takes twenty.
One time a guest got mad at me for saying “I don’t know.” Crazanity was shut down for some reason, and I was at the entrance turning guests away with “Sorry, I don’t know when it will open again.” When the ride opened again, I was working the Load position, and one of the guests — a man in his forties — who I apparently had turned away five minutes before we reopened looked at me and said, “I’m mad at you! You said the ride was closed, and here it is open. You’re stupid! I’m going to talk to your supervisor!” I told him that he can do that after the ride, but apparently he didn’t, because I told my supervisor about the incident afterwards. She told me that I should have called security and had him escorted off the ride, because we can’t have guests being disrespectful to team members. That was good advice that, fortunately, I didn’t have a reason again to put into practice because I usually had great interactions with park guests.
We did occasionally have had much longer ride shutdowns. The very next day after I was certified as a Crazanity ride operator, I was doing the morning safety check and there was a loud “boom!” as I was doing a ride cycle test with an empty gondola. My supervisor immediately pressed the Ride Stop button and called maintainance. It turned out that a motor coupling blew on top of the ride. We were shut down most of the day, but our brave maintanance crew (who had to climb up 170 feet to get to the ride moters) had everything working again before the park closed.
Last February, we experienced a more widespread closure. At around noon, equipment problems had shut off power to the entire park. Fortunately, no one was riding Crazanity when it happened, although a friend of mine on Ridder’s Revenge told me that one of the chain lift motors started smoking and they had to evacuate the ride station, but everyone got off safely. The power outtage lasted for hours, and we took turns standing at the ride entrnace, making sure no guests tried to get on the ride. Even though nothing was working, guests hung around the park for a couple of hours. It was all very eerie, but also kind of wonderful in a way. Management sent everyone home at about 3pm, but things were back to normal the next day, thanks again to the maintenance staff.
Let’s Get Jammin’
Crazanity is one of the few Six Flags attractions that is paired with another ride, which in this case was Jammin’ Bumpers. That is, Crazanity’s ride supervisor also supervised Jammin Bumpers, and many Crazanity teamembers were trained to operate that bumper car ride, including me, sowe treated it as just another position on Crazanity. However, I will save my description of working on that ride, as well as working on Gold Rusher, for my next blog post. Until then, theme park fans, have a Six Flags day!